
For many households, the bathroom cabinet is a catch-all for everything from toothpaste and floss to expired medications, extra razors, and half-used skincare samples. In small bathrooms—especially in urban apartments or older homes—this cabinet is often barely larger than a shoebox. Yet it's expected to store essentials for multiple people, sometimes even an entire family. Without a clear system, it quickly becomes a chaotic jumble of bottles, tubes, and forgotten items.
But a cramped cabinet doesn’t have to mean disorganized living. With thoughtful planning and strategic organization techniques, even the tiniest space can be transformed into a streamlined, functional storage hub. The goal isn't just to fit more in—it's to make everything easier to find, access, and maintain over time. This guide walks through practical, tested strategies to maximize every inch of your bathroom cabinet while eliminating visual and physical clutter.
Assess and Declutter: Start with a Clean Slate
The first step in organizing any storage space is to empty it completely. Remove every item from the cabinet and place them on a clean surface like the countertop or bathtub. This allows you to see exactly what you own, identify duplicates, and evaluate what’s truly necessary.
As you sort through the contents, categorize items into four groups:
- Keep: Daily-use essentials in good condition.
- Relocate: Items that belong elsewhere (e.g., hair tools, medicines).
- Donate/Sell: Unused but unopened products suitable for others.
- Discard: Expired medications, dried-up products, or broken containers.
Pay special attention to expiration dates. According to the U.S. Food and Drug Administration, most over-the-counter medications lose potency after one year, and some degrade faster in humid environments like bathrooms. Skincare products with active ingredients—like retinol or vitamin C—can oxidize and become ineffective within six months of opening.
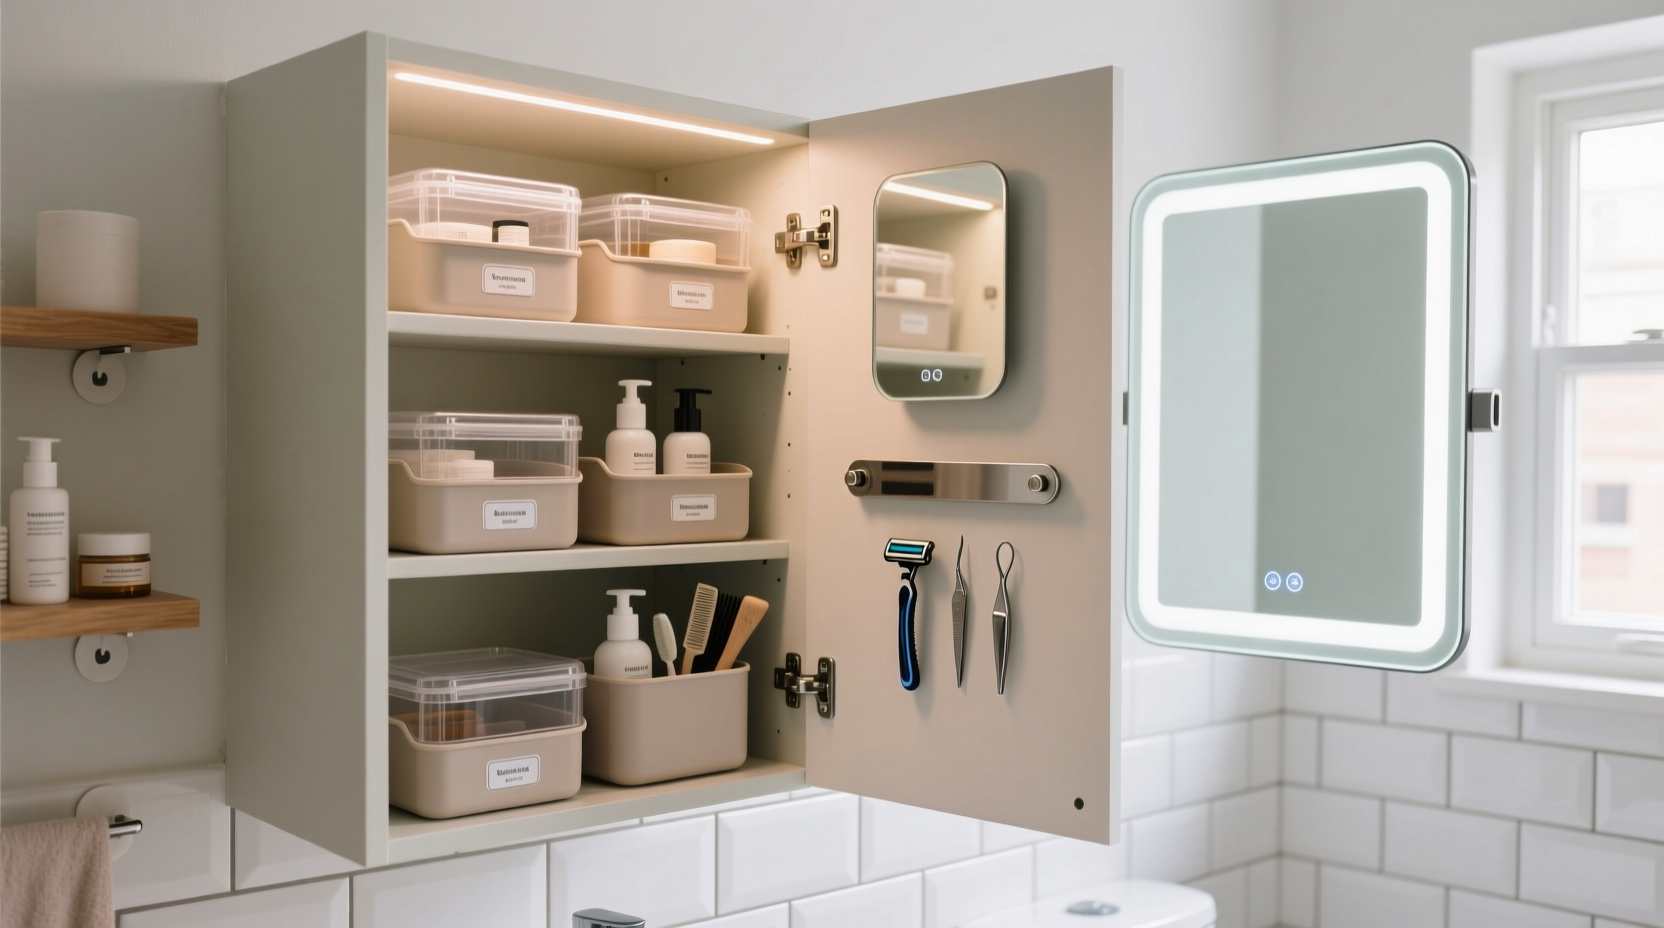
Optimize Vertical Space with Tiered Storage
In a shallow cabinet, depth is limited—but height is often underutilized. Most people stack items flat, which buries lower products beneath taller ones. Instead, use vertical layering to create visibility and access.
Consider these tiered solutions:
- Acrylic shelf risers: Transparent, slim-profile trays that lift smaller items (like contact lens cases or travel-sized lotions) into view.
- Turntable organizers (lazy Susans): Ideal for round cabinets or deep corners. Rotate to access items at the back without digging.
- Stackable bins: Modular containers that can be rearranged as needs change. Choose open-top styles for quick access or lidded versions for dust protection.
Store heavier items on lower shelves to maintain stability. Reserve upper levels for lightweight, frequently used products like hand soap or dental floss.
“In small-space design, visibility equals usability. If you can’t see it, you won’t use it—and you’ll likely buy duplicates.” — Lena Torres, Interior Organizer & Author of *Compact Living Essentials*
Create Zones for Daily Routines
Efficient organization isn’t just about fitting things in—it’s about aligning storage with behavior. Group items by routine rather than product type. This reduces decision fatigue and streamlines morning and nighttime rituals.
Common zones include:
- Morning prep: Toothbrush, toothpaste, mouthwash, deodorant, razor, face wash.
- Nighttime care: Makeup remover, night cream, retinol, cotton rounds, floss.
- First aid: Band-aids, pain relievers, antiseptic wipes (store out of children’s reach).
- Travel kit: Mini toiletries, TSA-approved containers, spare contacts.
Use labeled bins or fabric baskets to define each zone. Labels eliminate guesswork, especially in shared bathrooms. For a minimalist look, opt for removable adhesive labels or chalkboard tags.
Real-Life Example: The Duplex Dilemma
Sarah and James share a guest bathroom in their two-bedroom duplex. With no linen closet nearby, the cabinet had become a dumping ground for guest towels, cleaning wipes, and backup toilet paper. After following the zonal method, they repurposed the top shelf for overnight guests (toothbrush kits, soap, lotion), the middle for household cleaners (disinfectant sprays in a sealed bin), and the bottom for rolled hand towels. By assigning purpose to each level, they reduced clutter and made hosting easier.
Maximize Door and Wall Space
The inside of the cabinet door and side walls are often ignored real estate. These areas are perfect for lightweight, flat, or frequently accessed items.
Here’s how to use them effectively:
- Over-the-door organizers: Clear plastic pockets hold bobby pins, nail clippers, earbuds, or medication reminders.
- Adhesive hooks: Small metal or plastic hooks secure hair ties, tweezers, or a loofah.
- Magnetic strips: Mount inside the door to hold metal tools like scissors, tweezers, or nail files.
- Wall-mounted racks: Slim wire or acrylic shelves attach to side panels for extra bottle storage.
Avoid overloading the door—too much weight can strain hinges, especially in older cabinets. Stick to items under 1 pound and distribute weight evenly.
| Storage Area | Best For | Avoid Storing Here |
|---|---|---|
| Top Shelf | Lightweight, infrequent-use items (travel kits, backups) | Heavy bottles, daily essentials |
| Middle Shelves | Daily hygiene products, skincare | Chemicals near children, expired goods |
| Bottom Shelf | Towels, large containers, cleaning supplies | Fragile glass, damp items |
| Cabinet Door | Small tools, accessories, labels | Liquids, heavy objects |
| Side Walls | Vertical organizers, hooks, slim bins | Items blocking hinge movement |
Smart Product Choices for Compact Spaces
What you store matters as much as how you store it. Streamline your inventory by choosing multi-functional, space-efficient products.
Consider switching to:
- Bar versions: Bar soap, shampoo bars, and conditioner bars eliminate bulky bottles and reduce plastic waste.
- Refillable dispensers: Transfer liquid soap, lotion, or cleanser into sleek wall-mounted or countertop dispensers. Store refills in the cabinet.
- Collapsible containers: Silicone travel bottles that flatten when empty save significant space.
- Miniaturized essentials: Travel-sized toothbrushes, single-use floss picks, or sample skincare sachets reduce bulk.
Also, consolidate duplicates. Do you really need three different facial toners? Two backup electric toothbrush heads per person is usually sufficient. Be ruthless—fewer items mean easier maintenance.
Step-by-Step: Reorganizing Your Cabinet in 60 Minutes
- Empty everything (10 min): Take all items out and wipe down shelves.
- Sort and purge (15 min): Discard expired goods, donate extras, relocate misplaced items.
- Measure the space (5 min): Note height, width, and depth to choose appropriately sized organizers.
- Assign zones (5 min): Decide where morning, night, and emergency items will go.
- Install organizers (10 min): Add risers, bins, hooks, or turntables.
- Restock strategically (10 min): Place heaviest items low, group by routine, label containers.
- Final check (5 min): Ensure everything is visible, accessible, and securely stored.
This process takes less than an hour but can save countless minutes over weeks of frustrated searching.
Frequently Asked Questions
How do I keep my bathroom cabinet dry and mold-free?
Bathrooms are naturally humid, but you can minimize moisture buildup. Wipe spills immediately, avoid storing damp items (like wet sponges), and consider adding silica gel packs inside bins to absorb excess humidity. Never store opened bar soap directly on shelves—use a draining soap dish instead.
Can I use kitchen organizers in my bathroom cabinet?
Absolutely. Many kitchen drawer dividers, spice racks, and utensil trays work perfectly for toothbrushes, cosmetics, or grooming tools. Just ensure materials are water-resistant and easy to clean. Stainless steel, acrylic, and silicone are ideal.
What if my cabinet has awkward angles or irregular shelves?
Customization is key. Use adjustable shelf risers, foldable bins, or soft fabric cubes that conform to odd spaces. You can also install removable pegboards on the back wall to hang small tools. Measure twice, buy once—look for modular systems that adapt to unique dimensions.
Checklist: Tiny Cabinet Organization Success
- ✅ Empty cabinet completely
- ✅ Discard expired or unused items
- ✅ Wipe down interior surfaces
- ✅ Measure shelf dimensions
- ✅ Choose organizers (risers, bins, turntables)
- ✅ Create usage-based zones
- ✅ Install door and wall add-ons
- ✅ Restock with like items together
- ✅ Label containers for clarity
- ✅ Review monthly for upkeep
Conclusion: A Small Space That Works for You
A tiny bathroom cabinet doesn’t have to be a source of stress. With deliberate choices and consistent habits, it can become a model of efficiency. The secret lies not in buying more storage gadgets, but in designing a system that reflects how you actually live. When everything has a designated home, mornings run smoother, clutter stays at bay, and the space supports—not hinders—your daily rhythm.


 浙公网安备
33010002000092号
浙公网安备
33010002000092号 浙B2-20120091-4
Comments
No comments yet. Why don't you start the discussion?