
In compact living spaces, the closet often becomes a battleground between order and chaos. When square footage is limited, every inch counts—especially in a tiny closet where clutter multiplies fast and accessibility vanishes overnight. The key to reclaiming control isn’t just decluttering; it’s rethinking how you use the space, particularly vertically. Most people overlook up to 60% of their closet’s potential because they treat it like a horizontal dumping ground instead of a three-dimensional storage system. With strategic vertical storage, even a closet the size of a broom cupboard can house an entire season’s wardrobe efficiently and elegantly.
Assess Your Closet’s Vertical Potential
Before installing any new hardware or rearranging items, evaluate the full height of your closet. Many standard closets have at least 7 to 8 feet of vertical clearance, yet most storage systems stop at shoulder level. That leaves a massive gap above—often used for forgotten boxes or seasonal overflow. Instead, transform this dead zone into functional zones: upper shelves for off-season storage, mid-level hanging rods for daily wear, and lower drawers or bins for accessories.
Start by measuring from floor to ceiling, noting existing rod positions and shelf spacing. Identify unused zones:
- The top 18–24 inches (ideal for shallow bins or flat storage)
- The back wall (perfect for over-the-door organizers or mounted racks)
- The space beneath hanging clothes (prime real estate for bins or pull-out trays)
- The side walls (underutilized surfaces for hooks, rails, or slim shelves)
Install Tiered Hanging Systems
Traditional single-rod setups waste vertical space by leaving large gaps between garments. A tiered hanging strategy doubles capacity by stacking rods at different heights. For example:
- Upper rod: Shirts, blouses, and lightweight jackets (36–40 inches from floor)
- Middle rod: Pants, skirts, dresses (60–66 inches from floor)
- Lower rod (optional): Children’s clothing or folded jeans on hangers (24–30 inches from floor)
Use adjustable brackets or closet systems like Elfa or IKEA PAX that allow customization. If you’re renting, consider tension rods or adhesive-mounted rails designed for light garments. Pair each rod with cascading hangers—S-shaped or tiered—to hang multiple items vertically on one hook without wrinkling.
“Vertical layering isn’t just about saving space—it’s about visibility. When everything has breathing room, you actually see what you own.” — Lena Torres, Professional Home Organizer & Author of *Small Space, Big Style*
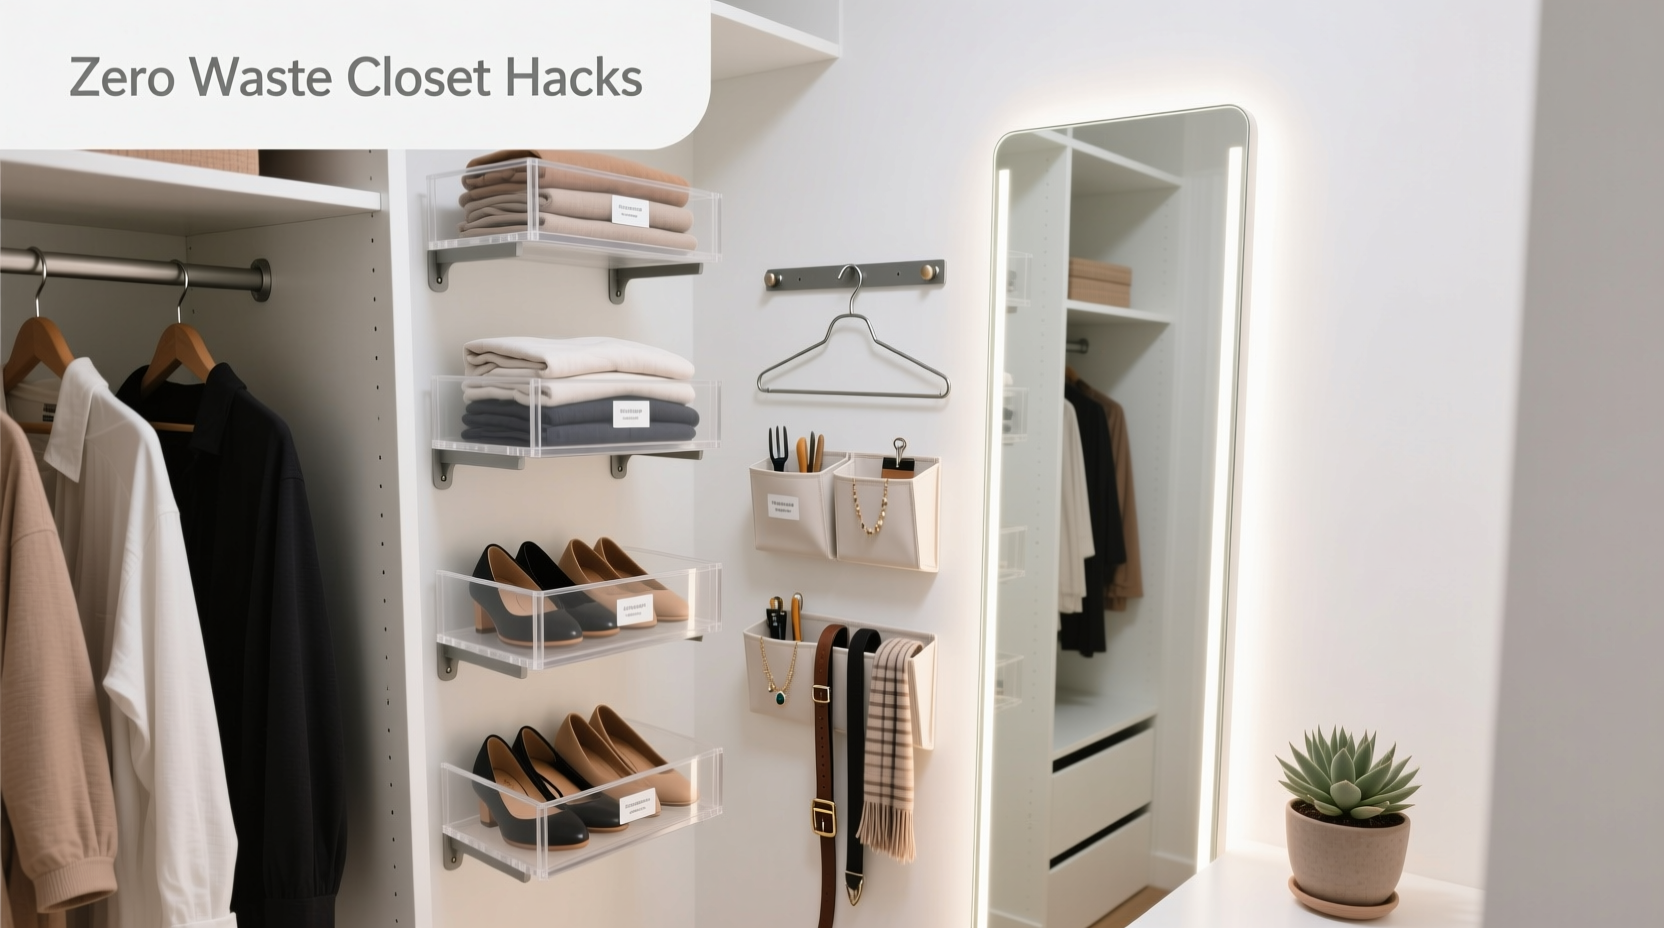
Maximize Wall and Door Surfaces
Floor and rod space are finite, but walls and doors offer nearly limitless expansion. These surfaces are ideal for storing smaller, frequently used items that would otherwise crowd shelves or drawers.
Back Wall: Mount Functional Grids and Rails
Install a pegboard or grid panel along the back wall. Customize it with hooks, baskets, and mini-shelves to hold:
- Belts and scarves
- Hats and bags
- Jewelry trays
- Shoe clips or boot hangers
Paint the grid to match your closet interior for a seamless look, or leave it exposed for industrial flair. Label baskets for quick identification.
Door: Leverage Every Inch
The inside of the closet door is prime real estate. Avoid flimsy over-the-door shoe organizers unless reinforced—they stretch and sag under weight. Instead, opt for:
- Over-door hooks with weight ratings (e.g., 15+ lbs) for robes or tote bags
- Sliding door pockets with clear compartments for socks, chargers, or travel-sized toiletries
- Narrow shelving units that attach with adhesive strips or screws
| Surface | Ideal For | Avoid |
|---|---|---|
| Back Wall | Accessories, grids, lightweight shelves | Heavy storage without proper anchoring |
| Closet Door | Shoes, small bins, hanging organizers | Overloading with bulky or wet items |
| Side Walls | Towel rods, narrow racks, fold-down ironing boards | Blocking door swing or rod access |
Optimize Shelf Height with Stackable Dividers
Fixed shelves often create awkward gaps too tall for folded sweaters but too short for bulkier items. Solve this with stackable acrylic or fabric shelf dividers. These let you create custom-height zones within a single shelf, preventing stacks from toppling and maximizing cubic space.
For example:
- Divide a 12-inch shelf into two 6-inch levels: one for folded tees, another for cardigans.
- Add risers under shorter items to store shoes or bins underneath.
- Use bookends or expandable shelf dividers to corral handbags or boxes.
Another innovation: floating corner shelves. In L-shaped closets, corners are notoriously hard to access. Install triangular or curved floating shelves to turn these blind spots into display areas for perfumes, folded pajamas, or linen sachets.
Step-by-Step: Build Your Zero-Waste Vertical System
Follow this timeline to reorganize your tiny closet in under a weekend:
- Day 1 – Empty & Evaluate (1–2 hours)
Remove everything. Sort into categories: keep, donate, seasonal. Measure closet dimensions and note problem areas. - Day 1 – Plan Zones (30 minutes)
Sketch a rough layout. Assign zones: hanging (short/long), shelves (folded), accessories, shoes. Prioritize daily-use items at eye level. - Day 2 – Install Hardware (2–3 hours)
Mount rods, shelves, grids, and door organizers. Use anchors for heavy loads. Allow paint or adhesive to cure if needed. - Day 2 – Organize & Label (1–2 hours)
Place items back using vertical principles: stack bins, tier hangers, use shelf risers. Label containers for clarity. - Ongoing – Maintain (5 minutes daily)
Return items to designated spots. Reassess every 3 months to adapt to seasonal changes.
Real-Life Example: Transforming a 3x4-Foot Reach-In Closet
Sophie, a graphic designer in Brooklyn, struggled with a cramped reach-in closet that couldn’t fit her workweek wardrobe. After adopting vertical strategies, she doubled her usable space:
- Added a second hanging rod below the original, creating a tiered system for blouses above and slacks below.
- Installed a metal grid on the back wall to hang scarves, hats, and a foldable tote.
- Used slim, stackable bins on the top shelf for off-season sweaters, labeled by month.
- Mounted a narrow over-door rack for gym clothes and reusable shopping bags.
The result? She now accesses all her essentials without overcrowding. “I was amazed at how much I could fit once I stopped thinking in flat layers,” she said. “Now my closet feels like a boutique—not a storage unit.”
Avoid Common Vertical Storage Mistakes
Even well-intentioned upgrades can backfire if not executed properly. Steer clear of these pitfalls:
- Overloading upper shelves: Heavy boxes on high shelves are dangerous and hard to access. Reserve top space for light, flat items like linens or shoeboxes.
- Ignoring ergonomics: Frequently used items should be between hip and eye level. Rarely used goods go above or below.
- Using mismatched hangers: Varied hanger styles create visual clutter and waste space. Switch to uniform slimline velvet or flocked hangers—they prevent slipping and save 2–3 inches per foot.
- Blocking airflow: Over-stuffing reduces air circulation, promoting mildew. Leave a finger’s width between garments.
“Vertical organization only works when it’s sustainable. If you can’t easily retrieve an item, you’ll stop using the system.” — Marcus Reed, Interior Designer & Tiny Home Specialist
Checklist: Your Zero-Wasted-Space Closet Audit
Use this checklist to ensure every inch serves a purpose:
- ✅ Measured total vertical height and identified unused zones
- ✅ Installed at least two hanging levels (short and long garments)
- ✅ Utilized back wall with grid, shelf, or rail system
- ✅ Maximized door space with secure, weight-appropriate organizers
- ✅ Added shelf risers or stackable dividers to eliminate air gaps
- ✅ Stored off-season items in labeled, flat bins at the top
- ✅ Used uniform hangers to save space and improve aesthetics
- ✅ Maintained 1–2 inches of clearance around items for airflow
- ✅ Assigned a home for accessories (belts, ties, jewelry)
- ✅ Tested accessibility—can you reach everything safely?
FAQ: Vertical Closet Organization
Can I add vertical storage to a rental closet without drilling?
Yes. Use adhesive-backed hooks, tension rods, over-the-door organizers, and freestanding shelving units. Look for products rated for heavier loads, such as Command™ Large Hooks or adjustable closet systems with non-slip bases.
How do I prevent clothes from wrinkling in tiered hanging systems?
Use slim, non-slip hangers and avoid overloading. Hang garments with enough space between them to drape naturally. For wrinkle-prone fabrics, place tissue paper between layers or use padded hangers.
What’s the best way to store shoes vertically in a tiny closet?
Use wall-mounted shoe cubbies, hanging shoe bags with clear pockets, or a narrow ladder-style shelf. Store shoes heel-to-toe in stacked bins with dividers to save depth. Keep frequently worn pairs at mid-level for easy access.
Conclusion: Turn Constraints Into Clever Design
A tiny closet isn’t a limitation—it’s an invitation to innovate. By embracing vertical storage, you unlock hidden capacity, improve visibility, and make daily dressing effortless. The goal isn’t perfection; it’s functionality with intention. When every shelf, rod, and inch of wall serves a purpose, clutter loses its foothold. Start small: add one tiered hanger, install a single grid panel, or repurpose an old ladder as a towel and robe rack. Each upgrade compounds, transforming chaos into calm.


 浙公网安备
33010002000092号
浙公网安备
33010002000092号 浙B2-20120091-4
Comments
No comments yet. Why don't you start the discussion?