
A cluttered pantry doesn’t just make meal prep frustrating—it wastes time, money, and valuable space. For those working with a small kitchen or limited storage, every inch counts. The good news? You don’t need a renovation or expensive organizers to transform your pantry into a streamlined, functional system. With clever dollar store finds and strategic organization techniques, even the tiniest pantry can function like one curated by a professional organizer.
The key lies in simplicity, consistency, and smart use of affordable tools. From repurposing plastic bins to labeling staples for quick access, this guide reveals practical, proven strategies that turn chaos into clarity—without breaking the bank.
Assess Your Space and Inventory First
Before buying any organizing supplies, take stock of what you have. A successful pantry overhaul starts with understanding your current inventory and spatial limitations. Begin by removing everything from your pantry. Yes, everything. This step may feel overwhelming, but it’s essential for identifying duplicates, expired items, and underused products.
As you pull items out, sort them into categories: baking supplies, canned goods, snacks, grains, pasta, sauces, breakfast items, etc. While doing this, check expiration dates and toss anything outdated. Be honest about what you actually use. That bulk bag of quinoa you bought “to be healthier” but haven’t touched in six months? It’s not serving you.
Once cleared, measure your pantry shelves and door dimensions. Write down the height, width, and depth. Many dollar store containers are standardized (often around 6–8 inches tall), so knowing your space ensures you purchase only what fits. This prevents wasted spending on containers that won’t work.
Dollar Store Hacks That Maximize Tiny Pantry Space
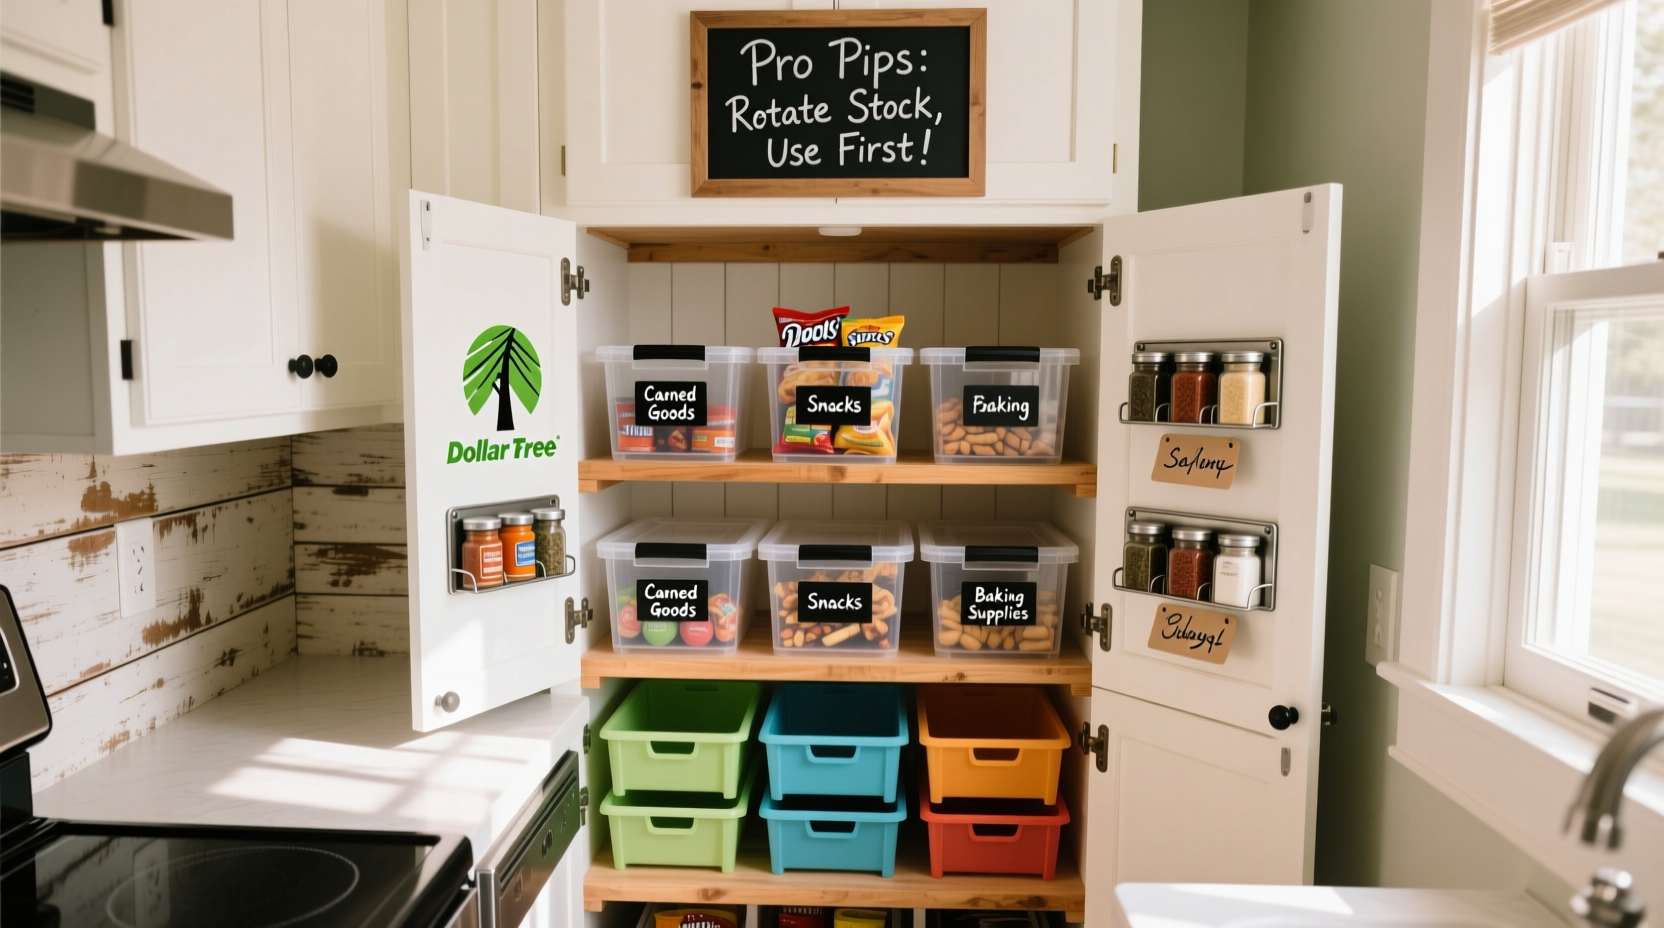
Contrary to popular belief, high-end organizing brands aren’t the only solution. Dollar stores offer surprisingly durable and versatile tools that, when used creatively, perform just as well as pricier alternatives. Here are seven dollar store hacks that professionals use to optimize small pantries:
- Repurpose clear food storage bins – These stackable containers are perfect for grouping similar items like snack packs, spice packets, or tea bags. Their transparency lets you see contents at a glance.
- Use metal magazine holders for spice jars – Slide upright spice bottles into magazine files to create pull-out drawers. No more digging behind bottles to find the paprika.
- Turn cake stands into tiered displays – Place a tiered dessert stand on a shelf to elevate smaller items like oil bottles or vinegar, making them visible and accessible.
- Hang shoe organizers on the back of the door – Over-the-door shoe racks with clear pockets hold onions, garlic, apples, or even spice packets. Just clean thoroughly before use.
- Label everything with adhesive labels and a marker – Dollar stores sell label makers or pre-cut label sheets. Labeling bins eliminates guesswork and keeps everyone in the household aligned.
- Use dish trays as can risers – Slide shallow dish trays under canned goods to create a second level. Now you can see both front and back rows instantly.
- Store dry goods in reusable deli containers – Replace flimsy packaging with rigid, lidded containers to keep flour, sugar, rice, and pasta fresh and pest-free.
These solutions cost less than $20 total and deliver maximum visual and functional impact. The goal isn’t perfection—it’s practicality.
Smart Storage Strategies for Small Footprints
Even with great containers, poor placement can undermine your efforts. Organization is as much about flow as it is about containers. Follow these spatial principles to ensure your tiny pantry remains usable long-term.
- Zoning by frequency: Keep everyday items (coffee, cereal, cooking oil) at eye level. Reserve top shelves for occasional-use items (baking extract, holiday spices) and bottom shelves for heavy goods (pet food, water bottles).
- Front-and-center visibility: Arrange items so labels face forward. If using baskets, place them perpendicular to the shelf edge so you can reach inside easily.
- Vertical stacking with limits: Stack no more than two deep. If something gets buried, it will be forgotten. Use turntables (also found at dollar stores) for oils, dressings, and condiments.
- Door space utilization: Install adhesive hooks or magnetic strips to hang measuring spoons, oven mitts, or small scissors—freeing up shelf real estate.
Do’s and Don’ts of Tiny Pantry Organization
| Do | Don't |
|---|---|
| Use clear, labeled containers for dry goods | Leave items in original boxes that block visibility |
| Rotate stock using FIFO (First In, First Out) | Stack new purchases in front of older ones |
| Group by meal type or usage (e.g., “overnight oats kit”) | Organize strictly by food category regardless of use |
| Reassess monthly and edit as habits change | Set it and forget it for months |
| Use shelf risers to double vertical space | Overfill bins so items get lost underneath |
Step-by-Step: Transform Your Pantry in One Afternoon
You don’t need days to reorganize. With focus and a plan, you can complete a full pantry transformation in under three hours. Follow this timeline for best results:
- Hour 1: Empty & Sort (45 min)
Remove all items. Wipe down shelves with a damp cloth and mild cleaner. Categorize food into piles: baking, canned, snacks, grains, breakfast, sauces, spices, misc. Discard expired goods. - Hour 1: Plan Zones (15 min)
Decide which shelf will hold which category. Map it mentally or sketch it. Prioritize accessibility based on usage frequency. - Hour 2: Container Prep (30 min)
Transfer dry goods into dollar store containers. Label each clearly. Use tape and marker if permanent labels aren’t available yet. - Hour 2: Install Organizers (30 min)
Place shelf risers, turntables, and bins. Hang door organizers. Attach small hooks for utensils. Ensure everything fits without overcrowding. - Hour 3: Stock & Finalize (45 min)
Place items back according to your zone map. Put oldest items in front. Test accessibility—can you grab the back row without moving three things? - Hour 3: Review & Adjust (15 min)
Step back. Open and close the door. Simulate grabbing dinner ingredients. Make small tweaks until the flow feels natural.
This methodical approach prevents decision fatigue and ensures lasting results. The goal is not just neatness, but efficiency during daily use.
Real-Life Example: Maria’s 2x3-Foot Pantry Turnaround
Maria, a busy teacher and mother of two, struggled with a narrow pantry tucked beside her refrigerator. At just 2 feet wide and 3 feet tall, it was crammed with open cereal boxes, loose pasta, and cans stacked haphazardly. “I’d buy another box of broth because I couldn’t see the one already in there,” she said.
After visiting her local dollar store, she purchased four clear rectangular bins, two wire magazine files, a lazy Susan, and an over-the-door shoe organizer. She transferred rice, pasta, and oats into labeled bins. Used the magazine files to hold spice jars upright on a middle shelf. Placed the lazy Susan in the corner for oils and sauces. Finally, she hung the cleaned shoe organizer on the back of the door for apples, onions, and individually wrapped snacks.
“Now my kids can get their own snacks. I see everything at a glance. And I’ve saved nearly $40 a month because I’m not doubling up on groceries,” Maria shared. Her entire project cost $18 and took two hours on a Sunday morning.
“Small spaces demand smart systems, not more stuff. The most effective pantry setups rely on visibility, access, and consistency—not square footage.” — Lena Torres, Professional Home Organizer & Founder of ClutterLogic
Essential Checklist for a Pro-Level Tiny Pantry
Your Pantry Transformation Checklist
- ✅ Remove all items from the pantry
- ✅ Discard expired or unused food
- ✅ Wipe down shelves and walls
- ✅ Measure shelf dimensions
- ✅ Visit dollar store for bins, labels, risers, and organizers
- ✅ Transfer dry goods into uniform containers
- ✅ Label all containers clearly
- ✅ Assign zones by category and frequency
- ✅ Install door organizers and shelf risers
- ✅ Restock with oldest items in front (FIFO)
- ✅ Test accessibility and adjust as needed
- ✅ Schedule a monthly 10-minute refresh
Frequently Asked Questions
Can I really organize a pantry well with only dollar store supplies?
Absolutely. While premium organizers look sleek, they don’t perform dramatically better than sturdy dollar store alternatives. Clear plastic bins, adhesive hooks, and simple labels do the heavy lifting. Success depends more on consistent use and layout than material cost.
How do I stop my pantry from getting messy again?
Build in maintenance habits. Dedicate five minutes weekly to straighten containers and wipe spills. Follow the “one in, one out” rule—if you add a new item, remove an old or unused one. Monthly, do a quick audit: check for expired items and reassess what’s working.
What if my pantry has no door or is open shelving?
Open pantries benefit even more from uniform containers. Use matching bins and label everything to create visual cohesion. Consider adding a small curtain or tension rod with fabric to hide less attractive items. Focus on symmetry and alignment to maintain a clean aesthetic.
Final Thoughts: Small Space, Big Impact
Organizing a tiny pantry isn’t about achieving Pinterest-perfect symmetry—it’s about creating a system that works for your life. With thoughtful planning and resourceful use of affordable tools, even the most cramped storage space can become efficient, intuitive, and stress-reducing. The dollar store offers more than novelty items; it provides accessible solutions that empower real change.
Start small. Pick one shelf. Try one hack. Once you experience the ease of finding exactly what you need in seconds, you’ll wonder why you waited so long. Organization isn’t a one-time event—it’s a habit. And the best habits are built on simplicity, repetition, and smart choices.


 浙公网安备
33010002000092号
浙公网安备
33010002000092号 浙B2-20120091-4
Comments
No comments yet. Why don't you start the discussion?