
A small pantry doesn’t have to mean limited storage or constant disarray. With smart strategies and thoughtful organization, even the tiniest pantry can hold weeks’ worth of groceries efficiently and look effortlessly tidy. Professional organizers across the country have perfected systems that maximize every inch—from door-mounted racks to tiered shelf inserts. These aren't just aesthetic upgrades; they're functional transformations that save time, reduce food waste, and make meal prep smoother.
The key isn’t buying more containers or spending hundreds on gadgets—it’s about rethinking how you use vertical space, categorize items, and maintain order daily. Whether your pantry is a closet-sized nook or a shallow cabinet next to the fridge, these proven techniques will help you eliminate wasted space and create a system that works long-term.
Assess and Declutter: The First Step to a Functional Pantry
Before organizing, evaluate what you actually need to store. Most pantries accumulate expired goods, duplicate items, and rarely used products that take up valuable real estate. Begin by removing everything from the shelves. Check expiration dates, consolidate partial bags into proper containers, and discard anything stale or unusable.
Categorize items as you go: baking supplies, canned goods, snacks, breakfast foods, oils and condiments, pasta and grains, etc. This step not only clears physical space but also reveals your consumption patterns—helping you avoid overbuying in the future.
After decluttering, clean the shelves thoroughly. Wipe down corners, vacuum crumbs, and consider lining shelves with easy-to-clean contact paper or non-slip mats. A fresh base sets the tone for a well-maintained system.
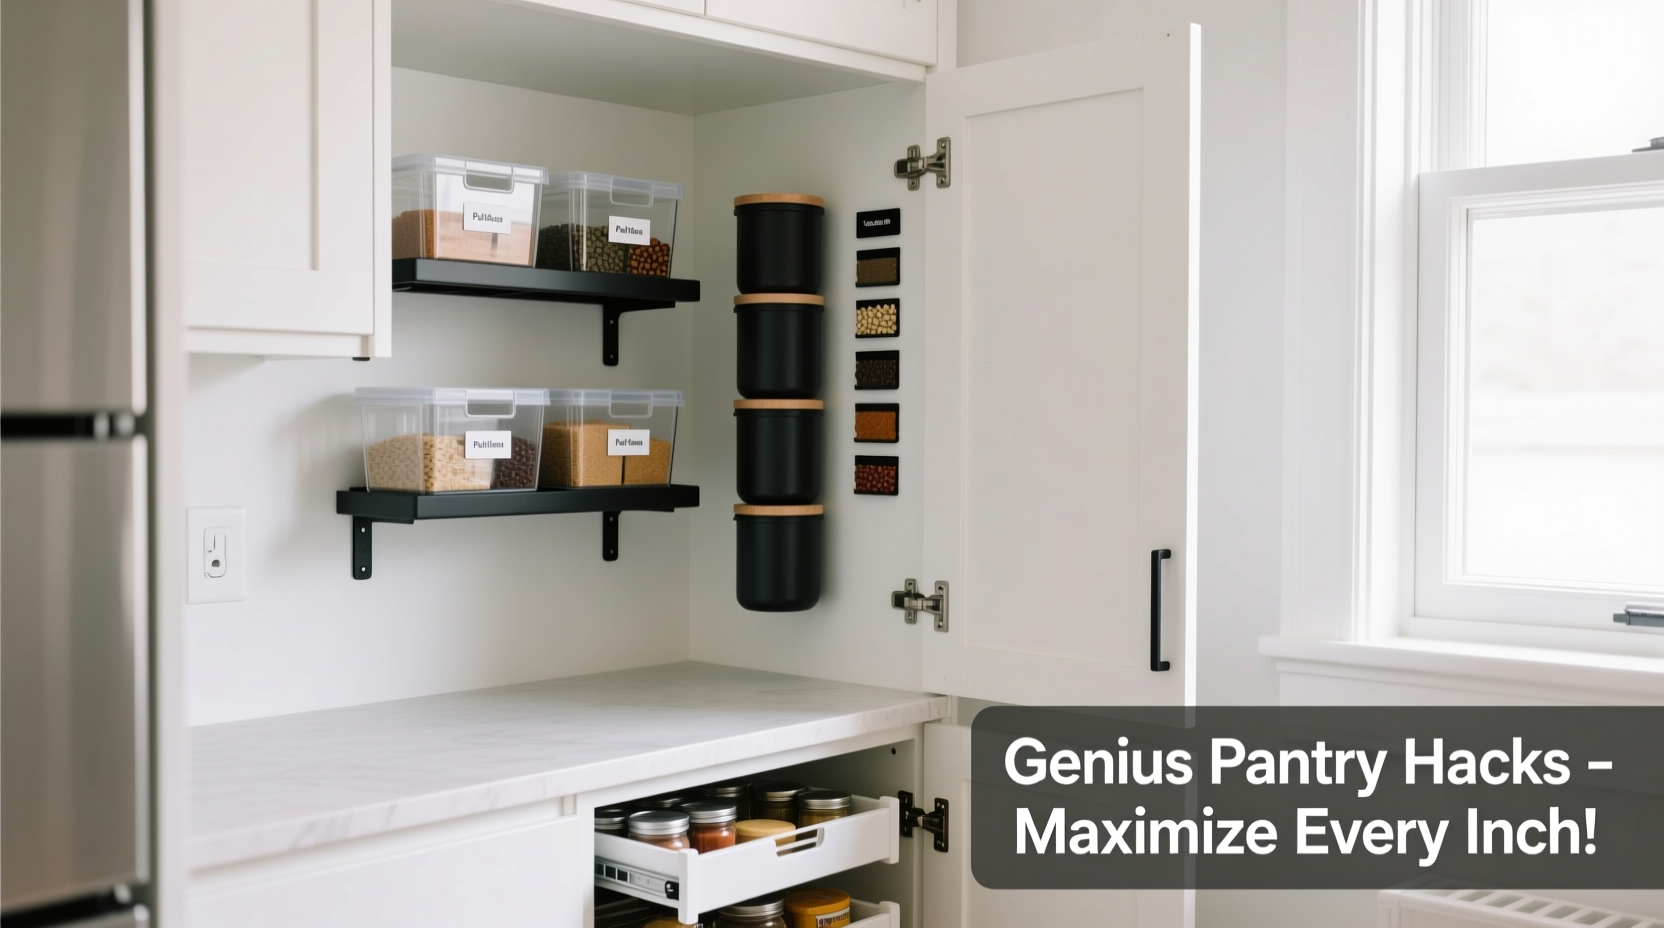
Maximize Vertical and Hidden Spaces
In a compact pantry, floor space is limited—but vertical space is often underutilized. The goal is to stack smarter, not higher. Here’s how professionals turn every inch into usable storage:
- Use shelf risers to create two levels on one shelf—perfect for stacking cans in front of taller boxes so nothing gets lost behind.
- Install under-shelf baskets to hold lightweight items like spice packets, tea bags, or seasoning wraps.
- Utilize the back of the door with over-the-door organizers—clear pockets work well for small jars, drink mixes, or snack bars.
- Add adjustable wire racks for wine bottles, large spice jars, or cleaning wipes stored vertically.
- Go deep with slide-out bins if your pantry has depth. Pull-out drawers make it easy to access items at the back without digging.
One organizer in Seattle transformed a 24-inch-wide pantry using tiered acrylic shelves and magnetic spice strips inside the door. “We gained 40% more accessible space,” she said, “and now everything is visible at a glance.”
“Visibility equals usability. If you can’t see it, you’ll forget it—and eventually throw it away.” — Lena Torres, Certified Home Organization Specialist
Smart Storage Solutions That Save Space
Transferring dry goods into uniform containers isn’t just Instagram-worthy—it prevents spills, keeps food fresher, and creates visual calm. But choosing the right containers matters. Opt for stackable, airtight options with square or rectangular shapes (they fit tighter than round ones).
| Item Type | Best Container | Pro Tip |
|---|---|---|
| Pasta & Rice | Square glass or BPA-free plastic | Label with purchase date and contents |
| Baking Supplies | Rectangular bins with scoops | Keep flour and sugar near prep area |
| Snacks | Clear, zip-top reusable bags | Store flat to save height |
| Spices | Magnetic tins or drawer inserts | Mount inside door or on wall strip |
| Oils & Liquids | Turntable (lazy Susan) | Place near cooking zone for quick access |
For narrow gaps between shelves, try slim rolling carts or file organizers made for pantry use. One clever hack: repurpose a silverware tray to separate sauce packets, bouillon cubes, or tea sachets.
Case Study: From Chaos to Clarity in 3 Hours
When Maria, a busy mom of three in Austin, decided to tackle her 18-inch-deep pantry, she was overwhelmed by jumbled boxes and forgotten ingredients. She spent less than $70 on supplies: two tiered shelf risers, a lazy Susan, clear stackable bins, and adhesive hooks.
She grouped items by meal function—breakfast staples together, lunchbox snacks in one bin, dinner bases (pasta, rice, lentils) in another. She mounted a magnetic strip inside the door for small spice jars and placed frequently used items at eye level.
The result? Her kids could find their own snacks, she reduced grocery waste by 30%, and meal planning became faster. “I didn’t think such a small space could feel this spacious,” she said. “Now I actually enjoy opening the pantry.”
Step-by-Step: Build Your Zero-Waste Pantry System
Follow this timeline to transform your pantry in a single afternoon:
- Day 1 Morning – Empty & Evaluate (30 min)
Remove all items. Discard expired goods, donate extras, consolidate duplicates. - Day 1 Afternoon – Clean & Measure (20 min)
Wipe shelves. Measure height, width, and depth to plan storage solutions. - Day 1 Evening – Purchase Essentials (Optional, 1 hr)
Buy stackable containers, shelf risers, bins, labels, or door organizers based on needs. - Day 2 – Sort & Contain (45 min)
Transfer dry goods into labeled containers. Group categories logically. - Day 2 Continued – Install & Arrange (30 min)
Place risers, lazy Susans, baskets. Put heaviest items on lower shelves. - Ongoing – Maintain Weekly (10 min/week)
Do a quick sweep during grocery restocking. Return items to designated zones.
Avoid Common Organizational Pitfalls
Even well-intentioned systems fail when built on flawed assumptions. Watch out for these frequent mistakes:
- Over-purchasing containers: Start with essentials. Add more only after testing what works.
- Ignoring frequency of use: Keep everyday items at eye level. Store backups or seasonal goods higher or lower.
- Forgetting airflow: Don’t cram shelves too tightly. Allow space around jars and cans for easy removal.
- Using opaque bins: Clear containers let you see contents instantly, reducing frustration and overbuying.
- Neglecting maintenance: Without regular check-ins, systems degrade. Schedule a monthly “pantry refresh.”
One overlooked issue is lighting. If your pantry is dark, install battery-powered LED strip lights or motion-sensor puck lights. They cost under $15 and dramatically improve visibility—especially helpful when reaching for items at the back.
Frequently Asked Questions
How do I organize a pantry without spending money?
You don’t need new containers to start. Reuse glass jars from sauces, group similar boxes together, and rotate older items to the front. Use rubber bands or colored tape to mark categories. Maximize existing space with simple hacks like stacking books under short cans to raise them into view.
What if my pantry has awkward shelves or odd dimensions?
Customize with modular solutions. Adjustable shelf risers adapt to different heights. Collapsible bins compress when needed. For slanted ceilings or irregular spaces, use baskets that conform to shape and secure with Velcro straps. Think flexible, not fixed.
How often should I reorganize my pantry?
A full reset every 3–6 months helps maintain efficiency. However, a weekly 5-minute tidy—returning misplaced items, checking for expirations—keeps the system running smoothly. Pair it with your grocery list planning for best results.
Final Tips Checklist
Use this concise checklist to ensure your tiny pantry stays efficient and clutter-free:
- ✅ Remove everything and discard expired or unused items
- ✅ Wipe down shelves and consider protective liners
- ✅ Categorize food by type and usage frequency
- ✅ Invest in stackable, clear, labeled containers
- ✅ Use risers, turntables, and door organizers
- ✅ Place most-used items at eye level
- ✅ Label all containers with contents and dates
- ✅ Implement a weekly 5-minute maintenance routine
- ✅ Add lighting if visibility is poor
- ✅ Review and refresh the system quarterly
“The most effective pantries aren’t the biggest—they’re the ones where every inch has a purpose.” — Jordan Lee, Minimalist Living Consultant
Take Action Today: Transform Your Tiny Pantry
Organizing a small pantry doesn’t require a renovation or a big budget. It takes intention, a few smart tools, and a commitment to simplicity. By applying these expert-backed strategies—decluttering first, maximizing vertical space, using clear containers, and maintaining consistency—you’ll turn a cramped cupboard into a model of efficiency.
Start small. Pick one shelf to reorganize today. Test a shelf riser or try labeling five containers. Once you experience the ease of finding exactly what you need in seconds, you’ll be motivated to complete the entire space. Share your before-and-after story, swap tips with friends, or leave a comment below with your favorite space-saving hack. Great organization isn’t about perfection—it’s about progress. And it begins with the next step you take.


 浙公网安备
33010002000092号
浙公网安备
33010002000092号 浙B2-20120091-4
Comments
No comments yet. Why don't you start the discussion?