
Cluttered cords behind your entertainment center aren’t just unsightly—they can make troubleshooting devices a nightmare and even pose safety risks. While zip ties and tape are common fixes, they often leave residue, damage surfaces, or create permanent bundles that hinder future adjustments. Fortunately, there are smarter, non-destructive methods to manage your cables effectively. From magnetic cable clips to cord channels and modular organizers, you can achieve a sleek, functional setup that’s easy to maintain and modify.
Why Avoid Zip Ties and Tape?
While convenient, zip ties and tape come with notable downsides. Once tightened, zip ties are nearly impossible to remove cleanly without cutting tools, and repeated use leads to an accumulation of plastic waste behind your furniture. Tape, especially adhesive varieties, can peel paint, leave sticky residues, or degrade over time, causing cables to fall loose unexpectedly.
Additionally, both solutions lack flexibility. When you upgrade a device or rearrange components, having wires bound tightly together forces you to dismantle the entire system just to access one cable. A better approach prioritizes accessibility, reusability, and aesthetics—without sacrificing stability.
“Cable management isn’t about hiding wires—it’s about creating a system that supports functionality, safety, and ease of maintenance.” — Jordan Lee, Home Automation Specialist
Alternative Tools for Cable Organization
Modern organizing tools offer reusable, adjustable, and visually discreet options. These alternatives allow you to group, route, and secure cables without damaging walls, furniture, or the cords themselves.
Magnetic Cable Clips
These small, powerful clips attach securely to metal surfaces such as AV racks, TV stands with steel frames, or even the back panel of some electronics. Their magnetic base allows for quick repositioning, and most feature grooves to hold multiple cords side by side. Unlike tape, they don’t degrade or leave marks when removed.
Cable Raceways and Cord Channels
Raceways are hollow plastic or fabric-covered channels that mount to walls or furniture backs using adhesive strips (often removable 3M tape). Cables run inside them, hidden from view. Choose models with snap-on lids for easy access later. Opt for white or black finishes to blend with your decor.
For renters or those avoiding wall modifications, consider flexible cord sleeves made of braided nylon. These expandable tubes bundle wires loosely and can be routed behind furniture without mounting.
Modular Cable Organizers
These stackable or interlocking units sit on shelves or behind stands and provide designated slots for different types of cables—HDMI, power, audio, etc. Some models include rubberized grips to keep cords in place without binding. Because they’re not fixed, you can reconfigure them as your setup changes.
Fabric Cable Ties and Velcro Straps
Often overlooked, reusable fabric ties and hook-and-loop straps (like Velcro) offer the bundling benefits of zip ties without the permanence. They can be opened and adjusted repeatedly, making them ideal for grouping similar-length cords. Choose wide straps to avoid pinching delicate HDMI or fiber optic cables.
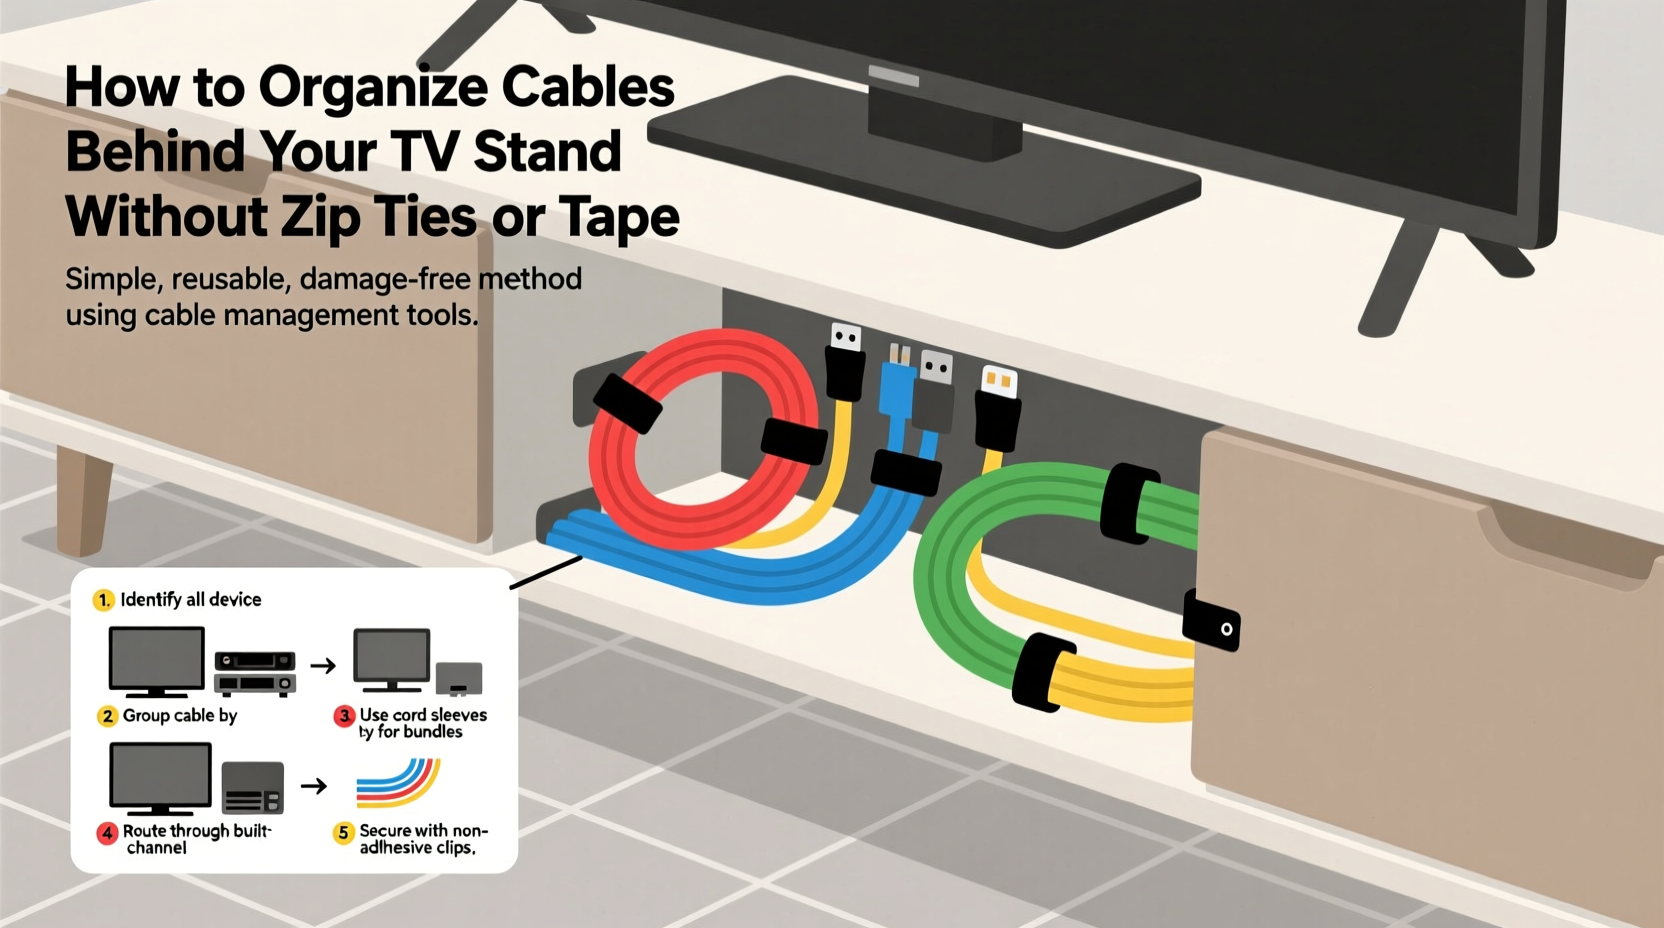
Step-by-Step: Organizing Without Damage or Clutter
A well-organized cable system starts with planning and ends with routine maintenance. Follow this sequence to transform a tangled mess into a streamlined layout.
- Power Down and Unplug Everything
Safety first. Turn off and unplug all devices connected to your TV stand. Label each cable at both ends using masking tape and a marker—e.g., “Soundbar Power,” “PS5 HDMI.” This prevents confusion during reassembly. - Assess Your Setup
Lay out all devices and measure cable lengths. Identify which cords are too long and may need coiling, and which are barely reaching their ports. This helps determine routing paths and where slack should be stored. - Group by Function
Separate cables into categories: power, video/audio, network, and accessories. Keep high-interference cables like power cords away from HDMI or Ethernet lines when possible to reduce signal noise. - Route with Purpose
Decide on a primary path—usually down the back of the TV stand and toward the outlet strip. Use magnetic clips on metal surfaces or position raceways along this route. Avoid sharp bends or kinks, especially in HDMI cables. - Manage Slack Strategically
Excess length shouldn’t dangle freely. Instead, form loose figure-eights or circles and secure them with Velcro straps. Store these loops neatly on shelf undersides or in open cubbies. Never stretch or compress cables tightly. - Reconnect and Test
Plug everything back in according to your labels. Power up each device and verify connections. If something doesn’t work, troubleshoot immediately while the system is still fresh in mind. - Final Tidy and Monitor
Once operational, do a visual check. Adjust clips or channels if any wires bulge out. Revisit the setup after a week to ensure nothing has shifted due to movement or vibration.
Do’s and Don’ts of Cord Management
| Do’s | Don’ts |
|---|---|
| Use removable adhesive mounts for raceways | Use duct tape or electrical tape for long-term attachment |
| Label all cables before disconnecting | Bundle power and data cables tightly together |
| Leave slight slack to prevent strain | Over-tighten any fastening method |
| Choose color-matched organizers for discretion | Run cables under heavy furniture that may shift |
| Inspect cords monthly for wear or heat buildup | Ignore frayed or overheating cables |
Real-World Example: The Minimalist Living Room Upgrade
Sarah, a remote worker in Portland, struggled with a chaotic entertainment center that housed her TV, gaming console, streaming box, soundbar, and router. After moving into a rental apartment, she wanted a clean look but couldn’t drill holes or use permanent adhesives.
She began by labeling every cord and unplugging the system. Using a combination of magnetic clips (which stuck perfectly to her metal TV stand frame), a 4-foot white cord channel mounted vertically with removable adhesive, and fabric Velcro straps, she rerouted all cables along a single clean line from the outlet strip to each device.
For excess HDMI cable length, she formed loose coils secured with soft ties and tucked them into an open compartment beneath the stand. Within two hours, her previously messy setup looked professionally installed—and she could easily swap devices when needed. Her landlord even complimented the tidy appearance during an inspection.
Checklist: Organize Your Cables Sustainably
- ✅ Unplug and safely power down all devices
- ✅ Label each cable at both ends
- ✅ Sort cables by type (power, HDMI, USB, etc.)
- ✅ Measure and assess required lengths
- ✅ Select non-damaging tools (magnetic clips, raceways, Velcro)
- ✅ Plan a clean routing path from outlet to devices
- ✅ Secure cables with spacing to avoid interference
- ✅ Manage slack with loose loops and reusable ties
- ✅ Reconnect and test all functions
- ✅ Schedule a follow-up check in one week
Frequently Asked Questions
Can I use these methods on a wooden TV stand?
Absolutely. For non-metallic surfaces, use adhesive-backed raceways with removable gel pads or opt for standalone organizers that rest on shelves. Magnetic clips won’t work on wood, but Velcro straps and cord sleeves are equally effective.
What if I have limited space behind my TV stand?
In tight spaces, prioritize vertical organization. Use slim raceways or flat cable combs that align cords side-by-side without adding bulk. Consider relocating your power strip to a nearby floor outlet with a longer extension cord to free up rear space.
Are wireless solutions a viable alternative?
Wireless technology reduces cable count but rarely eliminates it entirely. TVs, sound systems, and consoles still require power. However, using Wi-Fi for internet instead of Ethernet, or Bluetooth for audio peripherals, can significantly cut down on visible wiring.
Conclusion: A Cleaner Setup Starts Today
Organizing cables behind your TV stand doesn’t require zip ties, tape, or invasive modifications. With thoughtful planning and the right tools, you can create a system that’s neat, safe, and adaptable to future upgrades. Whether you choose magnetic clips, cord channels, or reusable fabric ties, the goal is sustainability—both in function and aesthetics.


 浙公网安备
33010002000092号
浙公网安备
33010002000092号 浙B2-20120091-4
Comments
No comments yet. Why don't you start the discussion?