
A dual monitor setup enhances productivity, improves multitasking, and transforms your workspace into a digital command center. But with added screens come added cables—power cords, HDMI or DisplayPort connections, USB hubs, audio lines, and more. Without proper organization, your desk can quickly devolve into a tangled mess that’s not only unsightly but also harder to troubleshoot and maintain.
Professional-grade cable management isn’t just about aesthetics—it’s about functionality, safety, and long-term usability. Whether you're working from home, running a small office, or building a high-performance workstation, organizing your dual monitor cables properly will save time, reduce stress, and extend the life of your equipment.
Why Cable Management Matters in Dual Monitor Setups
Most people underestimate the impact of cable clutter until they’re forced to unplug and reconfigure their monitors or track down a loose connection. Poorly managed cables increase the risk of accidental disconnections, dust accumulation, overheating due to restricted airflow, and even tripping hazards in shared workspaces.
Well-organized cables make it easier to identify issues, swap out components, and maintain a clean, professional environment. A tidy desk also contributes to mental clarity and focus—an essential benefit for anyone spending hours in front of two screens.
“Cable management is 30% of what makes a workstation feel professional. The rest is performance—but no amount of power can compensate for constant frustration over tangled wires.” — Daniel Ruiz, IT Infrastructure Consultant
Essential Tools and Materials for Clean Cable Routing
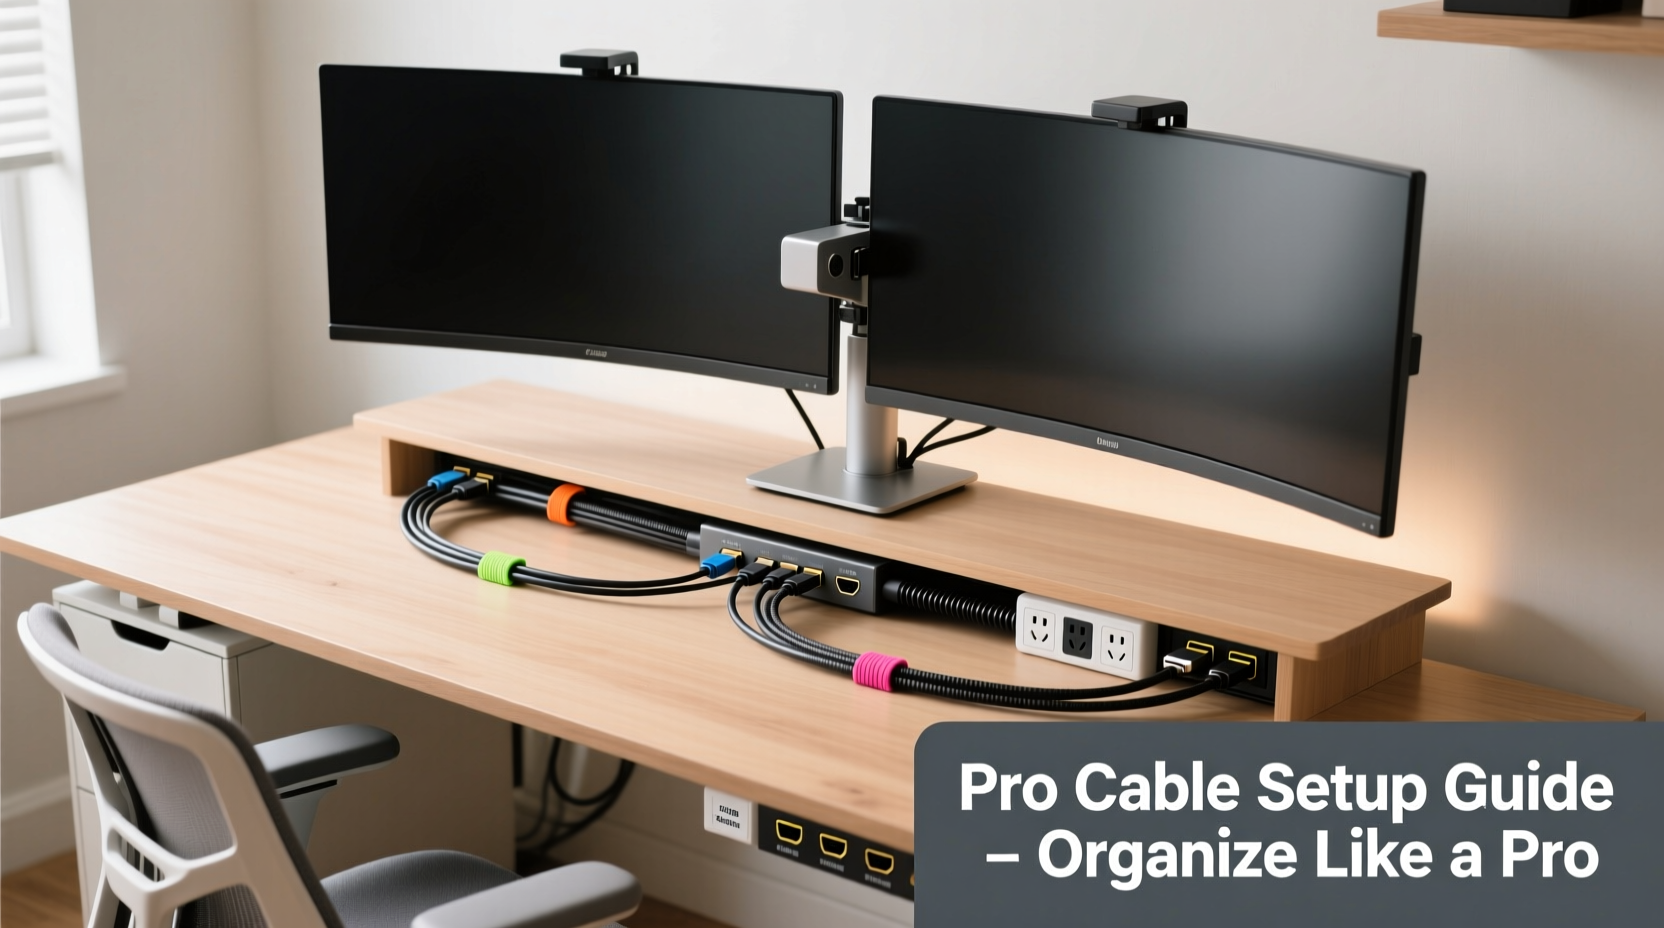
Before diving into the organization process, gather the right tools. Having the correct supplies on hand ensures efficiency and durability in your setup. Here’s what every pro uses:
- Cable ties (reusable zip ties or Velcro straps): Ideal for bundling cords without damaging them.
- Cable sleeves or braided wraps: Bundle multiple cables into a single, neat line.
- Cable clips or adhesive mounts: Secure cords along desks, walls, or monitor arms.
- Cable raceways: Enclose multiple cables behind your desk or along baseboards.
- Desk grommet or passthrough hole: Route cables through the desk surface to hide them underneath.
- Power strip with surge protection: Centralize power sources and avoid daisy-chaining outlets.
- Label maker or colored tags: Identify each cable quickly during maintenance.
Step-by-Step Guide to Organizing Your Dual Monitor Cables
Follow this logical sequence to transform your messy dual monitor station into a sleek, efficient workspace.
- Power down and disconnect everything. Turn off your computer, monitors, and peripherals. Unplug all cables to get a clear view of what you're working with.
- Inventory your cables. Lay them out and identify each one: primary display cable (e.g., DisplayPort), secondary monitor cable (e.g., HDMI), power cords, USB connections for webcam or keyboard, etc.
- Label each cable. Use small labels or color-coded tags to mark each cord by function (e.g., “Left Monitor,” “Main Power,” “Webcam USB”). This prevents confusion when reconnecting.
- Route cables through desk grommets or behind the desk. If your desk has a built-in passthrough hole, feed all necessary cables through it. Otherwise, use adhesive cable clips along the back edge to guide them downward.
- Bunch cables together using Velcro straps. Group similar cables—such as both monitor video lines or all USB extensions—and secure them at intervals (every 6–8 inches) to prevent sagging.
- Use a cable sleeve for a polished look. Slide grouped cables into a braided sleeve to create a single, flexible bundle that’s easy to manage and visually cleaner.
- Secure cables under the desk with raceways or clips. Install a plastic raceway along the underside of your desk to conceal the entire bundle. Alternatively, use adhesive-backed clips to hold cables flush against the surface.
- Connect to a centralized power strip. Mount a surge-protected power strip under the desk or place it vertically near the wall. Plug all monitor power cords, laptop chargers, and accessories into it to minimize outlet clutter.
- Test all connections. Reconnect everything, power up, and verify that both monitors are detected and functioning correctly.
- Final check and adjustments. Sit at your desk and ensure no cables are stretched tight or blocking movement. Adjust clip positions if needed.
Do’s and Don’ts of Dual Monitor Cable Management
| Do’s | Don’ts |
|---|---|
| Use Velcro straps instead of permanent zip ties | Over-tighten cable ties, which can damage wire insulation |
| Label all cables before disconnecting | Leave excess cable coiled tightly—this causes strain and heat buildup |
| Route cables behind the desk using raceways | Daisy-chain multiple power strips—it’s a fire hazard |
| Use a single cable sleeve for grouped wires | Run cables across walkways where they can be tripped over |
| Mount power strip under the desk to save space | Ignore airflow—ensure cables aren’t blocking fan vents on your PC or monitors |
Real-World Example: From Chaos to Clarity
Sarah, a freelance graphic designer, upgraded to a dual monitor setup to streamline her workflow. Initially excited, she soon found herself frustrated by a jungle of HDMI, USB-C, and power cables snaking across her desk. Every time she moved her chair, she risked unplugging something critical.
After spending an hour following a structured cable management plan, Sarah routed both monitor cables through her desk grommet, used Velcro straps to group them with her laptop charger, and mounted a slim power strip underneath. She labeled each cable with colored tags and tucked everything into a black braided sleeve.
The result? A clean, minimalist desk where she could easily access ports when needed. More importantly, she eliminated accidental disconnects and improved airflow around her workstation—her laptop now runs cooler, and she feels more focused during long design sessions.
Advanced Tips for a Pro-Level Finish
Once the basics are in place, elevate your setup with these professional techniques:
- Use magnetic cable holders: These snap onto metal surfaces (like monitor stands or CPU cases) and temporarily hold charging cables or headsets.
- Incorporate a monitor arm with built-in cable management: High-end arms like those from Ergotron or Amazon Basics have internal channels to hide video and power cables completely.
- Go wireless where possible: Use Bluetooth keyboards, mice, and speakers to eliminate unnecessary USB and audio cables.
- Install a desktop cable management box: A small enclosure on your desk surface can house adapters, dongles, and excess cable slack neatly.
- Color-code by function: Use different colored cable ties or sleeves for video, power, and data lines to instantly identify them.
“Top-tier workstations don’t just perform well—they look intentional. Hidden cables signal attention to detail, whether you’re on a Zoom call or just doing your best work alone.” — Lisa Tran, Workspace Design Specialist
Checklist: Cable Organization for Dual Monitor Setup
Use this concise checklist to ensure nothing is missed during your cable cleanup:
- ✅ Turn off and unplug all devices
- ✅ Identify and label each cable
- ✅ Measure cable lengths to avoid excess slack
- ✅ Choose appropriate cable ties or sleeves
- ✅ Route cables through desk grommet or rear edge
- ✅ Bundle similar cables together
- ✅ Secure bundles under the desk with clips or raceway
- ✅ Connect all devices to a centralized surge-protected power strip
- ✅ Test monitor detection and resolution settings
- ✅ Perform final visual and functional inspection
Frequently Asked Questions
How do I hide cables without drilling holes in my desk?
You don’t need to drill. Use adhesive-backed cable clips or a surface-mounted raceway along the back of your desk. These stick securely and can be removed without damage. Alternatively, route cables down the leg of your desk and along the baseboard using flat cord covers.
Can I use the same cable for both monitors?
Yes, if your GPU and monitors support the same connection type (e.g., both HDMI 2.0 or DisplayPort 1.4). However, avoid splitting one cable to run two monitors—each screen needs its own dedicated video signal for optimal performance.
What’s the best way to manage cables on a standing desk?
Standing desks require flexible solutions. Use braided sleeves and loosely bundled Velcro straps to allow movement. Avoid rigid conduits. Attach a vertical cable management tray to the desk frame so wires move smoothly during height adjustments without snagging.
Conclusion: Take Control of Your Workspace Today
A well-organized dual monitor setup reflects professionalism, efficiency, and respect for your tools. Taming cable chaos isn’t a one-time chore—it’s an investment in your daily workflow and long-term comfort. By applying systematic routing, smart bundling, and thoughtful labeling, you create a workspace that supports peak performance without distraction.
You don’t need expensive gear to get started. With basic tools and a little patience, you can achieve a clean, reliable setup that looks like it was installed by a technician. The difference is immediate: fewer distractions, faster troubleshooting, and a sense of control over your digital environment.


 浙公网安备
33010002000092号
浙公网安备
33010002000092号 浙B2-20120091-4
Comments
No comments yet. Why don't you start the discussion?