
Every gamer knows the frustration of tangled cords behind the entertainment center. With multiple consoles—PlayStation, Xbox, Nintendo Switch, and perhaps a PC or streaming box—the back of your setup can quickly become a jungle of power cables, HDMI wires, USB chargers, and audio connectors. Not only does this look unprofessional, but it also makes troubleshooting difficult, increases fire risk, and shortens cable lifespan due to constant bending and pulling. The good news? A clean, organized system is entirely achievable with the right strategy, tools, and a bit of discipline.
Organizing your gaming console cables isn’t about perfection—it’s about functionality, safety, and ease of access. Whether you’re setting up a new media room or revamping an old one, a systematic approach will save time, reduce stress, and improve both performance and aesthetics.
Why Cable Management Matters for Gamers
A cluttered console area isn’t just unsightly; it impacts your gaming experience in tangible ways. Dust accumulates faster in tangled wires, which can block ventilation ports and cause overheating. Frequent plugging and unplugging lead to frayed ends and connection issues. Worse, when something goes wrong—a flickering screen, no sound, or a failed boot—you waste valuable time tracing which cable belongs to what device.
Proper cable management improves airflow around consoles, reduces tripping hazards, and makes upgrades or repairs significantly easier. It also enhances the overall look of your gaming space, turning a chaotic corner into a sleek, professional setup.
“Cable clutter isn’t just visual noise—it’s a technical liability. Organized wiring means better heat dispersion, fewer faults, and faster diagnostics.” — Marcus Tran, AV Systems Engineer at NexaHome Tech
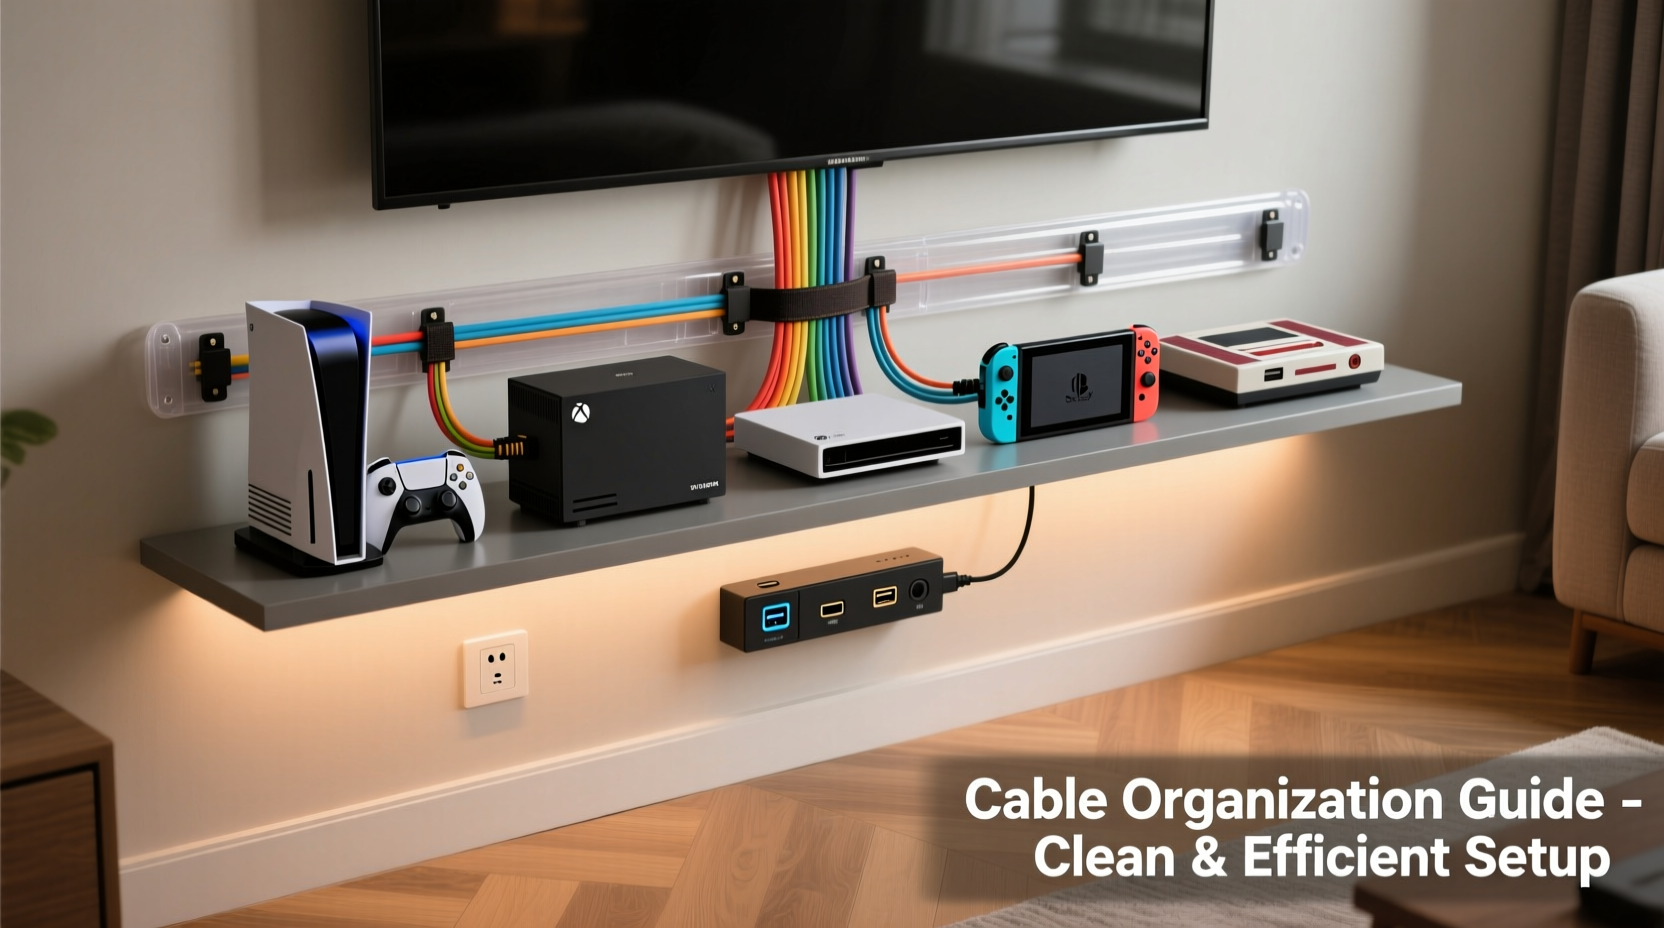
Essential Tools for Gaming Cable Organization
Before diving into organization, gather the right tools. These aren’t expensive, and most are reusable across future setups.
- Cable ties (reusable Velcro or nylon) – Ideal for bundling similar cables together without damaging insulation.
- Cable raceways or cord covers – Adhesive channels that hide bundles along walls or furniture edges.
- Cable clips or adhesive mounts – Keep cords aligned vertically or horizontally on TV stands or desks.
- Label maker or colored tags – Label each cable by function (e.g., “PS5 Power,” “Xbox HDMI Out”).
- Power strip with surge protection – Centralize all power sources safely and switch everything off at once.
- HDMI switcher or AV selector – Reduce the number of active HDMI cables if your TV has limited ports.
- Cable sleeves or braided wraps – Bundle multiple cords into a single, tidy tube for a cleaner look.
Step-by-Step Guide to Organizing Multiple Console Cables
Follow this practical sequence to transform your tangled mess into a streamlined, functional layout.
- Unplug and remove all devices. Start fresh. Disconnect every console, power adapter, and peripheral from the wall and TV. Lay them out on a table for inspection.
- Inspect and declutter. Check for damaged, frayed, or obsolete cables. Recycle old chargers you no longer use. Donate extra HDMI cables to friends or local schools.
- Group by device and function. Create piles: one for PlayStation, one for Xbox, etc. Within each, separate power, video (HDMI), audio, and USB/data cables.
- Measure and trim excess length. Don’t coil long cables tightly. Instead, use figure-eight loops secured with Velcro to prevent kinking. Store spare lengths in labeled bags taped under the stand.
- Label every cable. Use a label maker or color-coded rings. For example: red tag = PS5, blue = Xbox, yellow = Switch dock.
- Route cables strategically. Run power cords down one side of the cabinet and HDMI/audio on the other. Use adhesive clips every 6–8 inches to maintain alignment.
- Use a centralized power solution. Plug all consoles and accessories into a single surge-protected power strip. Position it where it’s easily accessible but out of sight.
- Install a cable raceway behind the TV stand. Feed all HDMI cables through it, leading directly to the wall outlet or media hub. Paint-matched raceways blend seamlessly into walls.
- Mount consoles securely. Use shelf risers or vertical stands to elevate devices. This improves airflow and gives more space for cable routing underneath.
- Test and finalize. Reconnect everything, turn on each console, and verify signal and power. Adjust cable tension if needed.
Smart Layouts: Comparing Different Console Setup Configurations
The way you arrange your consoles affects how manageable the cables remain over time. Below is a comparison of three common setups.
| Setup Type | Pros | Cons | Best For |
|---|---|---|---|
| Stacked Consoles | Saves floor space, minimal footprint | Poor airflow, heat buildup, hard to access lower units | Small apartments, compact entertainment centers |
| Side-by-Side Shelves | Better ventilation, easy access, clean lines | Requires wider cabinet, may need longer cables | Dedicated gaming rooms, wall-mounted TVs |
| Hidden Cabinet with Ventilation | Conceals clutter, dust-resistant, elegant look | Risk of overheating if not properly vented | Living rooms, family spaces where aesthetics matter |
Real Example: Transforming a Multi-Console Mess
Consider Alex, a streamer who owns a PS5, Xbox Series X, Nintendo Switch, and a gaming PC—all connected to a 75-inch TV. His initial setup had cables dangling from every angle, with power strips overloaded and HDMI switches buried under dust-covered boxes. After one console failed to display, he spent nearly 30 minutes unplugging and testing each cable.
He decided to reorganize using the steps above. He purchased a vertical metal rack to mount the PS5 and Xbox, placed the PC tower below, and used a labeled HDMI switcher to manage inputs. All power went through a smart surge protector controlled via app. He installed a white cable raceway along the back of the TV stand and used gray braided sleeves for HDMI bundles.
The result? A clean, accessible setup where every cable has a designated path. Switching between consoles takes seconds, and maintenance is straightforward. More importantly, his equipment runs cooler, and his streaming background looks professional.
Do’s and Don’ts of Gaming Cable Management
Avoid common pitfalls with these clear guidelines.
| Do’s | Don’ts |
|---|---|
| Use labels or color codes for quick identification | Leave cables tightly coiled or bent at sharp angles |
| Secure bundles with Velcro or soft ties | Run power and HDMI cables parallel for long distances (risk of interference) |
| Leave slack near connectors to prevent strain | Overload a single power strip beyond its rated capacity |
| Clean behind consoles monthly to remove dust | Ignore ventilation needs when placing consoles in cabinets |
| Group like functions (all power on one side, all video on the other) | Use damaged or frayed cables even if they “still work” |
Checklist: Your Cable Organization Action Plan
Keep this checklist handy when tackling your setup:
- ☐ Unplug all consoles and peripherals
- ☐ Sort cables by device and type
- ☐ Discard broken or redundant wires
- ☐ Label each cable clearly
- ☐ Measure and loop excess length properly
- ☐ Install cable clips, raceways, or sleeves
- ☐ Mount consoles with proper spacing
- ☐ Connect to a centralized, surge-protected power strip
- ☐ Route HDMI and audio cables separately from power lines
- ☐ Test all connections post-installation
- ☐ Schedule monthly maintenance checks
Frequently Asked Questions
Can I use wireless solutions to reduce cable clutter?
Yes, but selectively. Wireless controllers, headsets, and keyboards help, but core components like power and video still require physical connections. Consider a wireless HDMI transmitter for short-range setups, though latency may affect gameplay. True cable elimination isn’t feasible yet for high-performance gaming.
How often should I recheck my cable setup?
Inspect your system every 3–6 months. Look for loose connections, dust buildup, or signs of wear. After moving equipment or adding a new console, always re-evaluate the layout to maintain efficiency.
Is it safe to bundle many power cables together?
Bundling is safe if done loosely with Velcro and not enclosed in tight insulation. Avoid stuffing multiple high-draw cables (like console power supplies) into narrow conduits, as heat buildup can be a fire hazard. Always ensure adequate airflow around bundled power cords.
Conclusion: A Clean Setup Elevates Your Gaming Experience
Organizing cables for multiple gaming consoles isn’t a one-time chore—it’s part of responsible tech ownership. A well-managed setup protects your investment, improves reliability, and turns your gaming station into a source of pride rather than embarrassment. You don’t need expensive gear or advanced skills; just consistency, planning, and attention to detail.
Start today. Clear that tangle behind your TV. Label those cords. Secure them neatly. Feel the difference when you switch consoles without hesitation, troubleshoot without frustration, and show off a clean, professional rig. Your future self—and anyone helping you move or fix something—will thank you.


 浙公网安备
33010002000092号
浙公网安备
33010002000092号 浙B2-20120091-4
Comments
No comments yet. Why don't you start the discussion?