
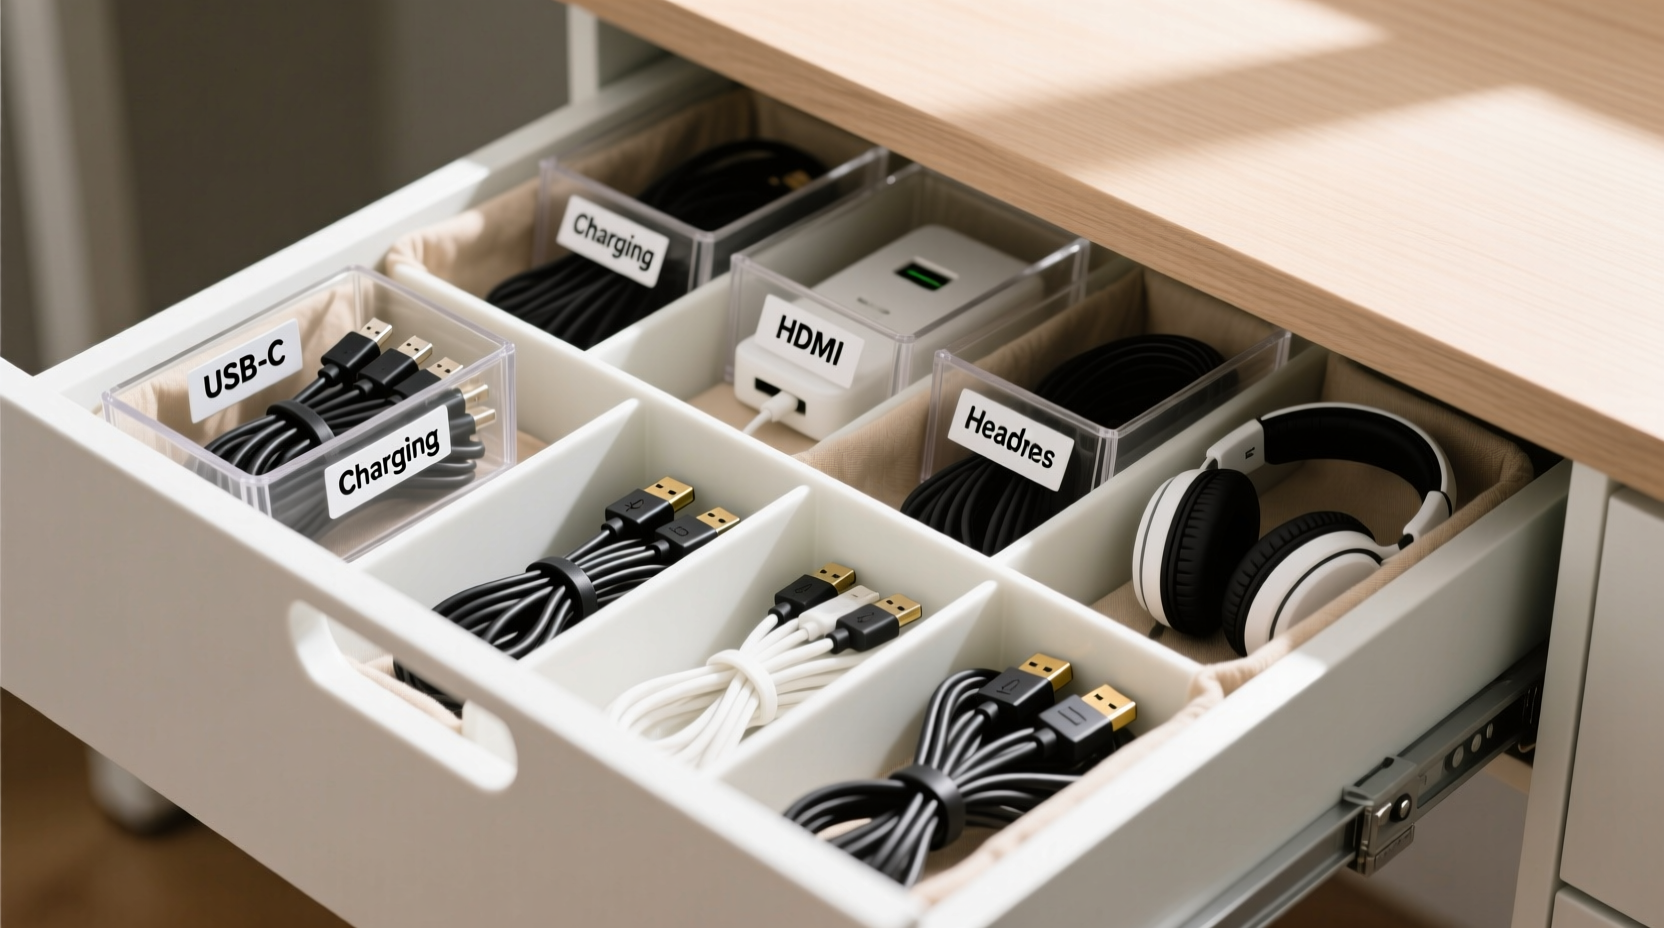
Cables are an unavoidable part of modern life. From charging cords to audio connectors, most homes and offices accumulate dozens of them over time. Without a system, they quickly turn into tangled messes that waste time and damage equipment. A dedicated drawer with dividers and clear labeling transforms chaos into order. This guide walks through the exact steps to create a clean, functional cable storage solution using simple tools and smart organization principles.
Why Drawer Organization Matters for Cables
A cluttered cable drawer isn’t just unsightly—it’s inefficient. When cords are jumbled together, it takes longer to locate the right one, increases wear from constant tugging, and raises the risk of damaging ports or devices. Over time, this disarray can lead to frustration and even unnecessary replacements.
Using a drawer with physical dividers and consistent labeling solves these problems by:
- Preventing tangling through physical separation
- Reducing search time with visual identification
- Extending cable lifespan by minimizing strain
- Freeing up counter and floor space
- Making travel prep faster with pre-sorted kits
The goal isn’t perfection—it’s practicality. An organized drawer should make your daily routine smoother, not add extra maintenance work.
Step-by-Step: Setting Up Your Cable Drawer System
Creating an effective cable management system involves more than tossing cords into compartments. Follow this structured process to build a lasting solution.
- Empty and assess your current collection. Remove everything from the drawer. Lay out all cables on a table and inspect each one. Discard frayed, broken, or obsolete cords (like old VGA or parallel printer cables).
- Categorize by function. Group similar items: phone chargers, laptop adapters, USB hubs, audio cables, HDMI, Ethernet, etc. This forms the foundation for your divider layout.
- Select the right drawer. Choose a medium-depth drawer (10–15 cm) with enough width to accommodate multiple sections. Avoid deep drawers where cables sink out of sight.
- Measure and plan compartment sizes. Sketch a rough layout based on cable thickness and length. Thicker power bricks need more vertical space; thin USB-C cords can be grouped tightly.
- Install adjustable dividers. Use modular foam inserts, plastic grid trays, or DIY cardboard separators. Secure them so they don’t shift when opening and closing the drawer.
- Coil and store each cable properly. Use the over-under method to prevent kinks. For shorter cords, wrap around a credit card or use reusable ties. Avoid tight rubber bands.
- Label every section clearly. Use waterproof labels indicating device type, length, or brand. Include color-coding if helpful (e.g., red for Apple, blue for Android).
- Test accessibility. Open the drawer and retrieve several cables. Adjust spacing if removal causes disturbance to neighboring compartments.
Choosing and Using Dividers Effectively
Not all dividers work equally well for cables. The best choice depends on drawer size, cable variety, and frequency of access.
| Divider Type | Best For | Drawbacks |
|---|---|---|
| Adjustable plastic grid trays | Uniform-sized items like USB cables | Limited flexibility for bulky adapters |
| Foam insert organizers | Precise fitting; good for mixed shapes | Harder to modify once cut |
| Cardboard or corrugated dividers | Budget-friendly DIY option | Less durable over time |
| Silicone cup organizers | Holding coiled cords upright | Takes more space per unit |
| Wooden tray with fixed slots | Permanent setups with stable inventory | Inflexible if needs change |
For most users, adjustable plastic grids offer the best balance. They’re widely available, easy to reconfigure, and sturdy enough to last years. Look for models designed for kitchen utensils or craft supplies—they often have ideal dimensions for cable storage.
If purchasing isn’t an option, cut strips of corrugated cardboard to act as temporary walls. Tape the base edges lightly to the drawer bottom to prevent sliding. This low-cost method works surprisingly well for testing layouts before investing in permanent solutions.
Smart Labeling Strategies for Instant Recognition
Labels are what turn organization into efficiency. Without them, even a tidy drawer becomes guesswork. Effective labeling combines clarity, durability, and consistency.
Use concise identifiers such as:
- \"iPhone 15 – 6ft\"
- \"Work Laptop Charger\"
- \"TV HDMI – Black\"
- \"Backup Ethernet Cable\"
Avoid vague terms like “charger” or “cable,” which defeat the purpose of sorting.
Choose label materials based on expected wear:
- PVC sticker labels: Waterproof and smudge-resistant; ideal for high-use drawers.
- Chalkboard stickers: Reusable; great for frequently changing inventories.
- Printed tape (label maker): Professional look; withstands friction.
- Handwritten tags: Acceptable only if using permanent ink and legible writing.
“Clear labeling reduces decision fatigue and saves up to 7 minutes per week in searching.” — David Lin, Productivity Researcher at HomeFlow Labs
Real Example: Transforming a Home Office Drawer
Sarah, a freelance graphic designer in Portland, struggled with a single deep drawer filled with over two dozen cables. Her workspace included three laptops, multiple monitors, tablets, and client loaner devices. Every morning, she spent 5–10 minutes untangling and locating the correct adapter.
She applied the following changes:
- Removed 14 obsolete or damaged cables
- Purchased a 12-compartment plastic organizer (30 x 20 cm)
- Grouped items into: MacBook Chargers, Android Cables, Monitor Cables, Audio, Travel Kit, Spares
- Labeled each slot with a Brother P-Touch label (e.g., \"MacBook Pro 96W\", \"iPad USB-C 1m\")
- Used silicone loops to keep coils secure within each section
After implementation, Sarah reported cutting her setup time in half. She also noticed fewer port issues due to reduced cable stress. Six months later, she added a second drawer for specialty gear but maintained the same labeling standard across both.
This real-world case shows that even modest investment in structure yields measurable returns in time and reliability.
Checklist: Build Your Cable Drawer in 10 Minutes
Use this quick-reference checklist to set up or refresh your cable drawer efficiently:
- ☐ Empty drawer completely
- ☐ Discard broken or unused cables
- ☐ Sort remaining cables by type and device
- ☐ Measure drawer interior dimensions
- ☐ Select and install appropriate dividers
- ☐ Coil each cable using the over-under technique
- ☐ Place one category per compartment
- ☐ Apply durable, descriptive labels to each section
- ☐ Store frequently used items near the front
- ☐ Test retrieval and adjust spacing if needed
Repeat this checklist quarterly during household resets to maintain order as technology evolves.
Common Mistakes to Avoid
Even well-intentioned systems fail when common pitfalls aren’t addressed. Steer clear of these errors:
- Overfilling compartments: Crowding leads to tangling and difficulty removing items. Leave breathing room.
- Using non-standard labels: Mixing handwritten, printed, and symbolic tags creates confusion.
- Ignoring cable length: Long cords bunched in small spaces will tangle. Reserve larger zones for extended runs.
- Forgetting future additions: Leave one empty section for new purchases or seasonal items.
- Placing heavy adapters on top: Power bricks should rest flat, not dangle from cords, to avoid connector strain.
“Organization fails not from poor tools, but from inconsistent habits. Label once, update rarely, and stick to the system.” — Maria Tran, Interior Systems Consultant
Frequently Asked Questions
How do I prevent cables from slipping under dividers?
Ensure dividers extend to the back of the drawer and press snugly against the sides. If gaps exist, use adhesive felt pads or foam strips to close them. Alternatively, place heavier items like power bricks at the rear to act as natural barriers.
What’s the best way to coil cables without damaging them?
Use the over-under method: form loops by alternating the direction of each wrap (one overhand, one underhand). This prevents internal wire twisting. Avoid wrapping tightly around small objects like pens, which can degrade insulation over time.
Should I keep original packaging for cables?
No. Original boxes and plastic clamshells create bulk and hinder access. Instead, retain one sample of each cable type in your drawer and discard extras. If needed, note model numbers on labels for future reference.
Final Thoughts: Make Order Sustainable
An organized cable drawer isn’t a one-time project—it’s an ongoing habit. The initial setup takes less than an hour, but its benefits compound over time through faster access, reduced frustration, and longer-lasting electronics.
The key is sustainability. Choose a system that fits your lifestyle, not one that demands perfection. Whether you use $5 foam inserts or a custom laser-cut tray, consistency in labeling and placement matters far more than the materials themselves.


 浙公网安备
33010002000092号
浙公网安备
33010002000092号 浙B2-20120091-4
Comments
No comments yet. Why don't you start the discussion?