
Cable clutter is one of the most common yet overlooked sources of disorganization in homes and offices. From tangled phone chargers to a spaghetti-like mess behind your desk, unmanaged cords not only look unsightly but can also pose safety hazards and reduce efficiency. The good news? You don’t need expensive cable management kits or specialized tools to fix this. With everyday household items already in your drawers, cabinets, or junk boxes, you can transform chaos into order. This guide reveals practical, creative, and sustainable ways to organize cables neatly—using what you already own.
Why Cable Clutter Matters More Than You Think
It’s easy to dismiss tangled cords as a minor inconvenience. But persistent cable clutter has real consequences. Tripping over loose cords, damaging connectors from constant tugging, or spending minutes untangling a single charger all add up over time. Poorly managed cables also make cleaning difficult and can trap dust, which affects air quality and equipment performance. According to a 2022 workspace efficiency study by the International Association of Home Organization, households that implemented basic cable management reported a 30% increase in perceived productivity and a noticeable reduction in stress related to daily tech use.
“Cable organization isn’t about aesthetics alone—it’s about function, safety, and longevity of your devices.” — Dr. Lena Patel, Ergonomics Consultant at TechWell Institute
Before diving into solutions, take inventory. Unplug and lay out every cable you regularly use: laptop chargers, HDMI cords, USB hubs, headphones, power strips, etc. Label them if needed. Knowing exactly what you’re working with makes organizing far more efficient.
Everyday Household Items That Work as Cable Organizers
You likely have several functional cable organizers already in your home—they just aren’t labeled as such. Repurposing common items reduces waste and saves money. Below are seven reliable household objects that double as excellent cable management tools.
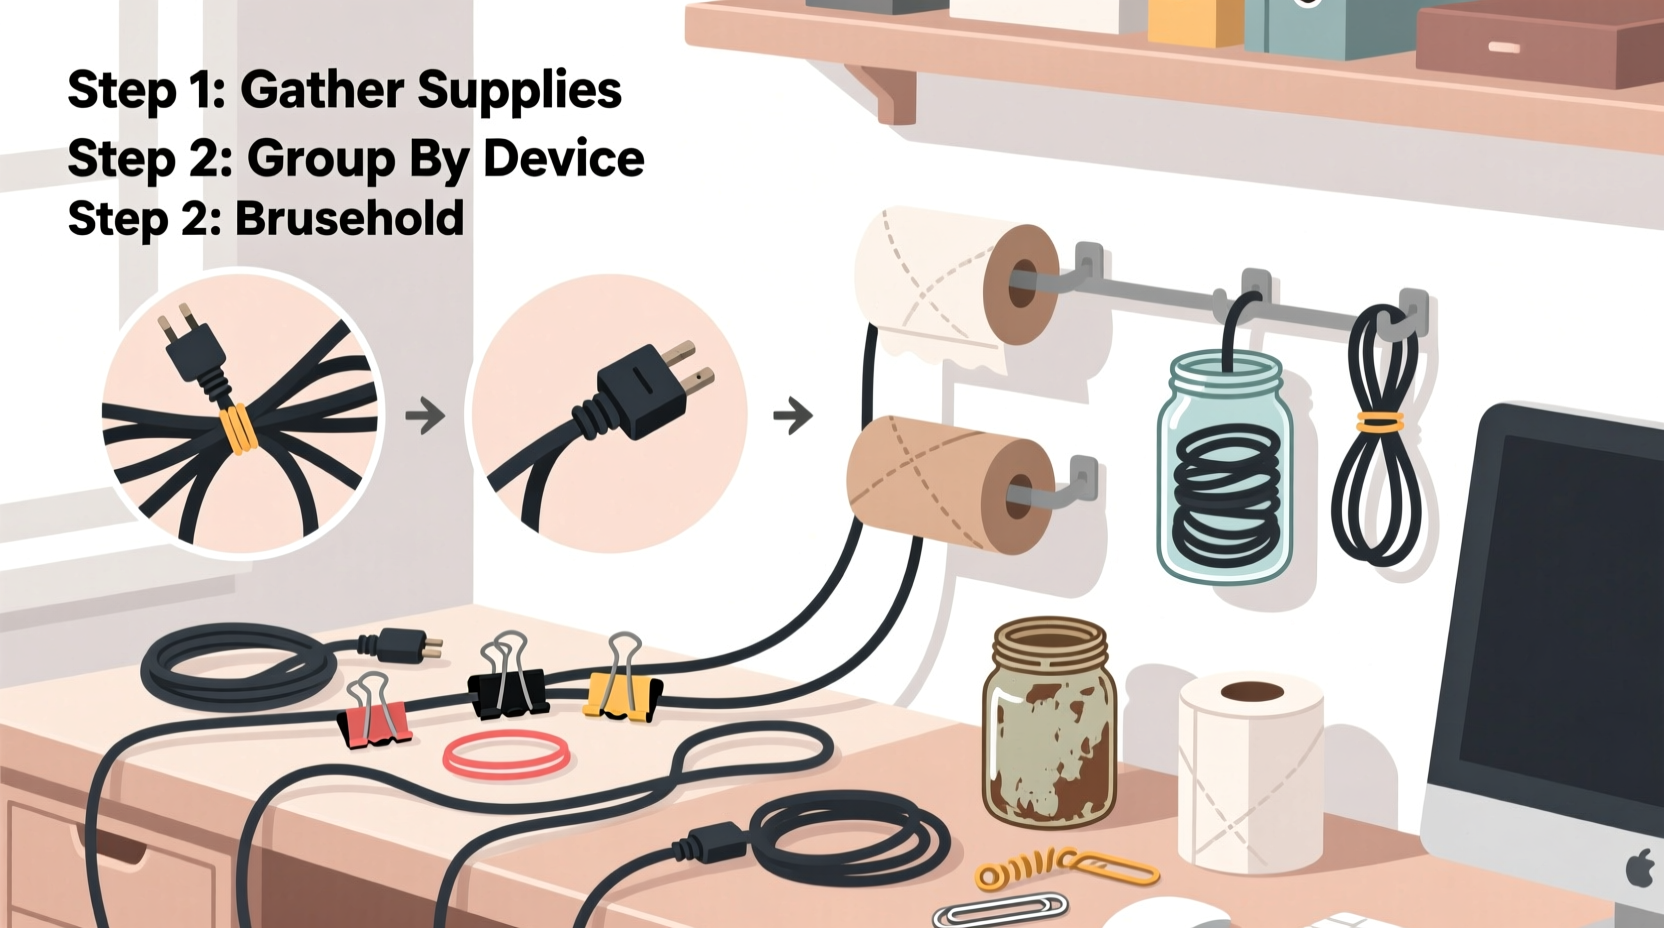
- Paper towel or toilet paper rolls: Ideal for wrapping and storing shorter cords like earphones or charging cables. Cut slits on both ends to thread the plug through and secure it.
- Binder clips: Perfect for securing cords to the edge of a desk. Clip them onto table edges and loop cables through the metal arms to prevent dangling.
- Clothespins or wooden pegs: Attach to the side of a shelf or board to hold individual cords in place. Great for keeping multiple device chargers separated and visible.
- Muffin tin or ice cube tray: Use to sort small electronics and their corresponding cables. Each compartment holds one device and its cord, preventing mix-ups.
- Rubber bands or hair ties: Wrap loosely around coiled cables to keep them bundled. Avoid tight elastic that can damage insulation over time.
- Old CD cases: Sturdy plastic cases can store flat cables like USB or Ethernet cords. Slide them in and label the front for quick identification.
- Shoebox with holes punched in the sides: Turn it into a hidden cable hub. Feed cords through the holes, label each opening, and store the box under a desk or shelf.
Step-by-Step Guide to a Tangle-Free Setup
Follow this five-step process to achieve a clean, lasting cable organization system using only household supplies.
- Unplug and assess: Disconnect all cables from outlets and devices. Group them by frequency of use: daily, weekly, occasional, or storage-only.
- Coil each cable properly: Use the over-under method—alternating loops left and right—to prevent twisting. Never wrap tightly around your hand; this creates kinks.
- Label everything: Use masking tape and a pen to mark each cable (e.g., “Monitor HDMI,” “Laptop Charger”). Stick the label near the plug end.
- Choose containment methods: Match each cable type with a suitable household organizer. For example, use toilet paper rolls for phone chargers and binder clips to route cords along desk edges.
- Install and test: Reconnect devices, route cables neatly, and ensure everything reaches its destination without strain. Adjust positioning as needed.
This method works whether you're managing a home office, entertainment center, or kitchen appliance station. Consistency across setups makes maintenance easier.
Smart Storage Solutions Using What You Already Own
Storage doesn't have to be complicated. The key is accessibility and visibility. If you can’t see or reach a cable easily, you’ll stop using the system. Here are three innovative storage hacks using common household containers.
1. The Muffin Tin Router Station
If you work with multiple gadgets—a tablet, e-reader, wireless earbuds, smartwatch—store each with its charger in a muffin tin cup. Place the tin in a drawer or on a shelf. The metal base helps dissipate heat, and the compartments naturally separate devices. Add a small sticky note inside each cup for labels.
2. The Shoebox Cable Vault
Cut rectangular openings in the long sides of a shoebox. Thread each coiled cable through its own slot. Close the box and stack it vertically or horizontally. This keeps dust off and prevents pets from chewing exposed wires. Use different colored tapes on each slot to color-code by device type.
3. The Wall-Mounted Pegboard Hub
Repurpose an old pegboard or even a wooden cutting board. Nail small hooks or attach clothespins at various points. Hang coiled cables by their plugs or use the pegs to create routing paths. Mount it behind a desk or inside a closet door for a hidden but accessible system.
| Household Item | Best For | Limits |
|---|---|---|
| Toilet paper roll | Short cords (earbuds, USB) | Not durable long-term |
| Binder clip | Desk cable routing | May scratch surfaces |
| Rubber band | Quick bundling | Elastic degrades over time |
| Muffin tin | Multi-device charging | Takes counter space |
| CD case | Flat cable storage | Limited size capacity |
Real-Life Example: Transforming a Home Office Corner
Sarah, a freelance graphic designer in Portland, struggled with a chaotic desk setup. Her laptop, monitor, external hard drive, lamp, and phone charger created a dangerous tangle behind her workspace. She spent nearly 10 minutes every morning untangling cords and often tripped over loose cables.
Using only items from around her apartment, she transformed the area in under an hour. She used two binder clips to anchor power cords to the back of her desk, preventing sagging. Old toilet paper rolls became labeled homes for her frequently swapped cables. A spare muffin tin stored backup drives and camera chargers in a drawer. Finally, she repurposed a shoebox as a hidden hub for longer cords, feeding them through slits and labeling each hole.
The result? A clean, safe workspace where every cable had a designated place. Sarah reported saving 15–20 minutes per week and noted fewer device connection issues due to reduced wear on connectors.
Checklist: Quick Cable Cleanup Routine
Use this checklist monthly to maintain order without effort:
- ✅ Unplug and inspect all cables for fraying or damage
- ✅ Discard any broken or obsolete cords (recycle responsibly)
- ✅ Recoil cables using the over-under method
- ✅ Reapply labels if faded or missing
- ✅ Reattach clips, bands, or holders that have loosened
- ✅ Dust around cable hubs and under desks
- ✅ Test all connections for stability
Set a calendar reminder or tie this routine to a monthly task like bill payment to stay consistent.
Avoid These Common Cable Management Mistakes
Even well-intentioned efforts can backfire if done incorrectly. Steer clear of these frequent errors:
- Using twist ties or zip ties too tightly: They can cut into insulation and cause short circuits. If you must use them, leave room for movement and never cinch completely.
- Ignoring airflow: Bundling too many power adapters together traps heat. Space them out or use ventilated containers.
- Overlooking cable length: Excess cord should be loosely coiled—not wrapped tightly around devices. Long loops prevent tension on plugs.
- Forgetting future access: Don’t seal cables in permanent enclosures. Choose removable solutions so you can upgrade or replace devices easily.
“Simplicity beats perfection in cable management. A system you actually use is better than a perfect one you abandon.” — Mark Tran, DIY Tech Organizer & Blogger
Frequently Asked Questions
Can I use masking tape to label cables?
Yes, masking tape is ideal for temporary or adjustable labeling. Write the device name with a permanent marker and stick it near the plug. Replace every few months if it starts peeling. For longer-lasting labels, write directly on electrical tape and wrap it around the cable.
What’s the best way to store long extension cords?
Use the over-under coiling technique and secure the bundle with a soft cloth strip or wide rubber band. Store the coil in a bucket, laundry basket, or hang it on a wall hook. Avoid wrapping extension cords around sharp corners or furniture edges, as this damages the outer sheath.
How do I keep pets from chewing cables?
Route cords through PVC pipes, garden hoses (cut open), or spring wire protectors (often sold for vacuum cleaners). Alternatively, use a closed container like a shoebox with feed-through holes or mount cables high using adhesive clips. Bitter-tasting pet deterrent sprays can also help, but physical barriers are more reliable.
Final Thoughts: Neatness Starts with Mindset
Organizing cables isn’t a one-time chore—it’s an ongoing habit. The most effective systems are simple, adaptable, and built from what you already have. By leveraging household items creatively, you avoid unnecessary purchases and reduce waste. More importantly, you reclaim space, reduce frustration, and create a safer environment for your electronics and family.
Start small. Pick one problem area—your nightstand, entertainment center, or workstation—and apply one or two of these methods today. Once you experience the clarity of a tidy cable setup, you’ll wonder why you waited so long.


 浙公网安备
33010002000092号
浙公网安备
33010002000092号 浙B2-20120091-4
Comments
No comments yet. Why don't you start the discussion?