
Cable clutter is one of the most common yet overlooked problems in homes and offices. Tangled cords behind desks, entertainment centers, or workbenches don’t just look messy—they make troubleshooting difficult, increase wear on connectors, and pose tripping hazards. While retail cable management systems can cost tens or even hundreds of dollars, practical and affordable alternatives exist. With a few household items and a bit of creativity, you can achieve clean, organized cabling without spending a dime on specialty products.
The key is understanding that organization isn’t about having the fanciest tools—it’s about consistency, accessibility, and sustainability. This guide walks through proven, no-cost or low-cost methods to tame your cable chaos using everyday materials already in your home.
Assess Your Cable Situation
Before diving into solutions, take stock of what you're dealing with. Walk around your workspace, entertainment area, or garage and identify every cord in use. Group them by function: power cords, USB cables, HDMI lines, Ethernet cables, charging wires, etc. Label each group temporarily with masking tape and a marker—this helps avoid confusion later.
While assessing, ask yourself:
- Which cables are used daily?
- Which ones are rarely used but still plugged in?
- Are there damaged or frayed cables that should be discarded?
- Do any devices have redundant cords (e.g., extra chargers)?
This audit often reveals opportunities to reduce clutter before organizing it. Unplug unused devices, recycle broken cables, and donate duplicates. Fewer cables mean easier management.
DIY Cable Management Using Household Items
You likely already own tools capable of transforming chaotic wiring into a streamlined setup. The following solutions require minimal effort and zero investment if you repurpose existing supplies.
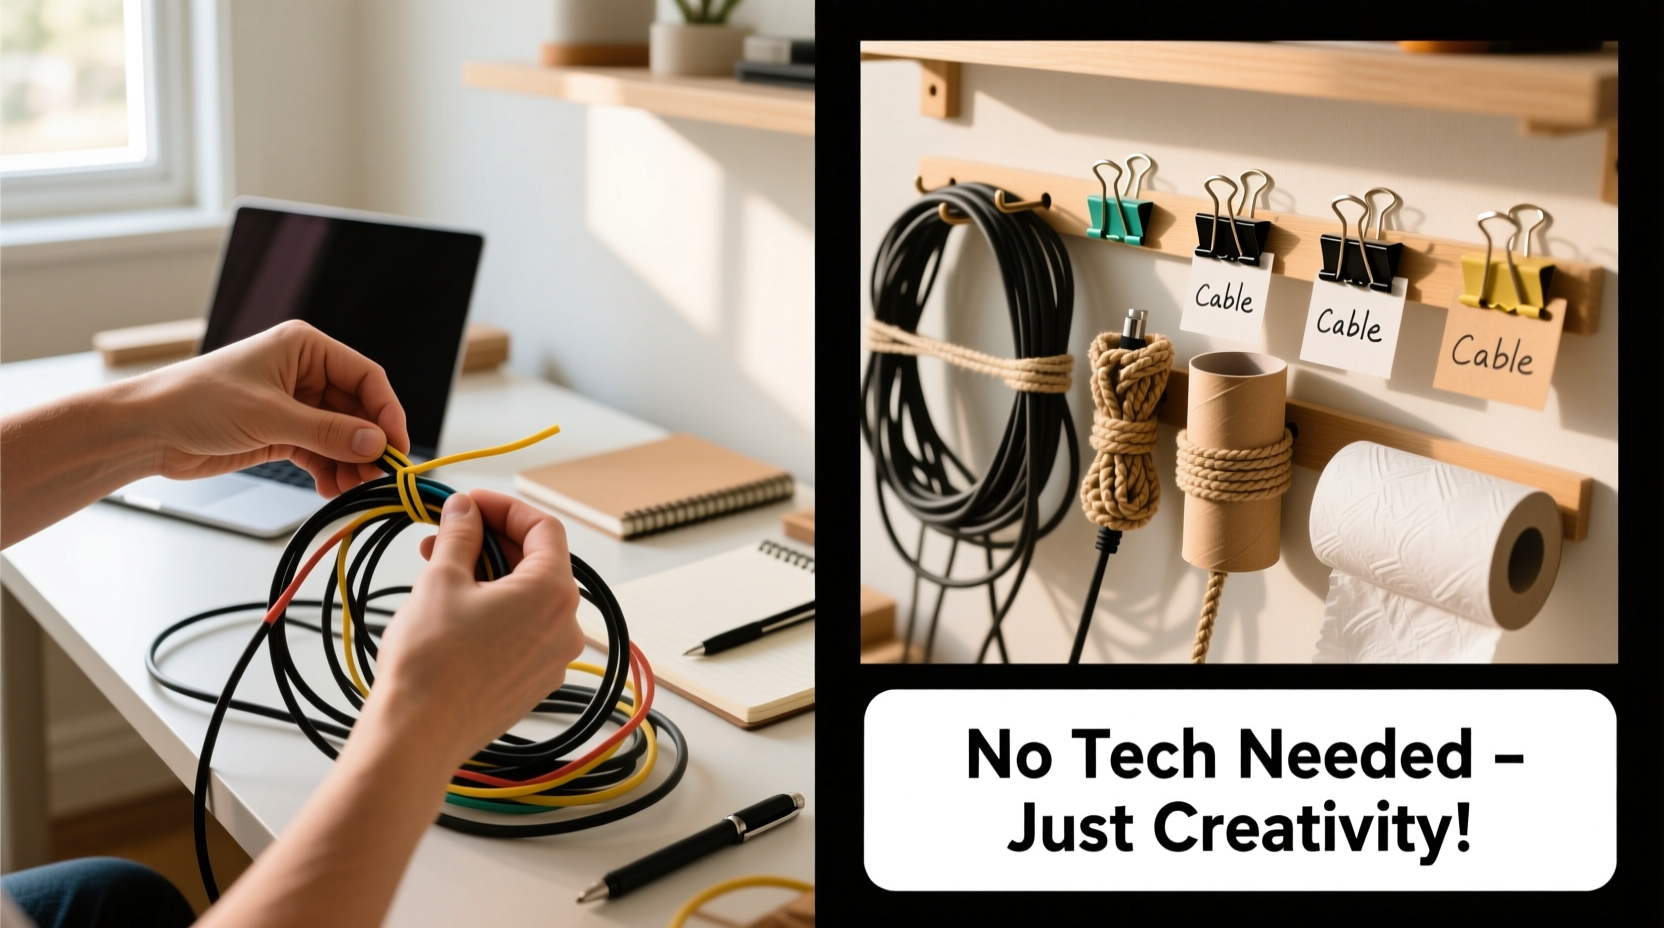
1. Toilet Paper or Paper Towel Rolls as Cord Protectors
Hollow cardboard tubes from toilet paper or paper towels are ideal for bundling and protecting short cords. Cut a roll to desired length (typically 3–6 inches), slide your cable inside, and secure the ends with masking tape or rubber bands. This prevents tangling and shields fragile connectors.
Ideal for:
- Headphone cables
- USB-to-Lightning cords
- Short Ethernet patches
2. Binder Clips for Desk Edge Management
Binder clips are among the most versatile organizational tools. Clip them onto the edge of your desk and thread power strips or multiple cords through the metal arms. This keeps cords from dangling and reduces strain on plugs.
For heavier bundles, use large binder clips. You can also attach small hooks underneath the desk using adhesive Velcro strips and loop cords through them.
3. Bread Bag Tabs as Quick Labels
Plastic tabs from bread bags can be reused as instant cable identifiers. Cut them open into flat rectangles, write device names with a permanent marker, and slip them over the cable near the plug end. They’re weather-resistant, durable, and free.
4. Old Shoeboxes as Hidden Storage Hubs
Turn an old shoebox into a concealed cable station. Cut holes in the sides or top for cords to pass through, place a power strip inside, and tuck the box behind furniture. All excess wiring stays hidden, while outlets remain accessible.
For aesthetics, wrap the box in fabric or paint it to match your decor. Add ventilation holes if housing active electronics to prevent overheating.
Step-by-Step Guide to a Tangle-Free Setup
Follow this sequence to systematically eliminate cable mess using only household items:
- Unplug everything. Start fresh. Remove all devices from outlets and disconnect peripherals.
- Sort and purge. Discard unusable cables, keep essentials, and store backups in labeled envelopes.
- Measure and group. Bundle cords used together (e.g., computer, monitor, speakers) with twist ties or fabric strips.
- Create slack loops. Coil excess length neatly and secure with velcro strips cut from old laptop cases or watch bands.
- Route along edges. Use masking tape or reusable putty to affix cords along baseboards, desk legs, or wall trim.
- Label every cord. Use bread tags, masking tape flags, or nail polish (on white cables) for color coding.
- Install retention points. Mount binder clips, cup hooks, or notched cardboard guides where cords change direction.
- Test access and flexibility. Ensure devices can still be moved slightly without unplugging.
This process takes under an hour and yields long-term benefits. Revisit monthly to adjust for new devices or wear.
Smart Reuse: Turning Waste into Wire Control
Sustainability meets functionality when reusing discarded materials. Instead of buying plastic sleeves or zip ties (which often break and aren’t recyclable), rely on reusable, flexible alternatives.
| Household Item | Best For | How to Use |
|---|---|---|
| Old shoelaces | Bundling thick cords | Tie into loose knots or braided wraps; washable and durable. |
| Ziplock bag seals | Adjustable cable ties | Cut off the zipper strip and wrap around cord bundles; snaps shut securely. |
| Cardboard milk jug handles | Wall-mounted guides | Screw or tape to walls; loop cords through U-shaped handle. |
| Pen springs | Coil retainers for thin wires | Wrap around coiled earbuds or camera cables to maintain shape. |
| Fabric scraps | Soft cable wraps | Cut into 1-inch strips and tie gently around bundled cords. |
These materials outperform plastic ties in flexibility and reusability. Unlike single-use zip ties, they won’t saw through insulation or crack under temperature changes.
“Most cable damage comes not from use, but from improper storage. A loosely coiled wire protected from kinks lasts significantly longer.” — Raj Patel, Electronics Technician & Home Automation Consultant
Real Example: Transforming a Home Office Jungle
Consider Mark, a freelance designer working from a small apartment. His desk sat against a wall crowded with a desktop PC, dual monitors, printer, external hard drives, phone charger, and lamp. Six power cords, three HDMI cables, two USB hubs, and tangled Ethernet lines spilled behind the desk, making it impossible to move equipment without unplugging half the setup.
He spent $0 on organizers. Instead, he used:
- Two large binder clips to anchor power strips to the desk underside.
- Toilet paper rolls to house each monitor cable near the input port.
- An old shoebox with drilled holes to conceal the power strip and router.
- Shoelaces to bundle related cords and label with bread tags.
- Masking tape to route excess length vertically along the wall baseboard.
The result? A clean, modular system. He could now remove the printer for maintenance without disturbing other devices. Daily setup time dropped from minutes untangling cords to seconds. After six months, none of his cables showed signs of fraying—a noticeable improvement from before.
Common Mistakes to Avoid
Even with good intentions, poor habits can undo your efforts. Watch out for these pitfalls:
- Over-tightening ties: Excessive pressure damages internal wires. Leave room for slight movement.
- Ignoring heat buildup: Never enclose live power strips in sealed boxes. Always allow airflow.
- Using sharp objects: Avoid staples or nails to pin cords—they puncture insulation and create shock risks.
- Skipping labels: Without identification, future unplugging becomes guesswork.
- Coiling too tightly: Tight loops induce electromagnetic interference and stress connectors.
Checklist: DIY Cable Organization in One Hour
Use this checklist to complete a full cable cleanup using only household items:
- ☐ Unplug all non-essential devices
- ☐ Discard frayed or obsolete cables
- ☐ Group cords by device or function
- ☐ Label each cable near the plug end
- ☐ Bundle groups with fabric strips or old shoelaces
- ☐ Route cords along edges using tape or putty
- ☐ Secure power strips with binder clips
- ☐ Store backups in a labeled container (e.g., mason jar or envelope)
- ☐ Test device access and plug stability
- ☐ Take a photo for future reference
Frequently Asked Questions
Can I use duct tape for cable management?
Duct tape is strong but not ideal for long-term use. The adhesive degrades over time, leaves residue, and can damage cable jackets. Better options include painter’s tape (removable) or fabric-based wraps. If you must use duct tape, apply it only to stationary anchor points, not directly on cords.
How do I prevent pets from chewing cables?
Conceal cords inside cardboard tubing, PVC pipes, or routed along high baseboards. You can also use bitter apple spray (pet-safe deterrent) on outer jackets. For permanent setups, run cords through hollow curtain rods mounted along skirting boards.
What’s the best way to store spare cables?
Coil them loosely using the over-under technique, secure with a fabric tie, and store in labeled containers. Envelopes, jars, or repurposed tissue boxes work well. Keep them in a dry, temperature-stable location to prevent material degradation.
Final Thoughts and Call to Action
Organizing cables doesn’t require expensive kits or technical expertise. The most effective systems are often the simplest—built from items you already own and tailored to your space. By investing just an hour in thoughtful arrangement, you gain safety, efficiency, and peace of mind. Over time, maintaining order becomes second nature.
Start today. Pick one area—your desk, entertainment center, or workshop—and apply these DIY methods. Share your transformation story or favorite hack in the comments. Inspire others to ditch the clutter without spending a cent.


 浙公网安备
33010002000092号
浙公网安备
33010002000092号 浙B2-20120091-4
Comments
No comments yet. Why don't you start the discussion?