
Every modern home is filled with electronics—laptops, phones, gaming consoles, routers, smart speakers, and more. And with each device comes a tangle of cords and cables that quickly turn into an eyesore and a safety hazard. Most people buy expensive cable organizers or promise themselves they’ll “fix it later,” only to end up tripping over a power strip again six months down the line.
The truth is, you don’t need fancy products or hundreds of dollars to solve this problem. With just a few common household items and some simple techniques, you can create a permanent, low-cost cord management system that keeps everything neat, labeled, and accessible. The key isn’t buying more—it’s rethinking what you already have.
Why Permanent Cord Organization Matters
Cable clutter isn’t just ugly—it’s inefficient and potentially dangerous. Tangled wires make it hard to identify which cord powers which device, slow down troubleshooting, and increase wear and tear. Over time, frayed insulation or bent connectors lead to malfunctions or even fire risks. A well-organized setup saves time, reduces frustration, and protects your gear.
More importantly, temporary fixes rarely last. Wrapping cords with twist ties or stuffing them behind furniture only delays the inevitable mess. True organization means creating systems that endure daily use without constant maintenance. That’s where household hacks come in—they’re affordable, repeatable, and surprisingly durable when applied correctly.
“Most cable chaos stems from reactive fixes instead of proactive design. Once you treat cord management as part of your home infrastructure, not a chore, the solutions become obvious.” — David Lin, Home Systems Technician & DIY Tech Blogger
Household Items That Double as Cable Organizers
You likely already own several tools capable of transforming cable chaos into order. These aren’t gimmicks—they’re practical, tested solutions used by electricians, renters, and minimalist homeowners alike.
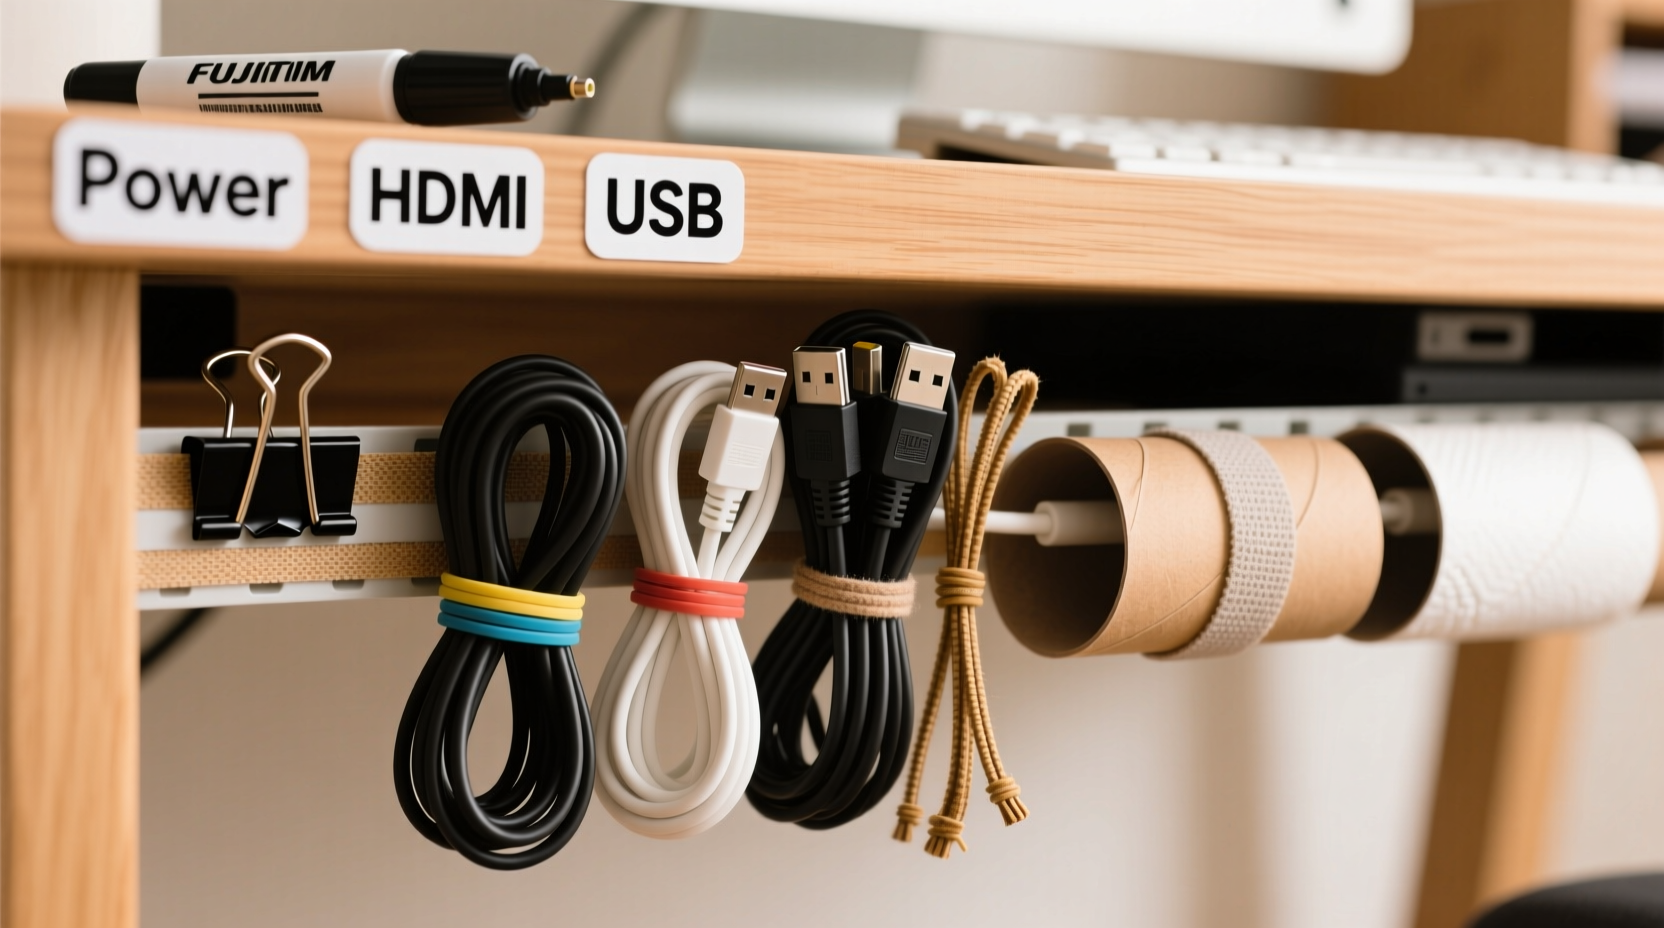
1. Toilet Paper and Paper Towel Tubes
Empty cardboard tubes are perfect for bundling small cords like phone chargers, earbuds, or USB cables. Cut slits on one end, thread the cords through, and wrap them neatly inside. Label the outside with the device name or color-code with markers.
2. Binder Clips
Standard office binder clips do more than hold papers. Clip them to the edge of a desk or entertainment center and loop cords through the metal arms to keep them separated and off the floor. Larger clips work especially well for thick power strips or HDMI bundles.
3. Socks (Yes, Socks)
Old or mismatched socks make excellent cable sleeves. Insert one end of a coiled cord into the toe, pull the rest through, and knot the top. This prevents unraveling and protects delicate wires. Use different colored socks to categorize by room or function—blue for bedroom, red for office, etc.
4. Forks and Spoons (Metal Utensils)
This may sound strange, but clean forks taped under desks or shelves act as wire guides. Place the tines between cords to keep them spaced and prevent tangling. Spoons can cradle thicker cables along baseboards using double-sided tape.
5. Bread Bag Clips
Those little plastic tags that seal bread bags? They’re ideal for labeling cords. Write the device name (“Printer,” “Monitor”) directly on the clip with a marker and attach it near the plug end. No more guessing which black cable goes where.
Step-by-Step Guide to Permanent Cord Management
A lasting solution requires planning, not just patching. Follow this five-step process to eliminate cable clutter for good.
- Unplug and Inventory Everything
Remove all devices from outlets and wall ports. Lay them out on the floor. Group by location (e.g., home office, living room) and function (power, data, audio/video). - Declutter Ruthlessly
Test each cable. If it’s frayed, doesn’t connect to anything, or hasn’t been used in a year, discard it. Recycle old electronics responsibly. You’ll be surprised how many “just in case” cords you’ve kept. - Measure and Shorten Where Possible
Excess length causes tangles. Use velcro strips (or shoelaces) to coil extra slack tightly. For long-term neatness, consider cutting and resealing certain extension cords—but only if you’re comfortable with basic electrical safety. - Create Fixed Pathways
Use masking tape or painter’s tape to mark routes along baseboards, under desks, or behind furniture. Then secure cords to these paths using repurposed clips, rubber bands, or adhesive hooks made from folded cardboard. - Install Your Household Hacks
Paper towel tubes for storage, binder clips for separation, socks for bundling, bread clips for labeling—apply your chosen methods systematically. Make sure every cable has a designated place.
Smart Storage Solutions Using Everyday Objects
Organization doesn’t stop at tidying visible cords. What about the ones behind your TV stand or under your desk? These areas need concealed but accessible systems.
- Shoeboxes as Hidden Cable Bins: Cut holes in opposite sides, feed tangled cords through, and store the box behind furniture. Label each hole by device type.
- Muffin Tins for Small Connectors: Mount a metal muffin tin under a desk. Each cup holds a different adapter, USB hub, or charging brick. The raised edges keep items from sliding.
- Picture Frames with Mesh Backing: Remove the glass, attach wire mesh or chicken wire to the back, and hang behind a workstation. Hook small cords onto the grid for easy reach.
- Old CD Cases for Flat Cables: Ideal for HDMI, Ethernet, or flat USB-C cables. Slide them in like discs, label the spine, and stack vertically like books.
Mini Case Study: The Apartment Gamer’s Setup
Mark, a freelance designer and avid gamer living in a 600-square-foot apartment, struggled with a jungle of cables behind his dual-monitor desk setup. His PlayStation, PC, monitor, router, lamp, and speaker all shared one overloaded power strip. Every time he unplugged something, the whole bundle shifted, causing connection issues.
Over a weekend, he implemented household hacks:
- Used a large toilet paper tube to wrap and store his secondary monitor cable when not in use.
- Mounted a muffin tin under his desk to hold extra controllers, dongles, and adapters.
- Labeled every cord with bread bag clips—color-coded red for gaming, blue for work.
- Ran excess lengths through a shoebox tucked beside his desk leg, preventing floor clutter.
Two years later, his system remains intact. He reports faster troubleshooting, no lost accessories, and guests who compliment his “clean tech vibe”—all for less than $5 in supplies (mostly just reused household waste).
Do’s and Don’ts of DIY Cord Management
| Do | Don't |
|---|---|
| Use soft ties like fabric strips or old shoelaces to bind cords gently. | Use duct tape directly on cables—it leaves residue and damages insulation. |
| Label both ends of long cables so identification works from either side. | Bundle power and data cables tightly together—this can cause interference. |
| Leave slight slack at connection points to avoid strain on plugs. | Force cords behind furniture without checking for pinching or heat buildup. |
| Reassess your system every 6 months as devices change. | Ignore ventilation—never cover vents or trap heat around power bricks. |
Checklist: Build Your Permanent Cord System in One Afternoon
Follow this actionable checklist to complete your project efficiently:
- ☐ Unplug all non-essential electronics
- ☐ Gather household supplies: socks, tubes, clips, labels, scissors
- ☐ Sort cables into categories (charging, video, audio, network)
- ☐ Test and discard damaged or unused cords
- ☐ Coil each cable neatly using the over-under method (alternating loops to prevent kinks)
- ☐ Secure coils with fabric ties or rubber bands
- ☐ Label each cord clearly near the plug end
- ☐ Route cords along walls or under desks using tape or clips
- ☐ Store excess in designated containers (shoeboxes, tubes, bins)
- ☐ Plug everything back in and verify functionality
- ☐ Take a photo of the final setup for future reference
Frequently Asked Questions
Can I use hot glue to secure cables permanently?
Not recommended. While hot glue may seem like a strong fix, it becomes brittle over time and can damage cable jackets when removed. It also traps heat. Instead, use removable adhesives or mechanical fasteners like clips and ties.
How do I manage cords in a rental without damaging walls?
Use putty, removable adhesive hooks, or tape-based solutions. Avoid nails or drilling. Run cords along baseboards using thin masking tape (painter’s tape won’t peel paint). You can also use door gaps—thread cords through the small space between the door and frame to move them from room to room discreetly.
What’s the best way to label cords so labels don’t fade?
Write on bread clips or plastic tags with a permanent marker. For longer durability, print small labels on sticky address labels and cover them with clear packing tape. Alternatively, use colored heat-shrink tubing on the plug end for a professional look.
Conclusion: Turn Clutter Into Control
Organizing cords doesn’t require money or expertise—just intention and creativity. By leveraging everyday items you already own, you can build a system that lasts years, not weeks. The goal isn’t perfection; it’s sustainability. A single afternoon of focused effort pays off every time you charge your phone without untangling a knot or plug in a device without crawling behind the couch.
Start small. Pick one area—your nightstand, your home office, your entertainment center—and apply these hacks today. Once you experience the peace of a clean, functional space, you’ll wonder why you waited so long.


 浙公网安备
33010002000092号
浙公网安备
33010002000092号 浙B2-20120091-4
Comments
No comments yet. Why don't you start the discussion?