
In homes filled with smartphones, laptops, gaming consoles, and smart devices, tangled cords are more than an eyesore—they’re a daily frustration. The impulse is often to buy plastic cable boxes, Velcro straps, or branded cord wraps. But what if you could declutter your tech mess using only what’s already in your home? You don’t need to spend money on organizers to regain control. With clever repurposing, simple techniques, and a bit of patience, you can transform a chaotic tangle into a streamlined system—no purchases required.
Assess Your Cable Chaos
The first step toward organization is understanding the scope of the problem. Begin by identifying every cord in your space: phone chargers, laptop adapters, HDMI cables, power strips, USB hubs, extension cords, and more. Group them by function—charging, audio, video, networking—to see patterns in usage and redundancy.
Many people keep cables they no longer use, either because the device is gone or a newer version replaced it. Go through each one and ask: Does this serve a current purpose? Is it damaged? Could two similar cables be consolidated?
Once sorted, divide cables into three piles:
- Keep: Functional, frequently used, or essential backup cables.
- Donate/Sell: Working cables for older devices others might still use.
- Recycle: Frayed, broken, or outdated cords (check local e-waste programs).
This process alone reduces clutter and sets the foundation for a manageable system.
Repurpose Everyday Household Items
You likely already own objects that double as excellent cable organizers. The key is reimagining their function.
Cardboard Toilet Paper and Paper Towel Rolls
These are ideal for wrapping small cords like earbuds, phone chargers, or camera cables. Cut a slit along the side, feed the plug through, then wrap the cord around the tube. Secure the end with a rubber band or a piece of tape. Stack them upright in a drawer for easy access.
Old Mugs or Cups
Place a mug behind your desk or entertainment center. Drop coiled cords inside so only the plugs are visible. This keeps them off the floor, prevents tangling, and adds a quirky touch. Ceramic mugs also weigh enough to stay put when tugged.
Clothespins and Binder Clips
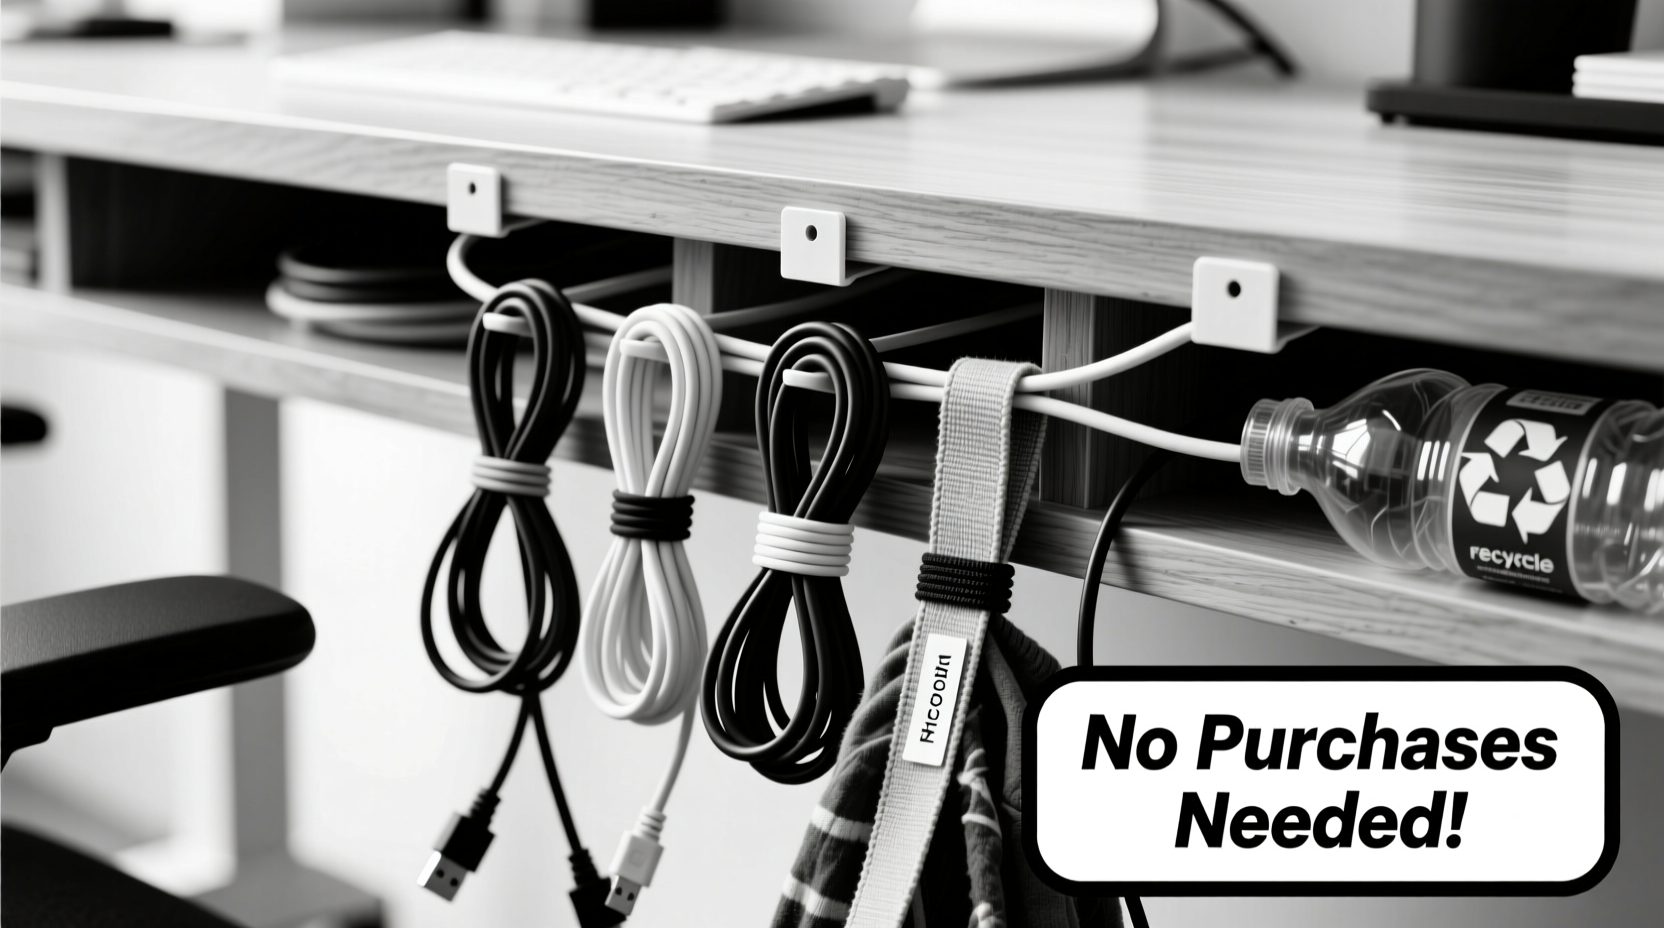
Clip binder clips to the edge of your desk and loop excess cords over the metal arms. For hanging cords vertically—like those from a wall-mounted monitor—use clothespins to secure them to the back of furniture. A simple wooden clothespin can hold multiple cords neatly together.
Bread Tags
Those tiny plastic tags that seal bread bags make surprisingly effective cable ties. Slide one onto a coiled cord, thread the plug through the opening, and snap it shut. Write labels directly on the tag with a fine-tip marker.
| Household Item | Best For | Tips |
|---|---|---|
| Toilet paper rolls | Small charging cables | Label the roll with device name |
| Mug or cup | Desk or shelf storage | Use decorative mugs for aesthetics |
| Binder clips | Managing slack under desks | Open clip to hang, close to lock cord |
| Bread tags | Quick labeling and bundling | Write with permanent marker |
| Paper towel tubes | HDMI, Ethernet, extension cords | Cut to size; store vertically |
Master the Art of Coiling and Wrapping
How you coil a cable determines whether it stays neat or becomes a knot in seconds. Avoid the “wrap it any which way” method—it causes internal wire stress and tangles.
The Over-Under Method
This professional technique prevents twist buildup. Hold the cable in one hand. Bring a loop over with your right hand, then under with the next. Alternate consistently down the length. Finish with a rubber band, hair tie, or bread tag.
“Twisting cables during storage leads to breakage at the connector. The over-under method preserves flexibility and longevity.” — David Lin, Electronics Technician
The Figure-Eight Wrap
Ideal for longer cords like extension cables. Hold the cable between thumb and forefinger, form a figure-eight by crossing the loop over itself, and continue until complete. Tie the ends together with a soft cloth strip. This minimizes kinks and makes unrolling smooth.
Build a No-Cost Cable Station
Create a dedicated zone for all your charging and connection needs. This doesn’t require a fancy setup—just strategic placement and reuse.
Use a Shoebox as a Charging Hub
Take a standard shoebox and cut a few notches in the sides. Feed each charger cord through its own notch, then coil the rest inside. Place your devices on top to charge. The box hides clutter, protects cords from pets, and acts as a passive organizer.
Leverage Furniture Features
Wrap cords around bed frame legs, table supports, or chair rungs. Use old shoelaces or fabric strips to loosely tie bundles in place. Under-bed storage bins can house power strips and grouped cables, with only the necessary plugs pulled out for use.
Drawer Integration
If you have a spare drawer, turn it into a cable command center. Line up toilet paper rolls standing up, each holding a labeled cord. Add a small container for loose adapters. This keeps everything accessible but invisible.
Wall and Door Management
Hang a tension rod inside a closet door. Drape coiled cords over it like scarves. Alternatively, use push pins to create anchor points behind furniture—loop cords around them to prevent dragging. For wall-mounted TVs, run cables behind the unit and use folded masking tape as a temporary clamp to bundle them.
Step-by-Step: Organize Your Workspace in 60 Minutes
Follow this timeline to clear cable chaos from your desk or entertainment area.
- 0–10 min: Unplug everything. Lay cords out on the floor or table.
- 10–20 min: Sort into keep/donate/recycle. Label each with tape.
- 20–35 min: Coil each kept cable using the over-under method. Secure with rubber bands or bread tags.
- 35–45 min: Assign storage: toilet paper rolls for small cables, mug for desk cords, shoebox for charging hub.
- 45–55 min: Route cords neatly. Use binder clips under desk, pins behind furniture, or tension rods in closets.
- 55–60 min: Plug back in only what you use daily. Store backups in labeled containers.
This method ensures you’re not just hiding clutter but building a sustainable system.
Mini Case Study: From Tangled Desk to Streamlined Setup
Mark, a freelance designer working from his apartment, had a desk buried under seven cords: two laptop chargers, a monitor cable, USB hub, phone charger, headphones, and a lamp. He avoided sitting down because untangling the mess took five minutes every morning.
Using only supplies he had—a cardboard box, binder clips, rubber bands, and bread tags—he spent one Saturday afternoon organizing. He labeled each cord, coiled them properly, and clipped the binder clips to the desk edge to suspend slack. He stored backup cables in a decorated shoebox under the desk.
Result: His workspace looked cleaner, boot-up time dropped to under a minute, and he reported feeling more focused. Total cost: $0.
Common Mistakes to Avoid
Even with good intentions, poor habits can undo your progress.
- Skipping labeling: Without labels, you’ll forget which cord is which, especially when unplugging.
- Over-tightening ties: Hair ties or rubber bands pulled too tight can crush insulation over time.
- Ignoring airflow: Bundling too many power adapters together traps heat and creates fire hazards.
- Forgetting future access: Don’t wrap cords so tightly they’re hard to unwind quickly.
- Clustering unrelated cables: Mixing audio, charging, and data cables makes troubleshooting harder.
Frequently Asked Questions
Can I use duct tape to bundle cords?
Duct tape works in a pinch, but it leaves sticky residue and degrades over time. Better alternatives include fabric strips, rubber bands, or reusable zip ties made from old luggage straps.
How do I keep pet-chewers away from cords?
Reroute cords along walls or behind furniture where pets can’t reach. Use empty toilet paper rolls as protective sleeves—pets are less likely to chew through layered cardboard. Bitter apple spray on cords can also deter chewing.
What’s the best way to store long extension cords?
Use the figure-eight method instead of wrapping around your elbow. Store them in a large paper towel tube or hang them on a coat hook in a closet. Avoid leaving them coiled while in use, as this can cause overheating.
Final Checklist: Cord Organization Without Spending a Dime
- Unplug and gather all cables in one area.
- Sort into keep, donate, recycle.
- Label each cable near the plug.
- Coil using the over-under or figure-eight method.
- Store in repurposed items: mugs, boxes, toilet paper rolls.
- Secure with bread tags, clips, or rubber bands.
- Route neatly using furniture features or pins.
- Create a central station for charging or media cords.
- Review monthly to remove unused cables.
Conclusion: Take Control One Cord at a Time
Organizing cords isn’t about perfection—it’s about progress. You don’t need specialized tools or expensive kits to make a meaningful difference. Every bread tag used, every mug repurposed, every cable coiled with care brings you closer to a calmer, more functional space.
Start small. Pick one area—the desk, the entertainment center, the nightstand—and apply these methods today. Share your before-and-after story with a friend or leave a comment below. Someone else struggling with cable chaos might find hope in what you’ve accomplished—with nothing but what was already in your home.


 浙公网安备
33010002000092号
浙公网安备
33010002000092号 浙B2-20120091-4
Comments
No comments yet. Why don't you start the discussion?