
A clean, organized workspace does more than look professional—it improves focus, reduces stress, and saves time. Yet one of the most common sources of clutter is often hidden: the jungle of cords behind your desk. Chargers, power strips, monitors, laptops, lamps, and peripherals all contribute to a tangled mess that’s not only unsightly but potentially hazardous. The good news? You don’t need expensive cable management kits or complex tools to fix it. With a few household items and some smart DIY techniques, you can tame the chaos efficiently and affordably.
From repurposed office supplies to creative uses of everyday materials, this guide walks through practical, budget-friendly strategies that deliver lasting results. Whether you’re working from home, managing a small office, or just tired of unplugging the wrong cord, these solutions will bring order to your setup—without breaking the bank.
Why Cable Clutter Matters More Than You Think
Disorganized cords aren’t just an aesthetic issue. Tangled cables increase the risk of tripping hazards, especially in high-traffic areas. They also make troubleshooting difficult—when something stops working, tracing the right wire becomes a frustrating game of “which end goes where?” Over time, constant bending, pulling, and knotting can damage insulation, leading to frayed wires or even electrical shorts.
Additionally, messy cords reduce airflow around electronics, contributing to overheating. Devices like routers, modems, and power strips generate heat; when surrounded by coiled cables, they can't dissipate it effectively. This shortens their lifespan and increases energy consumption.
“Cable management isn’t about perfection—it’s about safety, efficiency, and reducing daily friction.” — Jordan Lee, Electrical Safety Consultant
By organizing cords now, you’re investing in both functionality and longevity. And the best part? Most effective solutions cost less than $5—or nothing at all.
Essential Tools and Materials You Already Own
You likely have everything you need already. Before buying anything, take inventory of these common household and office items:
- Old twist ties or zip ties (from produce bags or packaging)
- Cardboard tubes (toilet paper or paper towel rolls)
- Velcro strips (from old electronics or headphones)
- Clothespins or binder clips
- Rubber bands
- Paper clips (large or jumbo size work best)
- Scissors or wire cutters
- Duct tape or masking tape
These materials are not only inexpensive but reusable and environmentally friendly. Instead of adding plastic cable sleeves to landfills, repurpose what you already have. For example, a bundle of old zip ties can last years if reused properly across different setups.
Step-by-Step Guide: Clean, Sort, and Secure Your Cords
Follow this timeline to transform your cord chaos into a streamlined system in under an hour.
- Unplug everything. Start with a blank slate. Unplug all devices from the wall and power strip. Lay them out on your desk so you can see each cord clearly.
- Identify each cord. Use small pieces of tape to label each one as you unplug it. Note its purpose and destination (e.g., “Left speaker,” “HP Printer”).
- Check for damage. Inspect every cord for fraying, exposed wires, or bent connectors. Discard any damaged cables immediately—they’re fire hazards.
- Group by function. Bundle cords that belong together: computer peripherals, entertainment devices, charging stations. This makes routing easier later.
- Measure and trim excess length. Don’t coil extra cable tightly—instead, use gentle loops. If a cord is excessively long, consider wrapping it around a cardboard tube or using a figure-eight method to prevent kinks.
- Reconnect thoughtfully. Plug devices back in, but route cords along the same path. Avoid sharp bends near plugs.
- Secure bundles. Use chosen DIY methods (see below) to fasten grouped cords together and attach them to the desk or wall.
This process may seem tedious at first, but once completed, maintenance becomes minimal. A quick monthly check ensures nothing shifts out of place.
Cheap and Clever DIY Solutions That Actually Work
Here are seven proven, low-cost hacks that professionals and organizers swear by. Each requires minimal effort and delivers maximum impact.
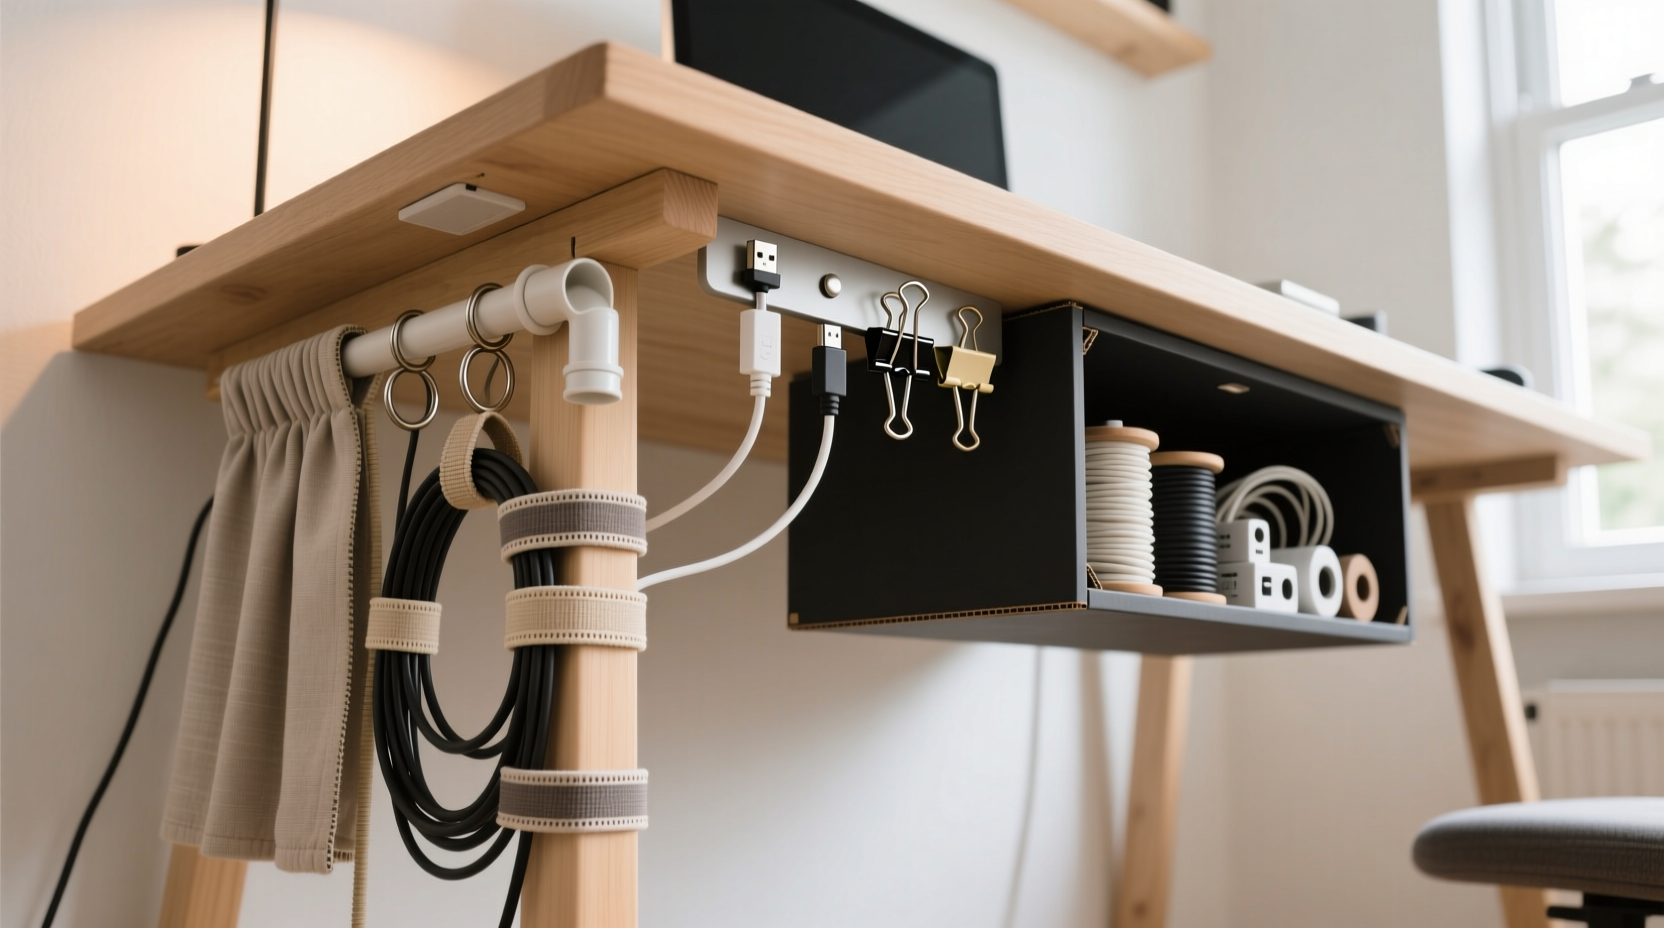
1. Binder Clip Cable Holders
Clip large metal binder clips to the edge of your desk. Thread cords through the metal arms to keep them separated and off the floor. Perfect for holding headphone cables, monitor power cords, or USB hubs.
2. Toilet Paper Roll Cord Organizer
Cut slits along one end of a cardboard tube and feed individual cords through. Place the roll against the wall or under the desk to contain multiple lines neatly. Paint or wrap it for a polished look.
3. Velcro Strip Bundles
Cut old Velcro straps into 4-inch pieces. Wrap them around grouped cords every 6–8 inches. Unlike zip ties, Velcro is adjustable and reusable. Ideal for frequently changed setups.
4. Clothespin Wall Mounts
Attach wooden clothespins to the back of your desk with strong tape or small nails. Clip cords into them vertically to prevent tangling. Works especially well for charging cables.
5. Paper Clip Cord Separators
Unbend a jumbo paper clip into a straight wire, then twist the ends to create two small hooks. Slide it between two cords to keep them apart. Reuse across different clusters.
6. Duct Tape Cable Labels
Cut small strips of duct tape, write on them with a permanent marker, and stick them directly onto cords. The sticky backing adheres well and resists wear. Choose colored tape for visual coding (blue for monitors, red for power, etc.).
7. Shoebox Cable Station
Repurpose a shoebox as an under-desk storage bin. Cut holes in the sides for cords to pass through. Store adapters, extra cables, or dongles inside. Keeps everything accessible yet hidden.
Do’s and Don’ts of DIY Cable Management
| Do | Don’t |
|---|---|
| Use soft ties like fabric strips or Velcro to avoid damaging insulation. | Use tight rubber bands that degrade and snap over time. |
| Leave slack in cords to prevent strain on connectors. | Stretch cords taut between devices and outlets. |
| Label every cord before securing it. | Assume you’ll remember which cord goes where. |
| Route high-heat devices (like power strips) away from bundled cables. | Bury hot-running equipment under dense cord clusters. |
| Anchor cords to the desk or wall to reduce movement. | Let cords dangle freely where they can be pulled accidentally. |
Real Example: Transforming a Home Office in 45 Minutes
Sarah, a freelance graphic designer in Portland, had a chronic cable problem. Her dual-monitor setup, drawing tablet, laptop dock, lamp, and phone charger created a spaghetti-like tangle behind her IKEA desk. Every time she moved her chair, she risked unplugging her monitor.
She spent one Saturday morning following the step-by-step guide above. She used binder clips from her junk drawer, labeled cords with masking tape, and bundled them with old zip ties. She mounted two clothespins under the desk to hold her frequently used charging cables. Finally, she slid a toilet paper roll over her thickest bundle to give it structure.
The entire project cost $0 and took 42 minutes. Since then, Sarah reports fewer tech interruptions, faster cleanup, and even compliments from clients during video calls. “I didn’t realize how much mental clutter those cords were causing,” she said. “Now my whole workflow feels smoother.”
FAQ: Common Questions About DIY Cord Organization
Can I use Scotch tape to secure cords?
No—Scotch tape loses adhesion quickly and leaves residue. Use painter’s tape for temporary holds or duct tape for stronger anchoring. Even better: opt for mechanical fasteners like clips or ties.
How do I manage cords if I rent my space?
Renters should avoid nails or permanent adhesives. Instead, use removable options like adhesive-backed Velcro, over-the-desk hooks, or tension rods behind the desk to run cords along without damaging walls.
What’s the safest way to shorten long cords?
Never cut a cord unless you’re replacing the plug with proper electrical hardware. Instead, loosely coil excess length and secure it with a twist tie or cord wrap. Avoid tight loops that can cause electromagnetic interference or overheating.
Final Checklist: DIY Cord Organization in Five Steps
- ✅ Unplug and label every cord.
- ✅ Discard damaged or obsolete cables.
- ✅ Group cords by device or function.
- ✅ Choose 2–3 DIY methods (e.g., binder clips + Velcro).
- ✅ Secure bundles and test accessibility.
Repeat this checklist every six months or after adding new devices. Consistency prevents buildup.
Take Control of Your Workspace Today
Organizing cords behind your desk doesn’t require special skills or expensive gear. It requires attention, a little time, and the willingness to reuse what you already own. The benefits go beyond appearance—clean cable management enhances safety, simplifies troubleshooting, and supports a focused, productive environment.
Start small. Pick one solution from this guide and implement it tonight. In less than 30 minutes, you can reclaim control over your workspace. Once you see the difference, you might wonder why you waited so long.


 浙公网安备
33010002000092号
浙公网安备
33010002000092号 浙B2-20120091-4
Comments
No comments yet. Why don't you start the discussion?