
Behind every sleek, organized workspace lies a battlefield of tangled cords. Chargers, power strips, monitor cables, USB hubs, Ethernet lines—the list grows longer with each new device. While the market is flooded with cord management systems, most are overpriced, unnecessary, or simply impractical for temporary setups. The good news? You don’t need to spend a dime on plastic clips, Velcro sleeves, or cable boxes to regain control.
With a few clever techniques and common household items, you can tame the chaos behind your desk using what you already own. This guide walks through practical, no-cost strategies that deliver real results—backed by ergonomic principles, electrician insights, and tested methods from real home offices.
Assess Your Cord Situation First
Before grabbing any tools or supplies, take inventory. Pull your desk away from the wall and examine the mess. Identify which cords are essential, which can be removed, and which are duplicates or obsolete.
Ask yourself:
- Which devices absolutely need to stay plugged in?
- Are there chargers for gadgets no longer in use?
- Can multiple devices share one power strip instead of separate outlets?
- Is wireless charging an option for phones or headphones?
Eliminating excess cords is the first step toward organization. Every cable removed reduces clutter and makes the remaining ones easier to manage.
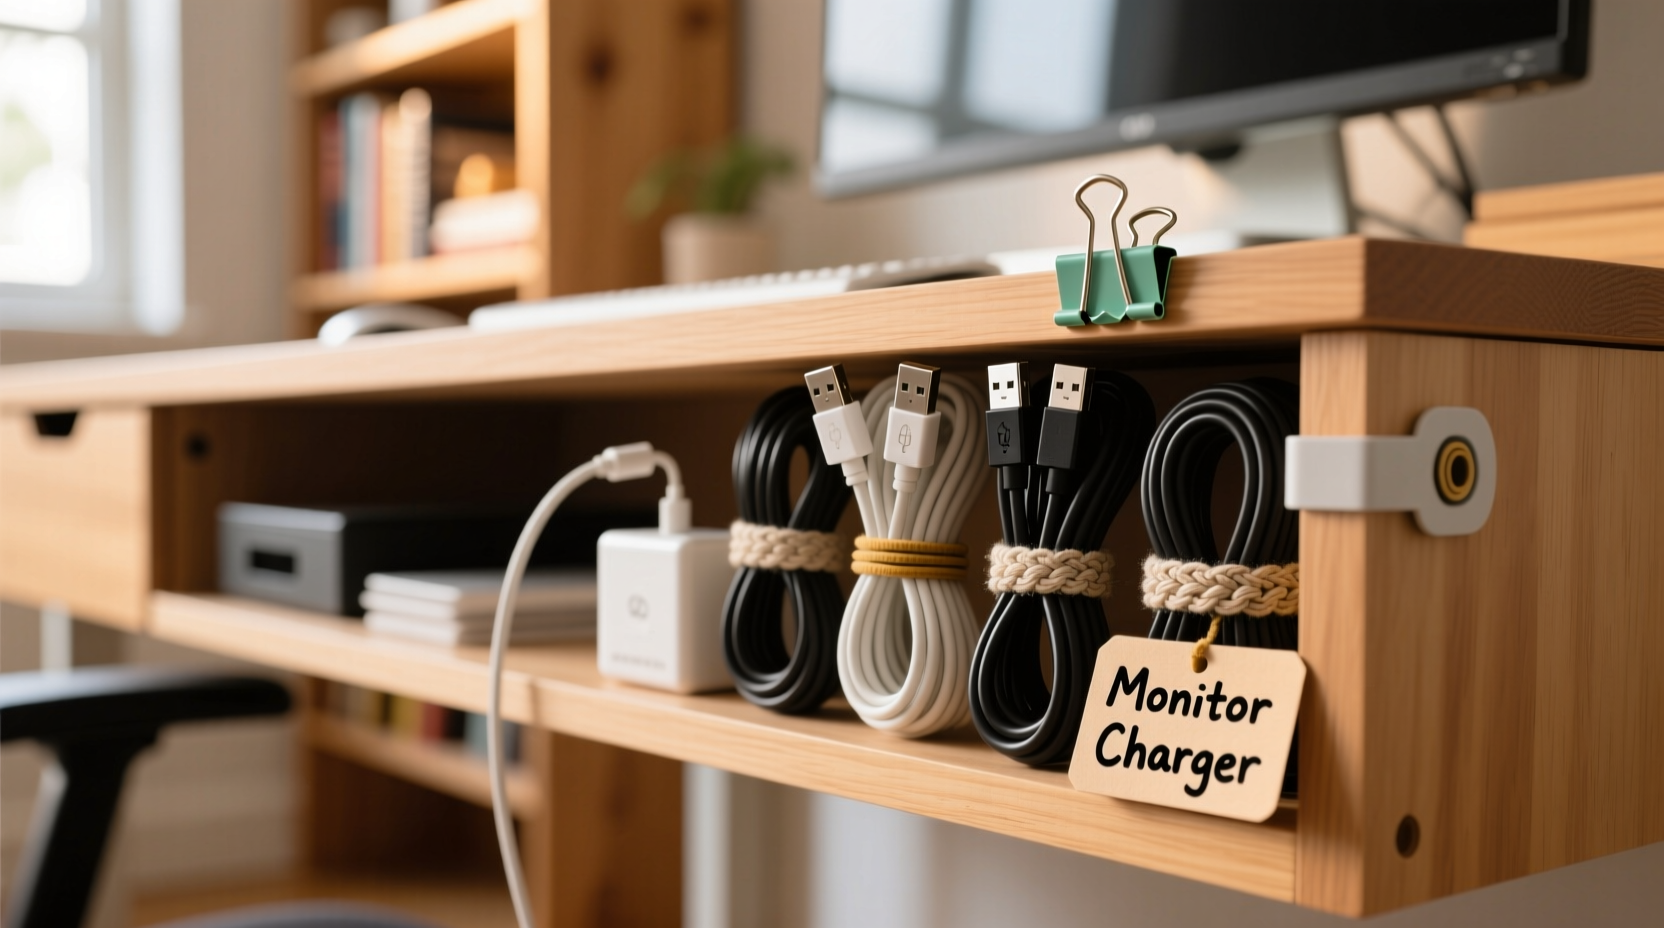
Use Binder Clips to Route Cords Neatly
Binder clips are one of the most underrated office supplies when it comes to cord management. Their spring-loaded metal arms grip desk edges tightly and can hold multiple cords in place.
Here’s how to use them effectively:
- Select medium or large binder clips (the bigger the clip, the more cords it can manage).
- Clip them to the back edge of your desk where cords hang down.
- Thread each cord through the metal loops so they’re secured and aligned.
- Group similar cords together—power cables on one side, data cables on the other.
This method keeps cords off the floor, prevents them from swinging or tangling, and makes unplugging safer and faster. It also elevates cords slightly above carpet or rugs, reducing dust buildup and tripping hazards.
A variation involves flipping the clip upside-down and threading cords through the outer loop only, allowing vertical alignment while keeping the clip anchored.
Repurpose Old Cardboard into Custom Cord Channels
If you’ve ever ordered something online, you likely have spare cardboard lying around. Instead of tossing it, turn it into a DIY cord channel or backing panel.
Follow this simple process:
- Cut a rectangular piece of cardboard slightly taller than your power strip and wide enough to span its length.
- Fold it vertically to create a U-shaped channel.
- Slide the folded cardboard behind the power strip and against the wall.
- Feed each cord into the channel so they run straight down in an organized bundle.
The cardboard acts as a barrier that hides and guides cords, preventing them from splaying out in different directions. For added durability, wrap the outside in packing tape.
This solution is especially useful for desks flush against walls, where cords tend to get pinched or bent at awkward angles.
Create Reusable Ties with Fabric Strips or Shoelaces
Velcro ties and zip ties are convenient, but fabric offers a gentler, reusable alternative. Old t-shirts, socks, or shoelaces make excellent cord bundlers.
To prepare fabric ties:
- Cut strips from an old cotton shirt (about 1 inch wide and 12 inches long).
- Knot them into loops or use them as twist ties.
- Wrap them around grouped cords near the plug end or mid-length to prevent fraying.
Shoelaces work well for heavier bundles. Simply double-knot them around a group of cords and leave enough slack to untie easily when needed.
Unlike plastic zip ties, fabric won’t damage delicate insulation or leave residue. They’re also washable and reusable across projects.
“Cables fail most often at stress points—like sharp bends or tight bindings. Soft ties reduce wear and extend cable life.” — Rafael Nguyen, Residential Electrician & Home Automation Specialist
Mount a Clipboard as a Mini Cable Hub
A clipboard isn’t just for holding papers—it’s a hidden hero for cord control. Its metal clip and rigid back provide structure for organizing short runs of cords.
Here’s how to repurpose one:
- Remove any paper from the clipboard.
- Position it vertically behind your desk, either clipped to the edge or held in place with removable adhesive hooks.
- Wrap excess cord lengths around the flat back.
- Use the metal clip to secure the main line or anchor a power strip.
This works particularly well for monitors, lamps, or docking stations with coiled cords. By wrapping extra length neatly around the board, you eliminate dangling loops and reduce tripping risks.
For a permanent setup, attach the clipboard to the wall or desk underside with strong double-sided tape or museum putty—both removable and residue-free.
Step-by-Step: Organize Your Desk Cords in Under 30 Minutes
Ready to transform your workspace? Follow this timeline using only household items:
| Time | Action |
|---|---|
| 0–5 min | Unplug everything and lay cords out on the floor. Group by device type. |
| 5–10 min | Discard broken cables, duplicates, or outdated adapters. Keep only essentials. |
| 10–15 min | Label each cord with tape. Attach to corresponding device. |
| 15–20 min | Bundle cords using fabric strips or rubber bands. Keep like functions together. |
| 20–25 min | Secure bundles to desk edge with binder clips or cardboard channels. |
| 25–30 min | Plug everything back in, test connections, and adjust routing as needed. |
By following this sequence, you’ll go from chaotic spaghetti to a streamlined, labeled, and accessible system—all without purchasing a single product.
Real Example: Sarah’s Home Office Transformation
Sarah, a freelance graphic designer, worked from a corner desk in her living room. Her setup included a laptop, external monitor, drawing tablet, speaker system, phone charger, and Wi-Fi router—all powered and connected behind a narrow console table.
She avoided moving the desk because unplugging the “cord monster” felt overwhelming. After reading about low-cost solutions, she spent one Saturday afternoon reorganizing using only supplies from her closet: two binder clips, an old shoebox, and cut-up t-shirt strips.
She used the shoebox as a vertical sleeve behind the monitor, feeding all cords through it. Binder clips held USB and power lines flush against the desk edge. Fabric ties grouped audio and data cables separately.
The result? She regained confidence to clean behind the desk weekly, reduced accidental unplugs by 90%, and even received compliments during video calls when her monitor panned back slightly.
“I thought I needed to buy those $30 cable sleeves,” she said. “But cardboard and old clothes did the job better—and I can replace them anytime.”
Do’s and Don’ts of Cord Management Without Tools
To avoid common pitfalls, follow this quick-reference table:
| Do | Don't |
|---|---|
| Use soft materials like fabric or foam to bind cords | Use metal wire or twist ties that can cut into insulation |
| Leave slack near device ends to prevent strain | Stretch cords too tightly between desk and outlet |
| Group cords by function (e.g., all power vs. data) | Mix high-voltage and signal cables in one tight bundle |
| Anchor cords along edges using clips or tape | Let cords dangle freely where they can be stepped on |
| Check connections monthly for heat or fraying | Ignore warm plugs or discolored outlets |
Following these guidelines ensures both safety and longevity. Even without commercial products, smart habits prevent fire hazards and equipment damage.
FAQ
Can I use duct tape to hold cords together?
Duct tape can work temporarily, but it tends to dry out, leave sticky residue, and degrade over time. For long-term solutions, fabric ties, rubber bands, or reusable clips are better choices. If you must use tape, apply small pieces only at connection points and avoid wrapping entire lengths.
How do I hide cords without drilling holes?
You don’t need to drill. Use adhesive-backed hooks, museum putty, or tension rods behind the desk to route cords along baseboards or furniture backs. Flat cords can be tucked under rug edges (if safe), and cardboard channels can disguise bundles against the wall. Always ensure airflow and avoid covering hot devices.
What should I do if my cords are too short?
Never stretch cords to reach an outlet—that creates strain and increases fire risk. Instead, relocate your desk closer to the outlet or use a UL-listed extension cord rated for your devices’ wattage. Hide the extension cord using the same methods described here: route it along baseboards, secure it with clips, and bundle it neatly.
Final Checklist: No-Cost Cord Organization
Before calling the job done, run through this final checklist:
- ✅ Removed all unused or damaged cords
- ✅ Labeled each cord for easy identification
- ✅ Grouped similar cords (power, data, audio) together
- ✅ Secured bundles with fabric, rubber bands, or clips
- ✅ Anchored cords to desk or wall to prevent sagging
- ✅ Ensured no cords are pinched, stretched, or overheating
- ✅ Tested all devices after reconnection
This checklist ensures your setup is not only tidy but also functional and safe.
Take Control of Your Workspace Today
Organizing cords behind your desk doesn’t require a specialty store visit or a big budget. With a little creativity and everyday items, you can achieve a clean, professional look that enhances both productivity and peace of mind.
The key is consistency—tackle the mess before it grows, maintain your system weekly, and adapt as your tech needs evolve. What starts as a five-minute fix with a binder clip can become a lasting habit of intentional design.


 浙公网安备
33010002000092号
浙公网安备
33010002000092号 浙B2-20120091-4
Comments
No comments yet. Why don't you start the discussion?