
A desk drawer full of tangled cords is more than just an eyesore—it’s a daily frustration. Fishing through a knot of USB cables, chargers, and adapters wastes time, damages equipment, and undermines the efficiency your workspace should support. The good news? With the right strategy, you can transform that chaotic jumble into a neatly arranged, accessible system. This guide provides actionable steps, real-world insights, and expert-tested techniques to keep every cord in its place—tangle-free and ready when you need it.
Assess Your Cord Collection
The first step toward organization is awareness. Begin by emptying your desk drawer completely. Lay out every cord, adapter, and cable on a flat surface. Sort them into categories: phone chargers, laptop power supplies, USB hubs, audio cables, HDMI, Ethernet, and any specialty cords like camera or printer cables.
As you sort, ask yourself three critical questions:
- Do I use this regularly?
- Is it still functional?
- Do I have duplicates?
This evaluation helps eliminate clutter. Discard frayed, damaged, or obsolete cords—especially old proprietary chargers you no longer use. Recycle responsibly through e-waste programs. Keep only what serves a current purpose.
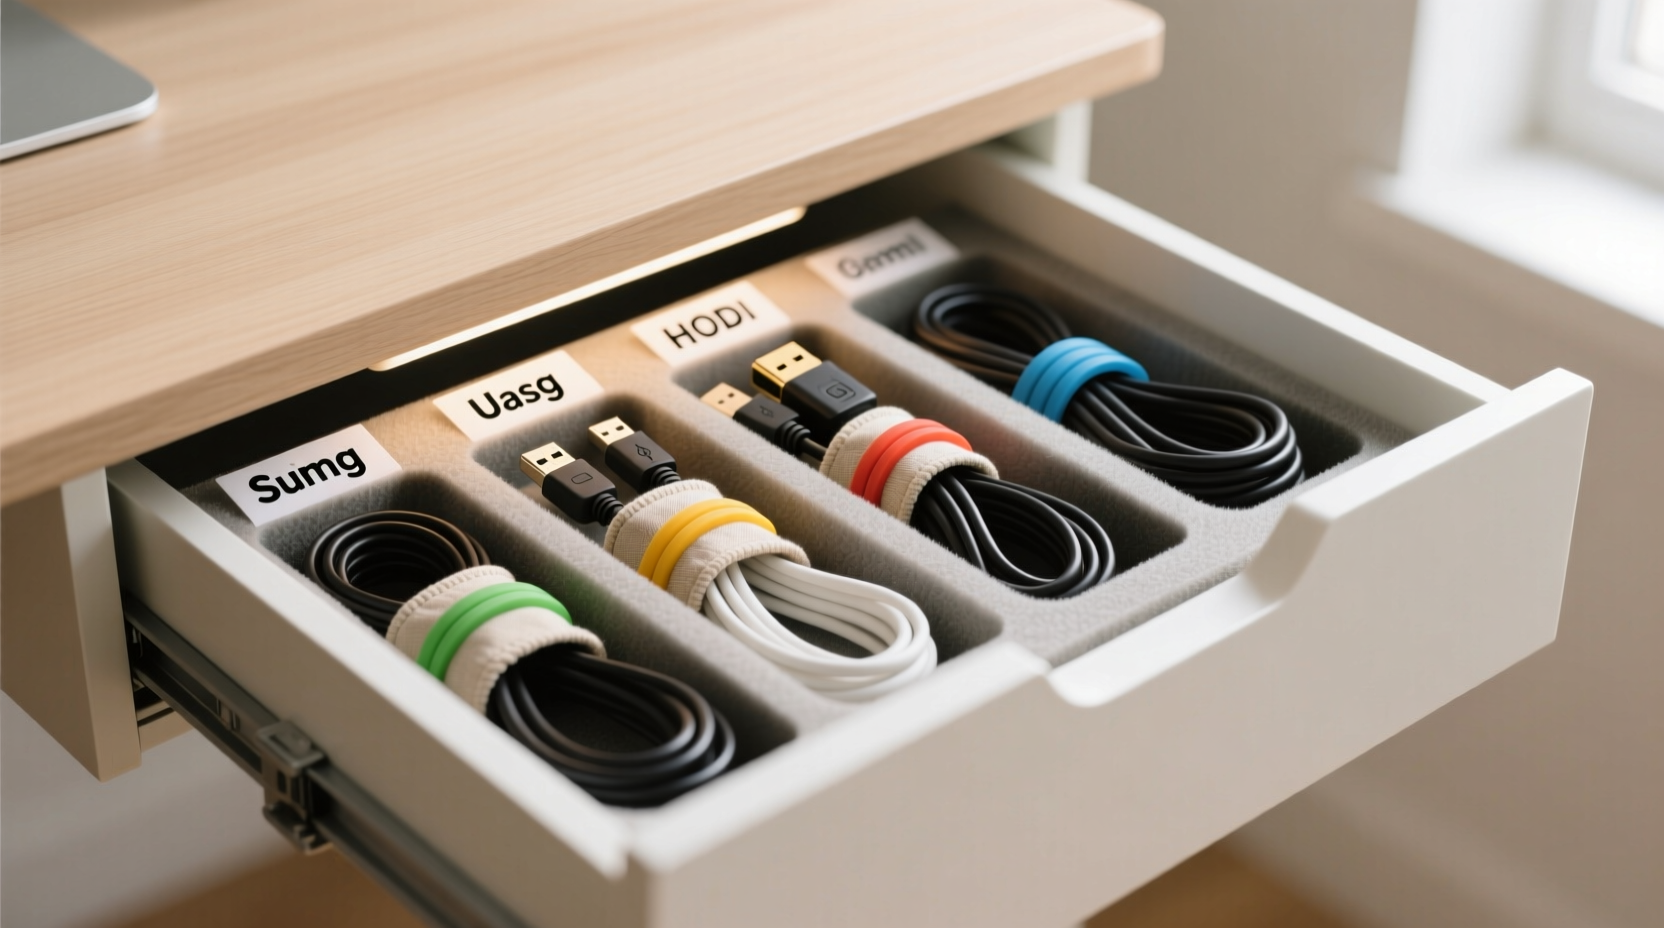
Create Dedicated Zones Using Dividers
Most desk drawers lack internal structure, which is why cords tangle easily. Introducing physical separation is key. Use adjustable foam dividers, plastic organizer trays, or even repurposed cardboard boxes cut to size to create distinct zones.
Assign each zone based on frequency of use:
- Primary Zone: Daily-use items (phone charger, earbuds, USB-C cable)
- Secondary Zone: Occasional-use cords (HDMI, external drive cables)
- Archive Zone: Rarely used but kept items (old camera charger, legacy accessories)
For a custom fit, measure your drawer’s interior and select a modular organizer that maximizes space. If buying isn’t an option, fold cardboard into L-shaped partitions and secure them with non-damaging adhesive putty.
“Cable chaos often stems from poor spatial planning. Just like tools in a workshop, cords need assigned homes.” — Jordan Lee, Workspace Efficiency Consultant
Use Cord Management Tools Strategically
Physical organizers alone aren’t enough. Tangles form when cords move freely. The solution lies in restraining length and motion using simple, low-cost tools.
Consider these options:
- Velcro straps: Reusable, gentle on insulation, and adjustable. Wrap loosely around coiled cords.
- Cable sleeves: Braided fabric tubes that bundle multiple cords into one neat strand.
- Mini cable clips: Adhesive-mounted guides that route cords along drawer walls, preventing cross-contact.
- 3D-printed or silicone cord spools: Compact reels that wind and secure individual cables.
Never use rubber bands or zip ties too tightly—they compress wire insulation over time, increasing the risk of short circuits.
| Tool | Best For | Limitations |
|---|---|---|
| Velcro Straps | Daily-use cords, temporary bundling | May wear out after years of reuse |
| Braided Sleeves | Multiple cords run together (e.g., monitor + power + USB) | Hard to separate individual cables once sleeved |
| Adhesive Clips | Guiding cords along drawer edges | May leave residue if removed |
| Cord Reels | Long cables (Ethernet, extension cords) | Takes up more space per unit |
Step-by-Step: Organize Your Drawer in 60 Minutes
Follow this timeline to complete a full cord overhaul efficiently.
- Minute 0–10: Empty & Evaluate
Pull everything out. Test each cord. Discard broken or unnecessary ones. - Minute 10–20: Categorize
Group by device type and usage frequency. Set aside duplicates. - Minute 20–30: Measure & Prepare
Measure drawer dimensions. Cut foam or cardboard dividers to fit. - Minute 30–45: Install Structure
Place dividers. Assign zones. Attach adhesive clips along sides if needed. - Minute 45–55: Coil & Secure
Use the over-under coiling method (see below) for each cord. Fasten with Velcro or spools. - Minute 55–60: Label & Store
Add labels or color codes. Place cords in designated zones. Close drawer and test access.
The Over-Under Coiling Method
This professional technique prevents twist buildup and kinks. Hold one end in your left hand. Use your right hand to loop the cord alternately over and under your fingers. After several loops, secure the middle with a Velcro tie. When uncoiled, the cable will lie flat without twists.
Real-World Example: From Chaos to Clarity
Sarah, a freelance graphic designer in Portland, struggled with a bottom drawer that housed over 15 cords. Her MacBook charger was constantly tangled with her Wacom tablet cable, and she often spent minutes untangling them each morning. After reading about structured drawer zoning, she implemented a three-zone system using a $12 adjustable tray organizer.
She labeled each cord with colored heat-shrink tags, coiled them using the over-under method, and grouped them by project type: client work, personal devices, and backup gear. She also installed two mini adhesive clips along the drawer’s long edge to guide frequently accessed cords.
The result? Sarah now retrieves any cable in under five seconds. She reports fewer connection issues—likely due to reduced physical stress on the wires—and says her workspace feels more professional and intentional.
Common Mistakes That Lead to Tangles
Even well-intentioned efforts can backfire if common pitfalls aren’t avoided. Watch for these errors:
- Storing cords while warm: Plugging in a laptop charger and immediately stuffing it away traps heat, weakening insulation over time.
- Mixing high- and low-frequency cables: Frequently pulled cords should never be buried under rarely used ones.
- Ignoring cable length: Excess slack invites looping and knotting. Use retractable reels for long cords like Ethernet.
- Overpacking the drawer: Crowding limits airflow and makes retrieval harder. Leave 20% open space for ease of access.
“The most organized drawer fails if it’s overloaded. Functionality beats fullness every time.” — Marcus Tran, Ergonomic Design Specialist
Checklist: Maintain a Tangle-Free Drawer
Use this checklist weekly to sustain order:
- ✅ Return each cord to its designated zone after use
- ✅ Inspect for fraying or exposed wires monthly
- ✅ Re-coil any loosely wound cables
- ✅ Wipe down the drawer interior with a dry microfiber cloth
- ✅ Rotate out outdated tech every 6 months
- ✅ Verify labels are still legible
Frequently Asked Questions
Can I use binder clips to manage cords in a drawer?
Yes, small binder clips work surprisingly well. Clip them to the edge of the drawer and thread cords through the metal arms to prevent sliding and tangling. They’re especially useful for securing headphone cables or shorter USB lines.
What’s the best way to store thick power bricks?
Power adapters generate heat and take up space. Store them upright in a deep compartment or use a mesh pouch with a hook to hang them on a drawer divider. Avoid stacking heavy bricks on top of delicate cords.
How do I organize cords for devices I don’t use often?
Pair each infrequently used device with its cord and store them together in a labeled zip-top bag. Include the model number and purpose (e.g., “Backup Monitor – Dell P2419H”). This keeps everything matched and dust-free.
Final Thoughts: Build a System That Lasts
Organizing cords isn’t a one-time fix—it’s the creation of a sustainable system. The goal isn’t perfection but consistency. When every cord has a clear home and a reliable method of storage, the drawer stops being a source of frustration and becomes a functional part of your workflow.
Start small. Clean one drawer. Apply the over-under coil. Add labels. You’ll notice the difference the next time you reach for a charger. And once you’ve mastered your desk, consider expanding the system to other areas: entertainment centers, travel kits, or garage tool stations.


 浙公网安备
33010002000092号
浙公网安备
33010002000092号 浙B2-20120091-4
Comments
No comments yet. Why don't you start the discussion?