
For crafters, the joy of creating often comes with a hidden challenge: clutter. When your workspace is limited—whether it’s a corner of a living room, a closet turned studio, or a shared desk—keeping materials accessible yet tidy becomes essential. One of the most effective solutions is organizing craft supplies using clear containers. Transparent storage not only maximizes visibility but also turns chaos into order without sacrificing style or function. With smart planning and the right tools, even the tiniest crafting area can become a well-oiled creative hub.
Why Clear Containers Work Best for Small Craft Spaces
In a compact environment, every inch counts. The goal isn’t just to store items—it’s to make them easy to find, access, and return. Opaque bins may hide messes, but they also hide contents, leading to rummaging, frustration, and double-purchasing of forgotten supplies. Clear containers eliminate that problem by allowing you to see exactly what’s inside at a glance.
Transparency supports visual inventory management. You’ll notice when glue sticks are running low or when glitter jars are nearly empty before starting a project. This reduces last-minute shopping trips and helps maintain momentum during creative sessions. Additionally, clear plastic, glass, or acrylic containers offer durability and stackability, both critical traits in confined areas.
“Visual organization is one of the strongest tools for productivity in small workspaces. If you can see it, you’re more likely to use it—and keep it organized.” — Lena Torres, Interior Organizer & Creative Space Consultant
Step-by-Step Guide to Organizing Supplies with Clear Containers
Transforming a cramped craft zone into an efficient, inspiring space doesn’t require renovation—just strategy. Follow this practical sequence to get started:
- Clear and Sort Everything: Empty all drawers, boxes, and surfaces. Group similar items: beads, washi tape, markers, thread, etc. Discard dried-out glue, broken scissors, or unused kits.
- Assess Your Storage Needs: Identify high-use versus occasional-use supplies. Frequently used items should be within arm’s reach; seasonal or specialty tools can go higher or deeper.
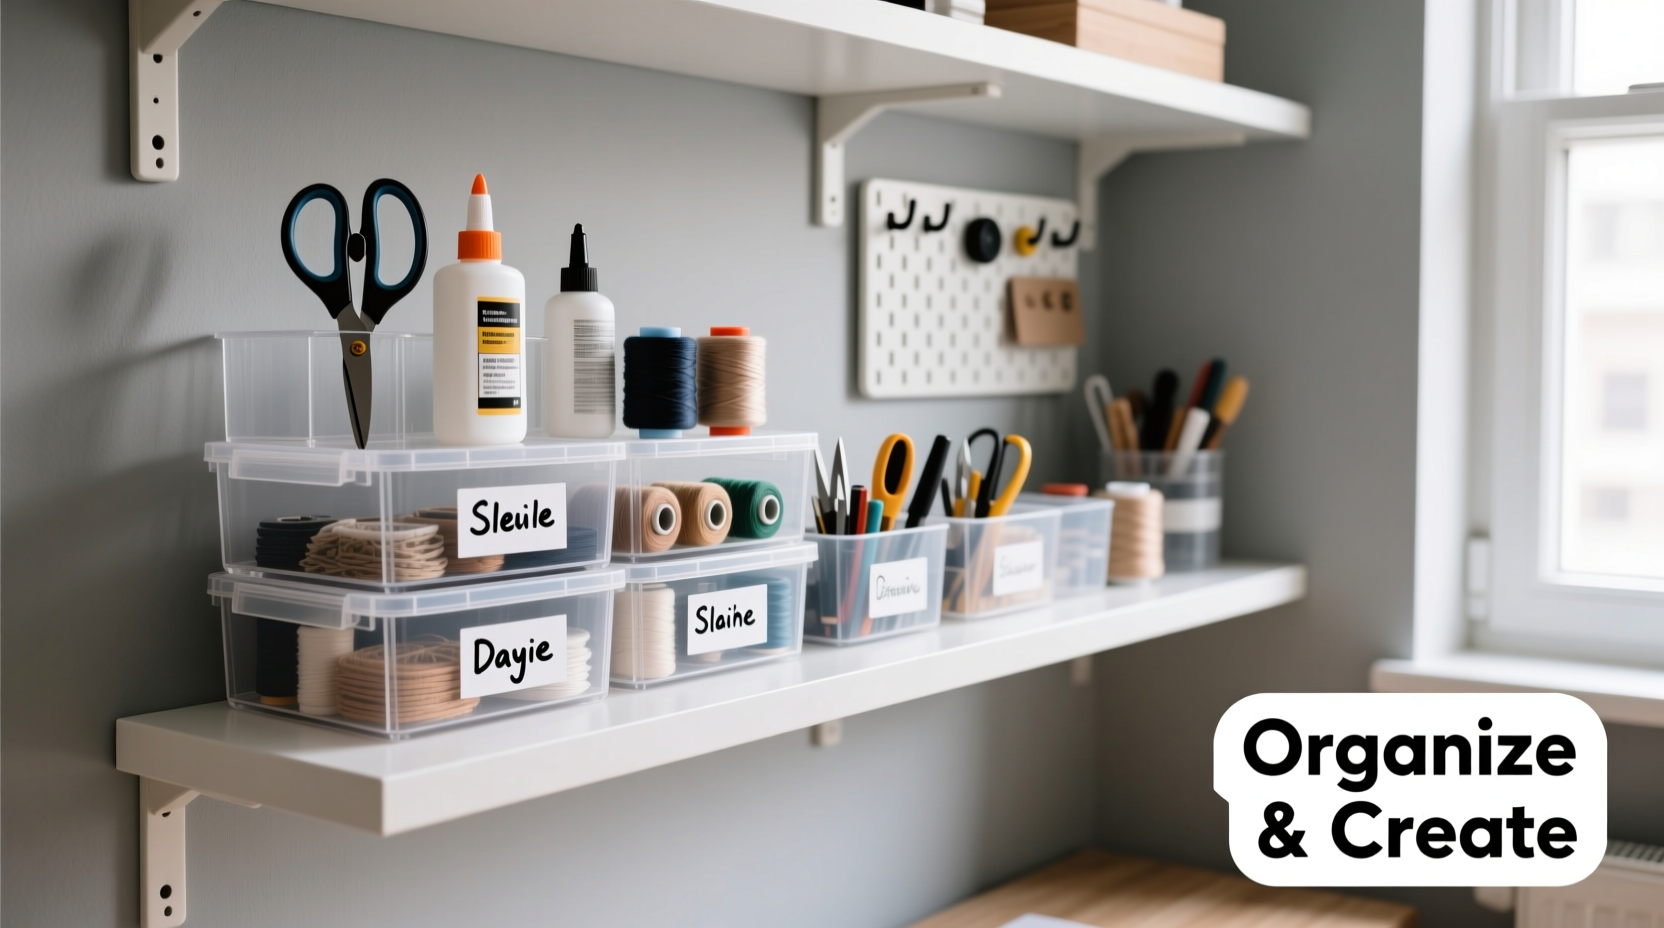
- Select Appropriate Container Types: Use small jars for sequins, lidded trays for stickers, rectangular bins for paper stacks, and narrow bottles for paintbrushes.
- Label Thoughtfully: Even if containers are clear, labels prevent confusion. Use waterproof tags or stick-on labels with consistent fonts and categories (e.g., “Red Glitter,” “Fine-Tip Markers”).
- Arrange by Frequency and Function: Place daily-use items at eye level. Store heavier containers on lower shelves to prevent tipping. Keep related supplies together (e.g., scissors + tape + rulers).
- Maximize Vertical Space: Install wall-mounted shelving or pegboards above your desk. Use stackable bins to grow upward instead of outward.
- Maintain Weekly: Dedicate five minutes each week to return misplaced items and wipe down container lids.
This methodical approach ensures sustainability. Once set up, the system works because it respects both logic and habit.
Choosing the Right Type of Clear Container
Not all clear containers are created equal. The best choice depends on material type, size, lid style, and intended placement. Below is a comparison of common options suited for different craft supplies.
| Container Type | Best For | Pros | Cons |
|---|---|---|---|
| Stackable Plastic Bins (with lids) | Paper, fabric scraps, yarn skeins | Durable, dust-resistant, modular | Can yellow over time with sun exposure |
| Glass Jars (Mason or Apothecary) | Beads, buttons, sequins | Airtight, elegant, non-toxic | Heavy, fragile, not ideal for kids’ zones |
| Acrylic Drawer Units | Small hardware like pins, needles, clips | See-through, slide easily, modern look | Limited depth per drawer |
| Repositionable Silicone Cups | Glue dots, foam pads, mini embellishments | Sticks to surfaces, movable, collapsible | Not sealable, poor for liquids |
| Plastic Test Tubes or Vials | Paint samples, ink refills, tiny findings | Space-efficient, portable, fun aesthetic | Narrow opening makes retrieval tricky |
When selecting containers, prioritize reusability and adaptability. A bin that holds ribbon today might store embroidery floss tomorrow. Avoid overly decorative designs that limit future use. Instead, opt for neutral shapes and standardized sizes that integrate seamlessly into evolving systems.
Real Example: Transforming a Closet Desk Into a Craft Nook
Sophie, a freelance illustrator and card-maker, converted a shallow hallway closet into her primary workspace. At just 3 feet wide, the area had to serve as storage, cutting station, and writing surface. She began by removing old shoeboxes and dumping everything onto her dining table.
After sorting, she realized she owned three separate packs of gold star stickers—two unopened—because she couldn’t see what she already had. That moment became her motivation for switching to clear organization.
She installed two floating shelves above a fold-down desk. On the top shelf, she arranged tall glass jars labeled “Glitter,” “Sequins,” and “Pom Poms.” The middle shelf held stackable plastic bins containing colored pencils, washi tapes, and adhesive rolls. Under the desk, a rolling cart with three transparent drawers stored larger items like cardstock and stencils.
By using only clear containers and labeling each one, Sophie reduced setup time from 15 minutes to under 2. More importantly, she stopped buying duplicates and regained confidence in her process. Her tiny space now feels expansive because nothing is hidden or lost.
Checklist: Setting Up Your Clear Container System
Use this checklist to ensure no step is missed when organizing your small craft area:
- ☐ Remove all supplies from current storage spots
- ☐ Sort items into functional categories (e.g., adhesives, coloring tools, textiles)
- ☐ Discard expired, damaged, or unused materials
- ☐ Measure available shelf/drawer/cabinet space
- ☐ Purchase or repurpose clear containers based on volume and frequency of use
- ☐ Label each container clearly (use removable labels for flexibility)
- ☐ Group related supplies together (e.g., paintbrushes next to paints)
- ☐ Store heavy containers on lower levels for safety
- ☐ Mount additional vertical storage (pegboard, wall rails) if floor space is tight
- ☐ Schedule a weekly 5-minute reset to maintain order
Completing this list creates a foundation that supports creativity rather than hinders it. Organization shouldn’t feel restrictive—it should remove friction between idea and execution.
Frequently Asked Questions
Can I use clear containers in direct sunlight?
Extended exposure to UV rays can cause some plastics to degrade or discolor over time, especially cheaper polystyrene varieties. If your containers sit near a window, consider rotating them periodically or placing them behind UV-filtering glass. Glass or BPA-free polypropylene containers tend to hold up better under light exposure.
How do I prevent static cling in plastic containers, especially with lightweight papers or tissue?
Static buildup is common in dry environments. To reduce it, wipe the inside of containers with a dryer sheet once a month or apply a light coating of anti-static spray designed for electronics. Alternatively, place a small piece of aluminum foil crumpled at the bottom of the bin to dissipate charge.
Are clear containers safe for storing adhesives like glue or Mod Podge?
Yes, but only if the container is chemically resistant and properly sealed. Avoid thin, flimsy plastics that may react with solvents. Thick PET or HDPE containers work best. Always store upright and check lids regularly for leaks. For long-term storage, keep original product labels visible beneath or alongside the container.
Expert Tips for Long-Term Success
Sustainability matters in any organizational system. A beautiful setup means little if it collapses after a few weeks. Consider these advanced strategies used by professional organizers:
- Color-code within clarity: While transparency shows content, adding colored labels or dot stickers by category (e.g., blue for drawing tools, green for scrapbooking) speeds identification even further.
- Use tiered trays inside drawers: These allow multiple layers of visibility, preventing items from being buried underneath others.
- Rotate seasonal supplies: Store holiday-specific materials (like Halloween stickers or Christmas ribbons) in clearly marked bins outside the main workspace, then swap them in as needed.
- Keep a “donate” bin nearby: When you open a container and realize you won’t use something, drop it straight into a box for donation. Prevents hoarding and keeps inventory honest.
“The most successful craft spaces aren’t the biggest—they’re the ones where every tool has a home and returns to it naturally.” — Marcus Lee, Studio Efficiency Coach
Conclusion: Turn Limitations Into Creative Advantage
Organizing craft supplies in a small space using clear containers isn’t about compromise—it’s about optimization. Clarity breeds control. Visibility invites usage. Structure fuels inspiration. By investing time in a thoughtful layout, you transform spatial constraints into a streamlined, joyful workflow.
You don’t need a dedicated room to be a serious crafter. What you need is intentionality. Start today: pull out one drawer, sort its contents, and replace it with labeled, transparent storage. Notice how much faster you work. Feel how much calmer your mind becomes when searching ends and creating begins.


 浙公网安备
33010002000092号
浙公网安备
33010002000092号 浙B2-20120091-4
Comments
No comments yet. Why don't you start the discussion?