
Every holiday season begins the same way: you pull out last year’s string lights, only to find them knotted into an unsolvable puzzle. The frustration of untangling dozens of delicate wires not only wastes time but risks damaging the bulbs or sockets. For years, this has been an accepted part of seasonal decorating—but it doesn’t have to be.
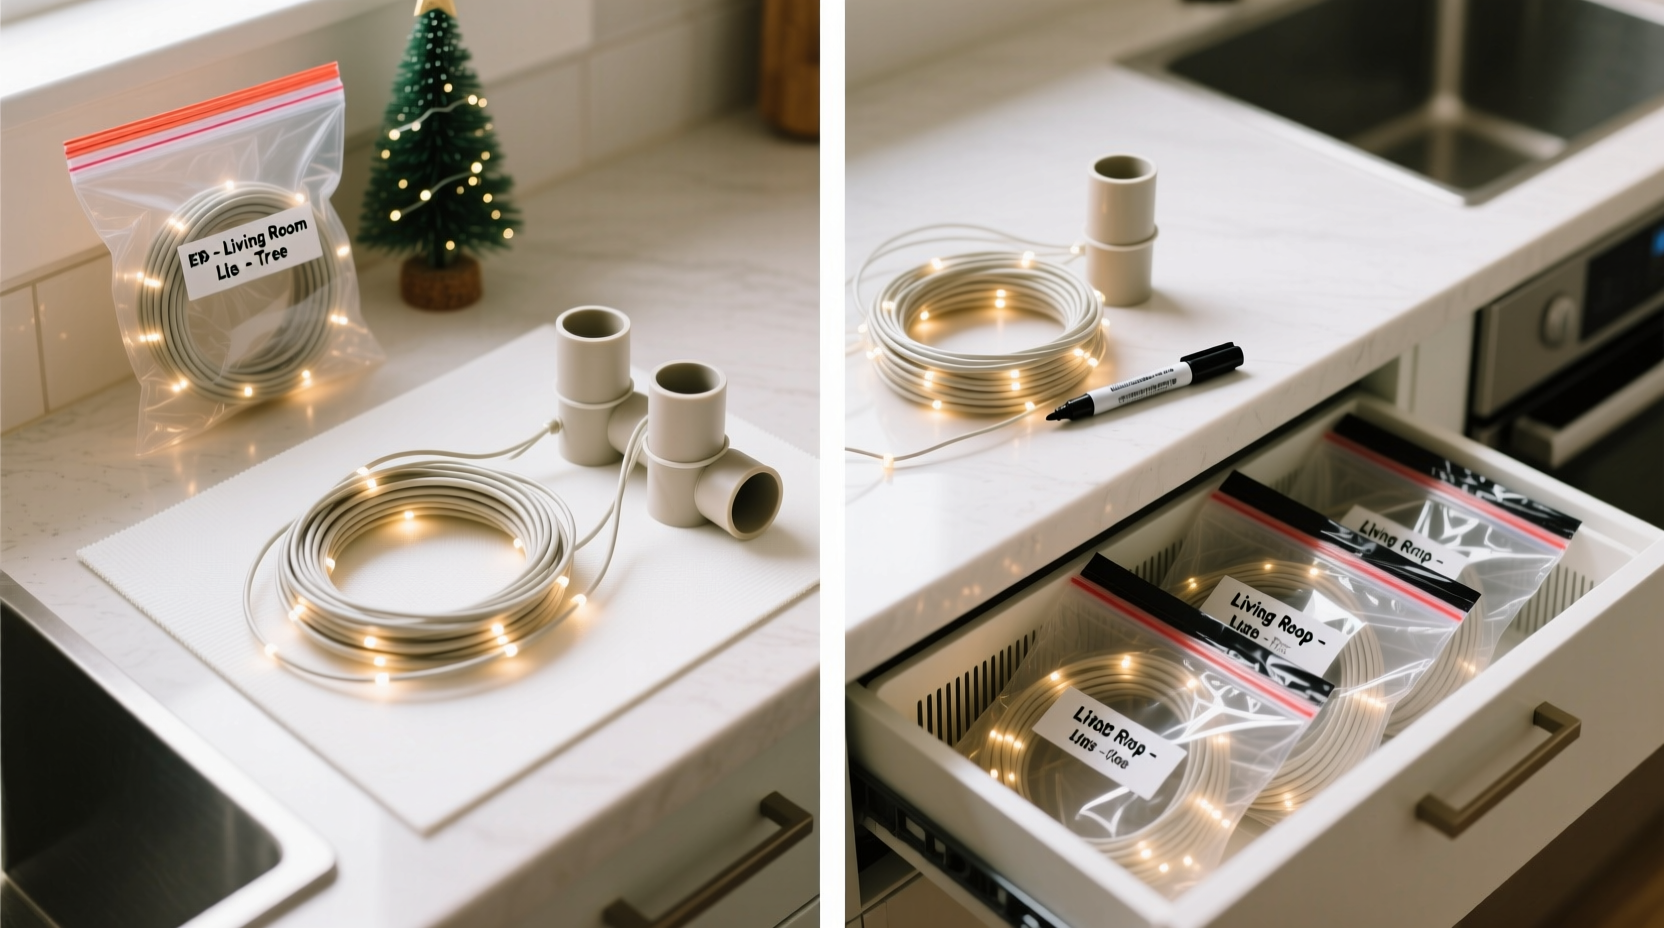
With a simple system using PVC pipe spools and labeled ziplock bags, you can store your light strands neatly, protect their integrity, and make setup faster and easier. This method is cost-effective, scalable, and ideal for both homeowners with modest displays and decorators managing hundreds of feet of lighting. More importantly, it prevents tangles before they start.
Why traditional storage fails
Most people store string lights by loosely wrapping them around cardboard boxes, tossing them in bins, or simply coiling them by hand. These methods may seem convenient at first, but they lead to long-term problems:
- Tangling: Without consistent tension and structure, wires twist unpredictably.
- Bulb damage: Pressure from tight knots can crack plastic sockets or break filaments.
- Deterioration: Exposure to moisture, dust, and temperature shifts degrades insulation over time.
- Identification issues: Without labels, it's hard to distinguish warm white from cool white, or 20-foot strands from 50-foot ones.
These small inefficiencies add up. A study by the National Association of Home Builders found that nearly 68% of households spend over 30 minutes per season untangling lights—time that could be better spent on actual decorating or family activities.
“Poor storage doesn’t just waste time—it shortens the lifespan of your lights. Proper winding and labeling can extend usability by three to five years.” — Marcus Tran, Electrical Systems Technician and Holiday Lighting Installer
Step-by-step guide: Creating PVC pipe spools
The key to preventing tangles is consistent, controlled winding. A rigid spool ensures each loop lies flat and maintains even spacing. PVC pipes are ideal because they’re lightweight, weather-resistant, inexpensive, and easy to cut and assemble.
Materials needed
- PVC pipe (¾-inch or 1-inch diameter, schedule 40)
- PVC end caps (two per spool)
- Hacksaw or PVC cutter
- Measuring tape
- Sandpaper (medium grit)
- Permanent marker
- Drill with ¼-inch bit (optional, for hanging)
Instructions
- Measure and cut the pipe: Decide on spool length based on light strand size. For standard 25–50 foot strands, cut the pipe to 12 inches. Longer runs may require 18- or 24-inch lengths.
- Smooth the edges: Use sandpaper to remove burrs from the cut ends to prevent wire abrasion.
- Attach end caps: Press a cap onto each end of the pipe. For added security, apply a small amount of PVC cement.
- Label the spool: Use a permanent marker to write details like length, color temperature, bulb type, and voltage directly on the pipe.
- Add a hanging hole (optional): Drill a small hole through one end cap to thread a hook or string for vertical storage.
Once assembled, the spool provides a stable, rotating core for winding. The smooth surface of PVC won’t snag wires, and the closed ends keep coils from slipping off during handling or storage.
Winding technique: How to wrap without tangles
Even the best spool fails if the winding method is flawed. Follow these principles for clean, reliable coiling:
- Start at the plug end: Always begin winding from the male plug. This keeps the heaviest component anchored and makes unwinding intuitive later.
- Maintain gentle tension: Don’t pull too tight—this can stretch wires or deform sockets. Let the weight of the strand help guide each loop.
- Use figure-eight or over-under method: Alternate the direction of each pass (over one time, under the next) to cancel out twists. This prevents “corkscrewing” when unwound.
- Secure the end: Once fully wound, use a reusable zip tie or Velcro strap to fasten the last few inches near the female connector.
Aim for uniform loops—roughly 2–3 inches apart—so no section bears excessive pressure. Avoid overlapping or crisscrossing wires, which create friction points and future snags.
Mini Case Study: The Community Center Display
The Oakridge Community Center used to spend nearly eight hours every November untangling 300+ feet of outdoor lighting. Volunteers worked in pairs, cutting knots with scissors and replacing broken bulbs mid-process. After switching to a PVC spool system with labeled wraps, setup time dropped to under two hours. They now assign specific spools by display zone (e.g., “Front Entrance – Warm White Icicles”) and store them on a wall-mounted rack in the maintenance shed. According to head volunteer Linda Ruiz, “We’ve cut labor in half and haven’t replaced a single strand due to damage since we made the switch.”
Using labeled ziplock bags for accessories and spare parts
Lights aren’t the only components that get lost or disorganized. Fuses, replacement bulbs, timers, extension cords, and clips often vanish into storage limbo. A secondary system using ziplock bags ensures everything stays together and accessible.
Organization strategy
- Sort by function: Create separate bags for fuses, spare bulbs (by type), controllers (for RGB sets), and mounting hardware.
- Label clearly: Use a waterproof label or permanent marker to note contents, quantity, and compatible light models.
- Store with the spool: Attach the bag to the spool using a binder clip, rubber band, or by slipping it under the securing strap.
- Use resealable bags with thickness: Opt for freezer-grade ziplocks—they resist punctures and last longer in storage conditions.
This modular approach means every component needed for installation travels with the lights. No more hunting for a fuse when a circuit blows mid-decorating.
| Component | Bag Label Example | Storage Tip |
|---|---|---|
| Miniature Spare Bulbs (C7) | C7 Red Spares – Qty 12 | Include a small piece of foam to cushion bulbs |
| Fuses | Fuses – 5A Fast-Blow (x6) | Keep in original packaging if possible |
| Timer Unit | Digital Timer – 24hr Cycle | Remove batteries before storing |
| Roof Clips | Gutter Clips – Black (x20) | Group by color and size |
Storage best practices for longevity
Even perfect winding won’t help if the environment damages the materials. Follow these guidelines to preserve your investment year-round.
- Control humidity: Store in a dry area to prevent corrosion on metal contacts and connectors. Silica gel packets placed in storage bins help absorb moisture.
- Avoid extreme temperatures: Don’t leave spools in unheated garages below freezing or attics above 100°F—both degrade insulation and solder joints.
- Stack wisely: If storing multiple spools, place them vertically like records or horizontally in shallow layers. Never pile heavy items on top.
- Keep away from rodents: Mice and squirrels chew through wire insulation. Use sealed plastic totes instead of cardboard boxes.
For large collections, consider building a dedicated rack from scrap wood or metal rods. Mount it on a garage wall or shed interior to keep spools visible, dust-free, and ready for use.
FAQ
Can I use this method for LED and incandescent lights alike?
Yes. Both types benefit from structured winding. However, LEDs are generally more flexible and less prone to breakage, so you can use slightly smaller spools. Incandescent wires are stiffer and more fragile—use wider spools (at least 10 inches in diameter) to reduce bending stress.
What if I don’t have tools to cut PVC?
Many hardware stores, including Home Depot and Lowe’s, offer free PVC cutting services. Bring your measurements, and they’ll cut the pipe to size. Alternatively, pre-cut PVC electrical conduit sections are available online and often come with end caps.
Are there alternatives to PVC spools?
Yes—cardboard tubes, wooden dowels, or plastic reels work, but they lack durability. Cardboard absorbs moisture; wood can splinter; and thin plastic cracks over time. PVC remains the most balanced option for strength, cost, and weather resistance.
Checklist: Organizing Your Lights This Season
- ☐ Inventory all light strands and note length, color, and condition
- ☐ Cut and assemble PVC spools based on strand size
- ☐ Wind each strand using the over-under method starting from the plug end
- ☐ Secure the end with a reusable tie
- ☐ Label each spool with key details
- ☐ Prepare ziplock bags for fuses, bulbs, and accessories
- ☐ Attach corresponding bag to each spool
- ☐ Store in a cool, dry, rodent-free location
- ☐ Photograph the setup for reference next year
Conclusion: Turn chaos into control
Organizing tangled light strands isn’t just about saving time—it’s about reclaiming peace of mind during busy seasons. By investing a few hours upfront with PVC pipe spools and labeled ziplock bags, you eliminate recurring frustration and extend the life of your decorations. This system scales from a single porch stringer to elaborate yard displays, and its simplicity ensures anyone in the household can use it.
Think of it as preventive maintenance: what takes effort today saves hours tomorrow. And unlike temporary fixes, this solution grows stronger with each passing year as your labeled, protected collection becomes more efficient and reliable.


 浙公网安备
33010002000092号
浙公网安备
33010002000092号 浙B2-20120091-4
Comments
No comments yet. Why don't you start the discussion?