
Digital photos accumulate quickly. A birthday party, a vacation, daily life—snap after snap fills your phone, camera, and cloud storage. Without a system, finding that one important image becomes frustrating. Cluttered folders, duplicate files, and forgotten memories buried in disarray are common. The good news: organizing your digital photo library doesn’t require technical wizardry or endless hours. With a clear strategy, consistent naming, smart tools, and disciplined habits, you can transform chaos into clarity—and preserve your visual history for decades.
1. Assess Your Current Photo Collection
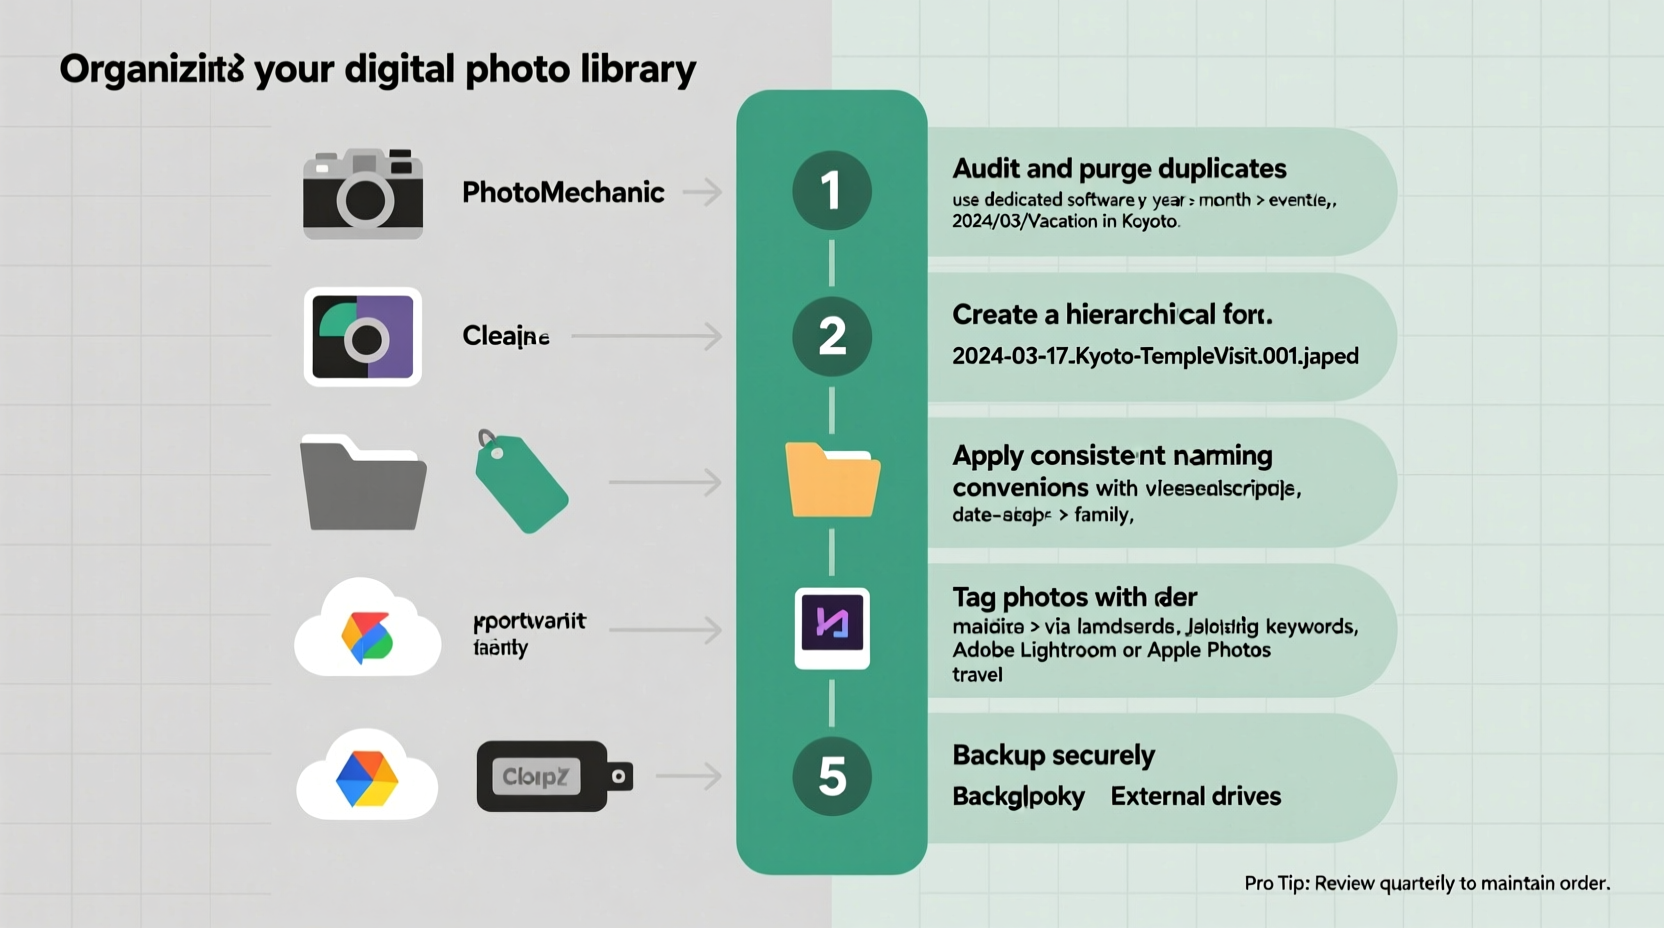
Before diving into reorganization, take stock of what you’re working with. This foundational step reveals the scope of your task and helps you plan effectively. Begin by identifying all locations where photos exist: smartphones, external drives, SD cards, laptops, and cloud services like Google Photos, iCloud, or Dropbox.
Transfer everything to a single master location on your computer. This central hub allows you to audit duplicates, assess quality, and avoid missing files later. Use file explorer tools to sort by date, size, or type. Note how many total images you have—this number will help you estimate time needed for cleanup.
During assessment, ask critical questions: How much is truly worth keeping? Are there blurry shots, screenshots, or accidental triggers clogging the collection? Be ruthless. Deleting low-value content now reduces long-term maintenance.
“Most people keep 70% more photos than they’ll ever revisit. Curating early saves time and emotional fatigue later.” — Sarah Lin, Digital Archivist & Memory Preservation Specialist
2. Build a Logical Folder Structure
A well-designed folder hierarchy is the backbone of any professional photo library. It should be intuitive, scalable, and consistent across devices. Avoid vague names like “Photos” or “Misc.” Instead, use a date-first approach combined with descriptive events.
The most effective structure follows a simple pattern:
Photos/
├── 2023/
│   ├── 2023-06_June_Trip_to_Portugal/
│   ├── 2023-08_Sophie's_Birthday/
│   └── 2023-12_Christmas_Family_Gathering/
├── 2024/
│   ├── 2024-01_New_Years_Eve/
│   ├── 2024-05_Beach_Vacation_Mexico/
│   └── 2024-09_Anniversary_Dinner/
└── Archived/
    ├── Old_Camera_Photos_2005-2010/
    └── Scanned_Film_Rolls/
This format ensures chronological sorting while allowing quick recognition of content. Sorting by year prevents overwhelming single folders and makes annual reviews seamless.
For family photographers or those managing multiple people’s images, consider adding subfolders by person or subject:
2024-05_Beach_Vacation_Mexico/
├── Family_Shots/
├── Kids_Playing/
├── Sunset_Landscapes/
└── Food_and_Dining/
Stick to one naming convention across all folders. Avoid special characters, spaces (use underscores or hyphens), and inconsistent capitalization. Consistency enables automation and compatibility across operating systems.
3. Rename Files with Meaningful Titles
Default filenames like IMG_4829.jpg or DCIM_0012.png offer no context. Renaming files systematically enhances searchability and preserves meaning over time.
Use a standardized format that includes date and brief description:
2024-07-12_Wedding_Ceremony_Maria_John.jpg2024-09-05_Daughter_First_Day_School.jpg2024-11-28_Thanksgiving_Dinner_Home.jpg
Manual renaming works for small batches, but batch processing tools save hours. Free software such as Bulk Rename Utility (Windows) or NameChanger (Mac) lets you apply patterns across hundreds of files at once. You can auto-insert dates, sequence numbers, or replace text en masse.
When renaming, extract metadata first. Many cameras and phones embed EXIF data—including precise timestamps, GPS coordinates, and device info. Tools like ExifTool can read and preserve this data during renaming, ensuring nothing valuable is lost.
4. Tag, Rate, and Categorize for Fast Retrieval
Folders and filenames get you partway. True professional organization leverages metadata tagging for multi-dimensional access. Tags allow you to find photos not just by date, but by person, event type, location, emotion, or color.
Use dedicated photo management software like Adobe Lightroom, Apple Photos, or DigiKam to assign keywords, star ratings, labels, and facial recognition tags. For example:
- Tag “beach,” “sunset,” “family” on vacation photos.
- Assign five stars to best shots; flag others for deletion.
- Label people using face recognition so searching “Emma” pulls all her appearances.
Metadata stays embedded in the file (when saved properly), making it portable across devices and future-proof against app changes.
Create a personal tagging taxonomy—a controlled vocabulary—to maintain consistency. Decide whether to use “vacation,” “trip,” or “holiday” and stick with it. Avoid overly granular tags unless necessary (“blue_sky_v2” adds noise).
| Tag Type | Purpose | Example |
|---|---|---|
| Event | Categorize by occasion | wedding, graduation, hiking_trip |
| People | Identify individuals | James, Aunt_Linda, Baby_Maya |
| Location | Geographic context | Paris_France, Lake_Tahoe, Home_Backyard |
| Mood/Theme | Emotional tone | joyful, candid, black_and_white |
| Technical | Filter by quality or gear | portrait_mode, HDR, iPhone_14 |
Over time, this layered approach means you can instantly pull up “all joyful beach photos with Emma from 2023 onward,” even if they're scattered across multiple folders.
5. Implement a Robust Backup Strategy
No organization effort matters if your photos vanish due to hardware failure, theft, or accidental deletion. Professionals follow the 3-2-1 backup rule:
- 3 copies of your data (original + two backups)
- 2 different media types (e.g., external drive + cloud)
- 1 offsite copy (cloud storage or physical drive stored elsewhere)
Start by backing up your master photo library to an encrypted external hard drive. Use automated tools like Time Machine (Mac), File History (Windows), or GoodSync to keep it updated nightly. Then, sync a second copy to a trusted cloud service.
Recommended options include:
- Backblaze Personal Backup – Unlimited storage, continuous syncing, easy restore.
- iCloud Photos – Seamless for Apple users, end-to-end encrypted.
- Google Photos – High-quality compression free; original quality requires paid plan.
- Amazon Drive / Microsoft OneDrive – Integrated with respective ecosystems.
Test your backups regularly. Once every quarter, attempt to restore a random folder to verify integrity. A backup you haven’t tested is not a backup—it’s hope.
“Photographs are irreplaceable. Backups aren’t optional—they’re ethical responsibility.” — Dr. Alan Zhou, Digital Preservation Researcher, MIT Media Lab
Step-by-Step Timeline: From Chaos to Control
Organizing thousands of photos feels daunting. Break it into manageable phases over 4–6 weeks:
- Week 1: Inventory & Consolidate
Gather all photos into one main folder. Identify duplicates and delete obvious junk (blurry shots, receipts, memes). - Week 2: Create Folder Hierarchy
Set up year-based parent folders. Begin sorting images into dated event folders. - Week 3: Rename & Standardize
Apply consistent naming conventions. Use batch tools to rename files efficiently. - Week 4: Tag & Enhance Metadata
Import into photo software. Add keywords, ratings, and facial tags. - Week 5: Backup & Verify
Copy full library to external drive and cloud. Confirm both copies are complete. - Ongoing: Maintain Weekly
Spend 20 minutes weekly adding new photos, tagging, and cleaning up.
Mini Case Study: Recovering a Decade of Lost Memories
Lena, a freelance writer, inherited 12 years of unsorted photos from her parents’ old computers and her own smartphones. Over 40,000 images were scattered across three laptops, two USB drives, and iCloud. She couldn’t find photos of her late grandfather’s 80th birthday—until she committed to a six-week reorganization.
Using the steps above, Lena created a master “Family_Photos” folder. She sorted by year, renamed files with event descriptions, and tagged key people. During tagging, she discovered multiple versions of the missing birthday—some previously hidden under generic names like “Party2015.” By week five, she had fully backed up the collection to a NAS drive and Backblaze.
Today, Lena searches “Grandpa 80th” and sees curated highlights within seconds. More importantly, her children can now explore family history with ease.
Essential Checklist: Pro-Level Photo Organization
Follow this checklist to ensure no step is missed:
- ✅ Gather all photos into one primary location
- ✅ Delete duplicates and low-quality images
- ✅ Create a year-based folder structure
- ✅ Name folders using YYYY-MM_Event_Title format
- ✅ Rename files with meaningful, consistent titles
- ✅ Use photo software to add keywords, ratings, and people tags
- ✅ Back up to two separate devices/media types
- ✅ Store one backup offsite (cloud or remote location)
- ✅ Test restoration process annually
- ✅ Schedule weekly maintenance sessions
FAQ
How often should I organize my photo library?
Perform a full organizational pass once per year. In between, dedicate 15–20 minutes weekly to import, tag, and back up new photos. Regular maintenance prevents backlog buildup.
Should I edit photos before organizing?
No. Edit only your best selections after organizing. Editing every image wastes time and complicates version control. Focus first on structure, then enhancement.
Can I rely solely on cloud services like Google Photos?
Cloud services are convenient but not foolproof. Algorithms may mislabel content, and policies change. Always maintain your own organized master copy. Use cloud platforms as a secondary access layer, not your primary archive.
Final Thoughts: Make Your Memories Work for You
Your photo library is more than data—it’s a living archive of who you are, whom you love, and where you’ve been. Disorganized files degrade its value. But with deliberate action, you turn scattered snapshots into a searchable, enduring legacy.
Start today. Pick one year. Sort one folder. Apply one naming rule. Small actions compound. Within weeks, you’ll navigate your collection with confidence. Years from now, you—or someone you care about—will open a folder labeled “2024-08_Family_Reunion” and feel the warmth of presence, preserved.


 浙公网安备
33010002000092号
浙公网安备
33010002000092号 浙B2-20120091-4
Comments
No comments yet. Why don't you start the discussion?