
Every serious gamer knows the frustration of tangled cords, loose power adapters, and a jungle of wires snaking behind their desk. A cluttered cable setup doesn’t just look messy—it can slow down your workflow, damage equipment over time, and even create safety hazards. While premium cable management kits and magnetic wraps are popular online, you don’t need to spend $50 or more to achieve a clean, functional setup. With a few clever techniques and household items, you can transform your gaming station into a tidy, efficient space.
The goal isn’t perfection—it’s practicality. You want a system that’s easy to maintain, allows for quick access when needed, and keeps everything secure during gameplay. The best part? Most of what you need is already in your home or available at dollar stores, hardware shops, or recycling bins. This guide walks through proven, low-cost strategies that deliver professional-level results without breaking the bank.
Assess Your Cable Setup First
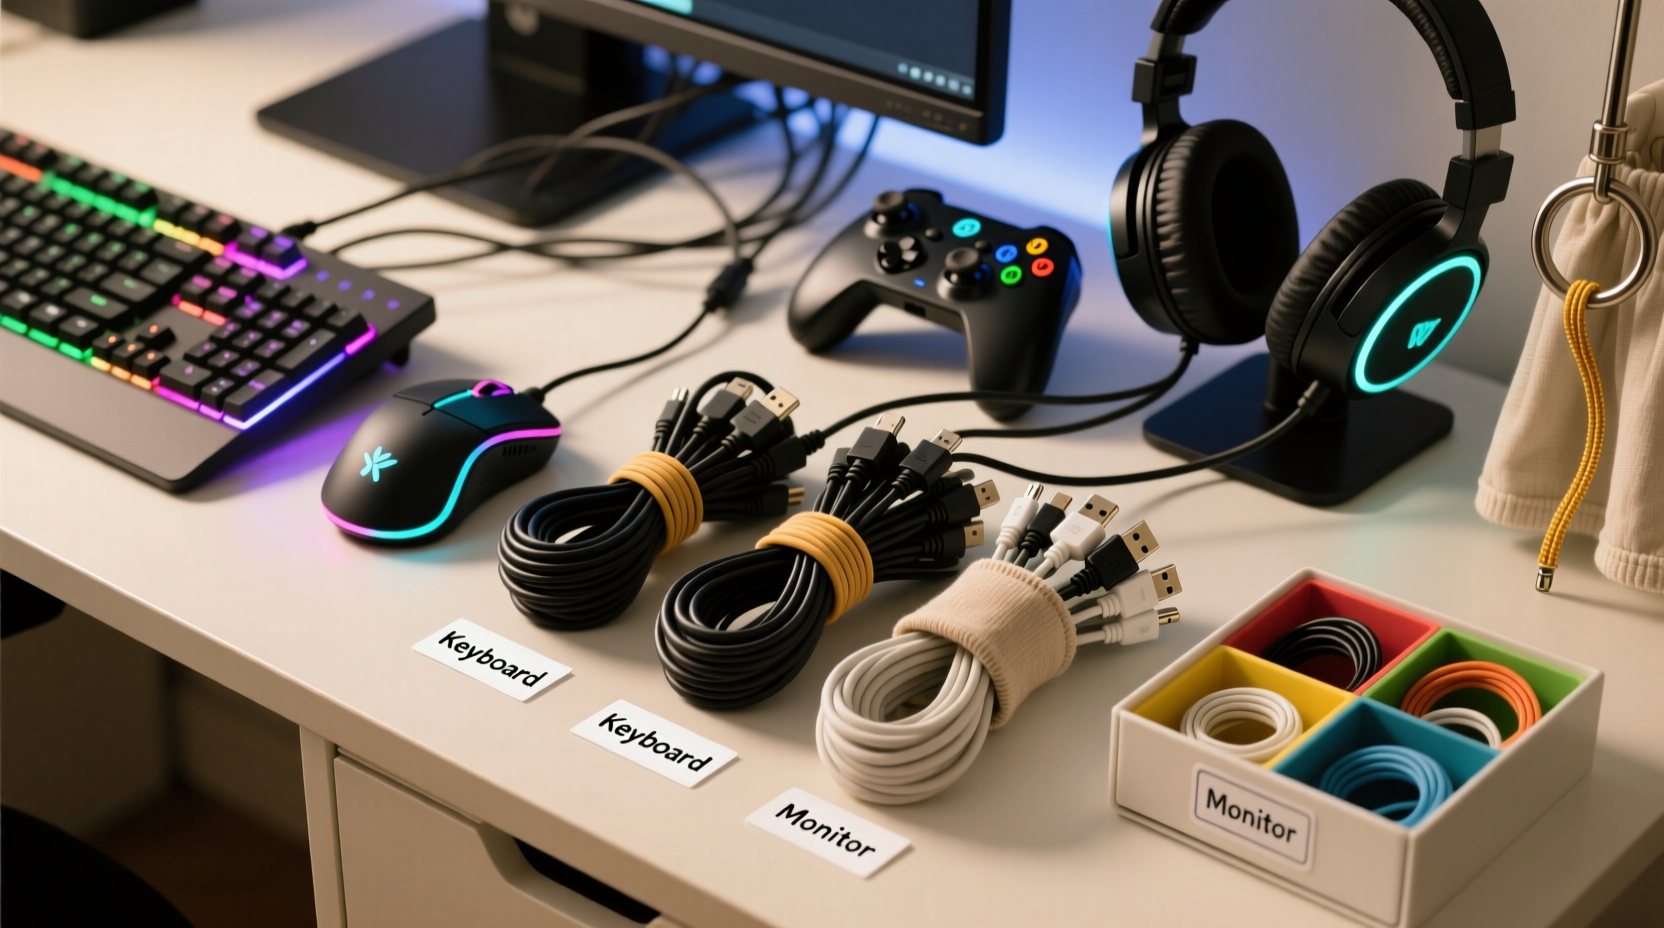
Before diving into organization, take stock of what you’re working with. Unplug your system and step behind your desk. Lay out every cable: HDMI, USB, power strips, audio jacks, charging cords, Ethernet lines, and any peripherals. Group them by function—display, audio, controller, network, power—and label each with a piece of tape if necessary.
This inventory helps identify redundancies. Maybe you have two HDMI cables when only one is in use. Perhaps old chargers are taking up space. Eliminate what you don’t need. Less clutter means easier management. Also, check cable lengths. Excessively long cords contribute to tangles. If a 6-foot HDMI cable runs from a TV three feet away, consider coiling the extra length neatly instead of letting it sprawl.
Budget-Friendly Tools You Already Own
You likely have several tools at home capable of excellent cable management. No need to buy specialized sleeves or branded clips when everyday objects work just as well—if not better.
- Cable Ties (Reused): Save zip ties from product packaging. Reuse them to bundle similar cords together—like all USB devices or audio cables.
- Paper Clips: Straightened or bent, they make great temporary anchors. Slide one through a gap in your desk frame to loop a cord around.
- Binder Clips: Clip them to the edge of your desk to hold multiple cables vertically, preventing them from dangling.
- Toilet Paper Rolls: Cut lengthwise and place over grouped cords to keep them bundled. Wrap with duct tape for durability.
- Old Hair Ties or Rubber Bands: Ideal for wrapping excess cord length. Choose fabric-covered ones to avoid scratching surfaces.
A study by the Consumer Technology Association found that over 60% of home entertainment users manage cables using improvised household solutions. Many report higher satisfaction than those relying on commercial products, citing flexibility and ease of adjustment.
“Most people overestimate how complex cable management needs to be. Often, the simplest fix—like bundling with reusable ties—is the most sustainable.” — Daniel Reyes, Electronics Technician & Home Setup Consultant
Step-by-Step: Organize Your Gaming Station in 30 Minutes
Follow this timeline to declutter and reorganize your gaming area efficiently.
- Unplug and Clear (5 min): Power down all devices. Gently disconnect cables from ports. Pull your PC tower or console forward if possible.
- Sort and Label (7 min): Group cables by type and device. Use masking tape and a pen to label each end clearly.
- Trim Excess Length (8 min): Coil surplus wire neatly. Secure with rubber bands or twist ties. Avoid tight loops that can damage internal wiring.
- Route and Anchor (10 min): Run bundles along desk edges or under furniture. Use binder clips or adhesive hooks to hold them in place.
- Final Check (5 min): Plug everything back in. Test each connection. Adjust positioning so nothing is strained or pinched.
This process prevents rushed decisions and ensures every cable has a purpose and place. Afterward, dust and wipe down surfaces—cleaning alongside organizing reinforces maintenance habits.
Smart Routing Without Drilling or Adhesives
Not everyone can drill holes or stick permanent mounts to walls or desks—especially renters. But you can still route cables cleanly using non-invasive methods.
Use the underside of your desk as a hidden highway. Run cords along the back lip, securing them with Velcro strips (reusable) or folded duct tape (temporary). For floor-to-desk routing, tuck cables behind baseboards or along carpet edges using flat cable raceways made from cardboard or repurposed plastic folders.
| Method | Cost | Best For | Drawbacks |
|---|---|---|---|
| Binder Clips | $0–$5 (multi-pack) | Holding vertical drops | May scratch finishes if metal |
| Velcro Straps | $3 for 10 | Bundling and adjusting | Less durable than zip ties |
| Cardboard Raceway | $0 (recycled) | Wall/floor routing | Not water-resistant |
| Adhesive Hooks (Removable) | $4 for 6 | Guiding cables mid-air | Limited weight capacity |
For monitors, wrap excess cords around the stand base and secure with a twist tie. This keeps them off the desk and reduces visual clutter. If you use a standing desk, avoid trapping cables between moving parts. Instead, leave slack coiled loosely beneath the desktop, anchored with a clip so it moves freely.
Real Example: How Mark Transformed His Basement Setup
Mark, a 28-year-old graphic designer and avid PS5 player, had a corner desk buried under a mess of cords. “I tripped over a power cable twice last month,” he said. “And every time I wanted to move my soundbar, I had to unplug half the room.”
Instead of buying a $40 cable sleeve kit, he used supplies from his garage: old zip ties, a shoebox, and some Velcro strips from a broken headset. He labeled each cable with tape, grouped them by function, and ran them through the shoebox placed upright behind his desk. Holes cut into the sides allowed cords to enter and exit neatly. Binder clips held the box in place and secured dangling ends.
The result? A fully organized, accessible setup for under $3. He saved time troubleshooting connections and gained confidence that his gear was protected. “It looks like something from a tech magazine now,” he said. “And I didn’t spend a dime I couldn’t afford.”
Dos and Don’ts of Budget Cable Management
Avoid common pitfalls that undermine even the best intentions. Follow these guidelines to ensure longevity and safety.
| Do | Don't |
|---|---|
| Use soft ties like cloth bands or Velcro to avoid cutting into insulation | Over-tighten zip ties, which can compress wires and reduce conductivity |
| Leave slack near devices to prevent port damage | Run power and data cables side-by-side for long stretches (can cause interference) |
| Label both ends of long or identical cables | Ignore heat buildup—ensure airflow around bundled cords |
| Check connections monthly for wear or looseness | Use nails or sharp staples to fasten cables (damages insulation) |
One often-overlooked issue is electromagnetic interference. Running HDMI or audio cables parallel to power cords for more than a foot can introduce static or signal drops. Cross them at 90-degree angles instead, or separate them physically using dividers made from cardboard or foam board.
FAQ
Can I use Scotch tape to hold cables in place?
Regular Scotch tape isn’t recommended. It loses adhesion quickly and leaves sticky residue. Instead, use painter’s tape (removable) or double-sided foam tape designed for lightweight mounting. Even better: mechanical holds like clips or ties eliminate adhesive risks entirely.
How do I hide cables without drilling holes?
Use cord covers made from cardboard or repurpose a PVC pipe section painted to match your wall. Route cables behind furniture, along baseboards, or under rugs (only if flat and safe). For monitors, use the built-in cable channels many modern stands offer.
What’s the cheapest way to label cables?
Write directly on electrical tape with a permanent marker and wrap it around the plug. Alternatively, cut strips from milk jug plastic and punch holes to slide onto cords. Both are waterproof, durable, and free.
Essential Checklist for a Clean Gaming Setup
Keep this checklist handy when organizing or maintaining your system:
- ✅ Unplug all devices before starting
- ✅ Identify and remove unused or damaged cables
- ✅ Label each cable at both ends
- ✅ Group by function (power, video, audio, data)
- ✅ Secure bundles with reusable ties or clips
- ✅ Route cords along edges or under desks
- ✅ Leave slack near plugs and ports
- ✅ Test all connections after reassembly
- ✅ Schedule a monthly cable check-up
Following this list ensures consistency and prevents backsliding into chaos. Over time, good habits replace constant reorganization.
Conclusion: Take Control of Your Setup Today
A clean gaming environment enhances performance, prolongs device life, and creates a more enjoyable experience. You don’t need expensive gear to achieve it. With thoughtful planning, reuse of everyday materials, and a few smart techniques, you can master cable management on a tight budget. The real investment isn’t money—it’s attention. Spend 30 minutes today fixing what’s been bothering you for months, and enjoy a streamlined, professional-looking station tomorrow.


 浙公网安备
33010002000092号
浙公网安备
33010002000092号 浙B2-20120091-4
Comments
No comments yet. Why don't you start the discussion?