
Every holiday season, millions of people unpack delicate glass balls, hand-blown figurines, vintage tinsel trees, and heirloom ceramic stars—only to discover chips, cracks, or shattered fragments when they open the box next year. Fragile ornaments aren’t just decorative; many carry decades of memory, family tradition, and emotional weight. Yet most storage failures stem not from poor quality, but from avoidable oversights in packing technique—not budget. You don’t need custom foam inserts, vacuum-sealed bags, or museum-grade archival supplies to protect them. What you *do* need is intentionality, structure, and smart use of what’s already in your pantry, linen closet, and recycling bin.
This guide distills proven methods used by professional archivists, museum preparators, and seasoned collectors into a practical, accessible system—all built around materials you likely have at home right now: clean paper towels, cardboard boxes, old T-shirts, bubble wrap (if available—but optional), toilet paper rolls, egg cartons, and even dry rice or popcorn kernels. No special trips to craft stores. No expensive kits. Just thoughtful, repeatable steps that eliminate guesswork and dramatically reduce breakage risk.
Why Household Items Work Better Than You Think
Professional conservators often prioritize “breathability,” “neutral pH,” and “cushioning without compression”—not flashy packaging. Many commercial ornament storage systems fail because they force rigid shapes, trap moisture, or rely on plastic sleeves that generate static and encourage sliding. In contrast, everyday household items offer distinct advantages:
- Paper towels and newsprint are acid-free (when unprinted or black-and-white), highly absorbent, and conform naturally to irregular surfaces—ideal for wrapping without pressure points.
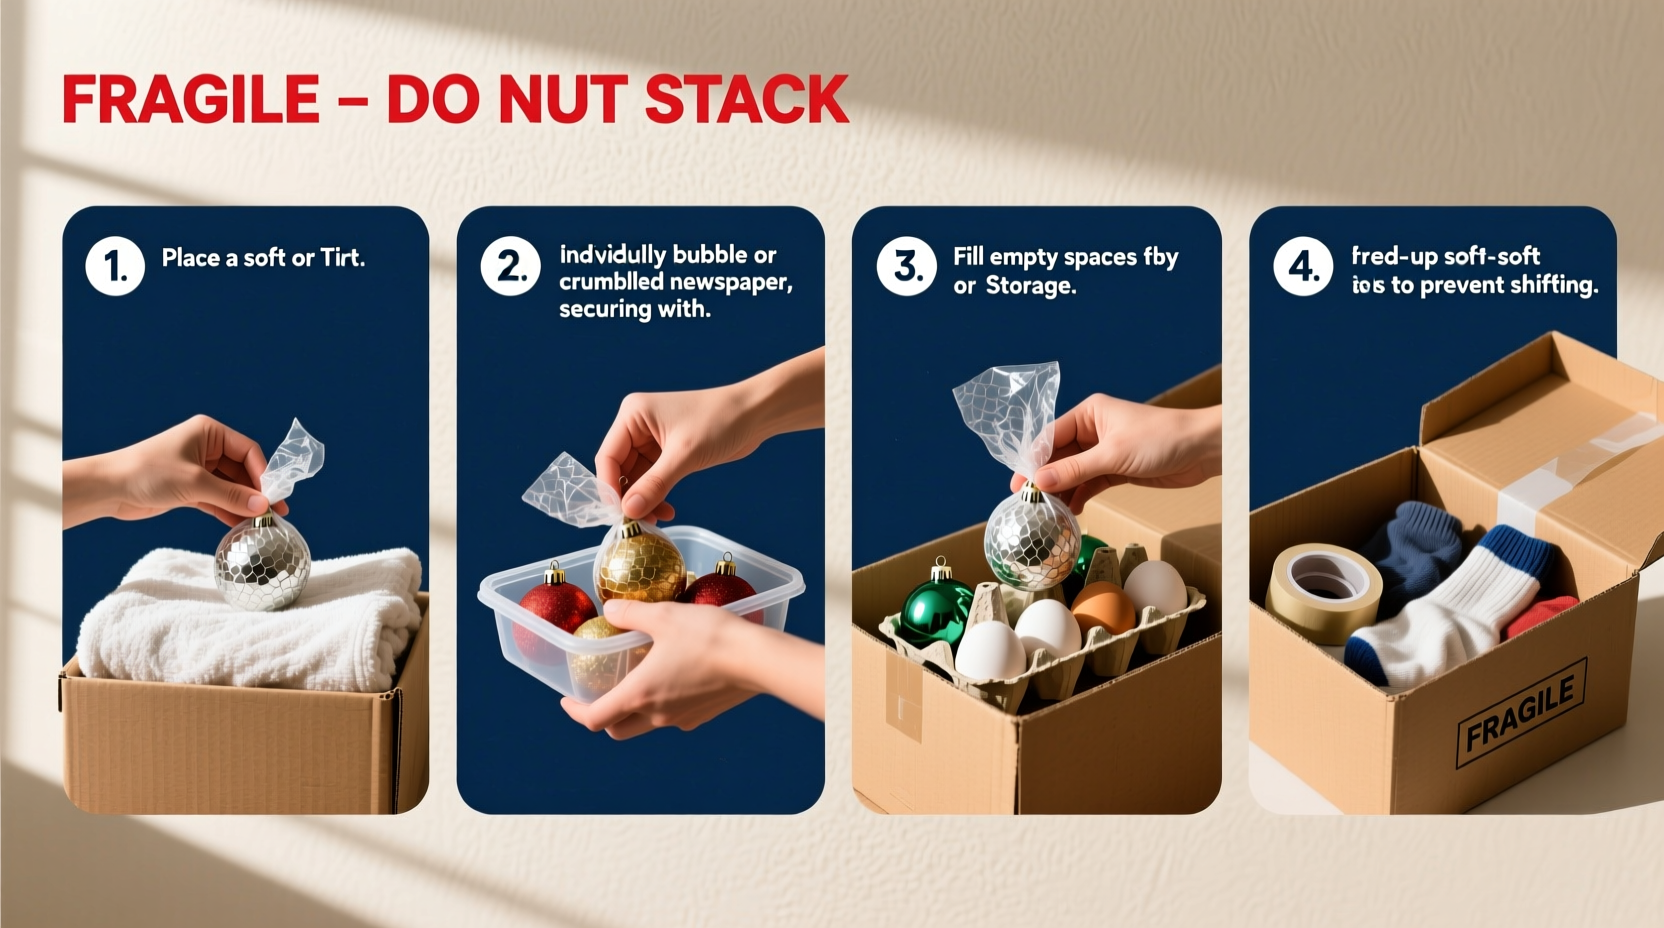
- Clean cotton T-shirts and pillowcases provide soft, stretchy containment with gentle friction—preventing ornaments from rolling or shifting during handling or stacking.
- Cardboard boxes from cereal, shipping, or moving supplies are rigid enough to resist crushing but porous enough to allow airflow—critical for preventing condensation buildup in seasonal storage.
- Egg cartons and muffin tins offer built-in, dimensionally stable compartments that cradle ornaments at their widest point—the natural center of gravity—reducing leverage-based stress on stems and hooks.
- Toilet paper and paper towel rolls double as vertical stabilizers and ring supports, especially for bell-shaped or flared ornaments that tend to tip over when laid flat.
As Dr. Lena Torres, Senior Conservator at the National Museum of American History, explains: “The most effective protective layers aren’t always the thickest—they’re the most *adaptive*. A single sheet of crumpled kraft paper can outperform three inches of synthetic foam if it’s placed where stress concentrates: at the base of a glass teardrop, behind a porcelain angel’s wing, or beneath the delicate hook of a mercury-glass ball.”
A Step-by-Step Packing System (No Special Tools Required)
Follow this 7-step sequence exactly. Skipping or reordering steps increases failure risk—especially for ornaments with metal hooks, painted details, or internal glitter.
- Sort & inspect: Group ornaments by size, weight, and fragility—not by theme or color. Set aside any with loose hooks, chipped paint, or hairline cracks for immediate repair or separate handling.
- Clean gently: Use a dry, lint-free microfiber cloth or soft makeup brush to remove dust. Never use water, glass cleaner, or polish—moisture trapped under wrapping causes clouding and adhesive failure.
- Wrap individually: For glass, ceramic, or thin-metal ornaments: place on a 10\" × 10\" square of plain white paper towel (avoid colored or printed paper—ink can transfer). Fold corners snugly over the ornament like an envelope, then tuck ends tightly. For delicate painted surfaces or glued-on glitter, add a second layer wrapped *perpendicular* to the first—this prevents seam pressure from concentrating on one spot.
- Choose compartmentalization: Place each wrapped ornament into its own cavity. Egg cartons work for ornaments up to 3.5\" wide. Muffin tins (preferably nonstick-coated) hold larger pieces securely. For irregular shapes—like wire-wrapped stars or crocheted snowflakes—use inverted small yogurt cups or plastic shot glasses lined with a scrap of fleece.
- Stabilize vertically: Insert a cut-to-length toilet paper roll upright in the center of each cavity *before* placing the ornament. This keeps the piece centered and absorbs lateral movement. For ornaments with long hooks (e.g., vintage Czech glass), thread the hook through the roll’s center before placing the ornament inside.
- Layer with buffer zones: Between rows in multi-layer boxes, lay down a full sheet of corrugated cardboard (cut from a shipping box) or two overlapping sheets of brown paper bag material. This prevents upper-layer weight from compressing lower-layer wraps.
- Seal & label thoughtfully: Close the box fully but do not tape shut permanently. Instead, secure flaps with removable painter’s tape or paper clips—allowing for mid-season checks. Label the top and one long side with permanent marker: “FRAGILE • [Ornament Type] • [Year Stored] • TOP LOAD ONLY”.
Do’s and Don’ts: A Quick-Reference Table
| Action | Do | Don’t |
|---|---|---|
| Wrapping Material | Plain white paper towels, acid-free newsprint, clean cotton T-shirts | Colored tissue paper (bleeds), newspaper with colored ink, plastic grocery bags (static + moisture) |
| Compartment Choice | Egg cartons (cardboard, not styrofoam), muffin tins, shallow cardboard trays with dividers | Stacked plastic ornament hangers, mesh bags, shoeboxes filled with loose packing peanuts |
| Storage Environment | Cool (40–65°F), dry (30–50% RH), dark, and vibration-free—e.g., interior closet shelf away from furnace or attic | Garages, attics, basements (humidity swings), near windows (UV exposure), on concrete floors (cold condensation) |
| Stacking Strategy | Single-layer boxes only. If stacking essential, limit to two identical boxes. Place heavier boxes on bottom—never on top of ornament boxes. | Stack more than two ornament boxes. Place books, tools, or other dense items on top of ornament storage. |
| Seasonal Handling | Unwrap and air ornaments for 1 hour before hanging—especially after winter storage—to equalize humidity. | Hang directly from storage—condensation residue weakens hooks and dulls finishes. |
Real-World Example: The Johnson Family’s 42-Year Collection
The Johnsons inherited a cedar chest of German glass ornaments from Great-Aunt Clara in 1981—over 120 pieces, including rare 1930s Dresden foil birds and hand-painted Bavarian fruit. For decades, they stored them in a plastic tub lined with polyester batting. By 2015, 17% showed surface scratching, 3 had broken stems, and several mercury-glass balls had developed cloudy “fogging” inside the glass.
In 2016, they switched to a household-item method: cleaned each ornament with a dry makeup brush, wrapped individually in unbleached paper towels (two perpendicular layers), placed in repurposed cardboard egg cartons (reinforced with hot-glued cardboard strips between rows), and stored in labeled, ventilated cardboard boxes on a closet shelf—never stacked. They added silica gel packets (from pharmacy deliveries) to each box, replaced annually.
After seven seasons, zero breakage occurred. Surface scratches vanished (due to elimination of polyester abrasion), and fogging halted entirely. Most significantly, their teenage granddaughter began helping with the ritual—not as a chore, but as a “family archive project.” As Mary Johnson told us: “It stopped feeling like fragile cargo and started feeling like something we *care for*, together.”
Smart Substitutions When You’re Missing One Item
You don’t need every material listed above. Here’s how to pivot without compromising protection:
- No egg cartons? Cut a cereal box into 2\" × 2\" squares. Score and fold each into a cube with an open top. Line with a scrap of flannel—then nestle the wrapped ornament inside.
- No clean cotton T-shirts? Use the softest, most worn-out cotton socks you own—cut off the toe, slide the ornament in, and tie the cuff with baker’s twine. The knit stretch holds shape without pressure.
- No acid-free paper? Soak plain printer paper in weak black tea (1 bag per cup of water, steeped 5 minutes, cooled), then blot dry on a towel. Tannins neutralize acids—this is a centuries-old archival trick used for aging documents.
- No silica gel? Fill clean, dry baby food jars with uncooked white rice. Seal with a coffee filter and rubber band. Rice absorbs ambient moisture effectively for 3–4 months before needing oven-drying at 200°F for 20 minutes.
- No muffin tin? Use a clean, empty 12-can soda case. Cut the top flaps off, reinforce corners with masking tape, and line each cavity with a folded paper towel square. Works especially well for larger ornaments like wooden angels or fabric wreaths.
FAQ: Your Top Storage Questions—Answered
Can I reuse last year’s wrapping paper or tissue?
No—unless it’s completely unwrinkled, undamaged, and free of ink transfer. Used wrapping paper loses tensile strength and develops micro-tears that concentrate pressure. Even “gentle” creases become stress points under stacking weight. Always use fresh, uncreased material for each season’s packing.
What’s the safest way to store ornaments with metal hooks?
Hook integrity is the #1 failure point. Before wrapping, inspect each hook for bending or corrosion. For plated hooks, lightly rub with a drop of mineral oil on a cotton swab—this prevents oxidation during storage. When wrapping, orient the ornament so the hook points *upward* inside its cavity (not sideways), and ensure the toilet paper roll extends ¼\" above the hook’s bend—this prevents the hook from catching on adjacent wraps or box walls during handling.
How often should I check my stored ornaments?
Once per season—ideally in early spring (after holidays) and again in late summer (before decorating prep). Open one box, unwrap 2–3 ornaments at random, inspect for moisture, odor, or loosening wraps, then rewrap and return. This takes under 10 minutes per box and catches issues before they cascade. Never go more than 18 months without visual verification.
Conclusion: Your Ornaments Deserve Intentional Care—Not Just Space
Packing fragile ornaments isn’t about perfection—it’s about respect. Respect for the hands that made them, the years they’ve witnessed, and the quiet joy they bring when light catches their curve just so. You don’t need a workshop, a budget, or expert certification to honor that. You need attention to detail, consistency in execution, and the willingness to treat ordinary household items as purpose-built tools.
Start small this season: choose five ornaments you love most. Pack them using just the egg carton, paper towels, and toilet paper rolls you already own. Notice how the process slows you down—how you examine each piece, remember where it came from, feel its weight and texture. That’s where preservation begins: not in the box, but in the moment of mindful handling.
Your collection isn’t waiting to be stored. It’s waiting to be tended. And tend it you can—with what’s already in your home, right now.


 浙公网安备
33010002000092号
浙公网安备
33010002000092号 浙B2-20120091-4
Comments
No comments yet. Why don't you start the discussion?