
Applying nail polish at home should be a simple, satisfying ritual—but too often, it ends in frustration. Streaks, uneven coats, and patchy color are common problems, especially when using budget-friendly drugstore polishes that may not have the ultra-smooth consistency of high-end brands. The good news? With the right technique, tools, and attention to detail, you can achieve salon-quality results using affordable polishes from your local pharmacy or supermarket.
The key isn’t expensive products—it’s method. From nail prep to brush control, every step influences the final finish. Whether you're a beginner or someone who's struggled with polish application for years, mastering even coverage is within reach. This guide breaks down exactly how to eliminate streaks, build flawless layers, and make drugstore nail polish work like a pro product.
Why Drugstore Polish Often Streaks (And How to Fix It)
Drugstore nail polishes are formulated to be cost-effective, which sometimes means they contain less pigment, thicker bases, or inconsistent flow. Unlike premium brands that invest in advanced resins and solvents for smoother application, many mass-market polishes require extra care during use to avoid streaking.
Common issues include:
- Low pigment concentration: Requires multiple coats, increasing the risk of dragging and smudging.
- Thick or clumpy formulas: Harder to spread evenly, especially if the polish has been sitting unused.
- Poor brush design: Wider or stiffer bristles make precision difficult on smaller nails.
- Fast drying time: Can cause visible lines if you don’t work quickly and smoothly.
But none of these are dealbreakers. In fact, understanding these limitations helps you adapt your technique accordingly. The solution lies in preparation, application rhythm, and layer management—not replacing your polish with pricier alternatives.
Step-by-Step Guide to Streak-Free Nails
Achieving even, streak-free color starts long before you dip the brush into the bottle. Follow this detailed timeline for consistent results every time.
- Remove old polish completely. Use acetone-free remover to avoid over-drying cuticles. Residue from previous manicures creates an uneven base.
- Shape and buff gently. File nails in one direction to prevent splitting. Lightly buff the surface to remove shine—this helps polish adhere better without causing damage.
- Push back cuticles and clean the nail bed. Use a cuticle stick and a drop of oil or cleanser. Any debris will disrupt smooth application.
- Wipe nails with alcohol or nail prep solution. This removes oils and dust, ensuring maximum adhesion. Let them dry completely.
- Apply a thin base coat. Even if your polish claims to have a base, using a separate one prevents staining and improves longevity. Wait 2–3 minutes to dry.
- Prepare your polish. Roll the bottle, wipe excess off the brush on the neck, and ensure bristles aren’t splayed.
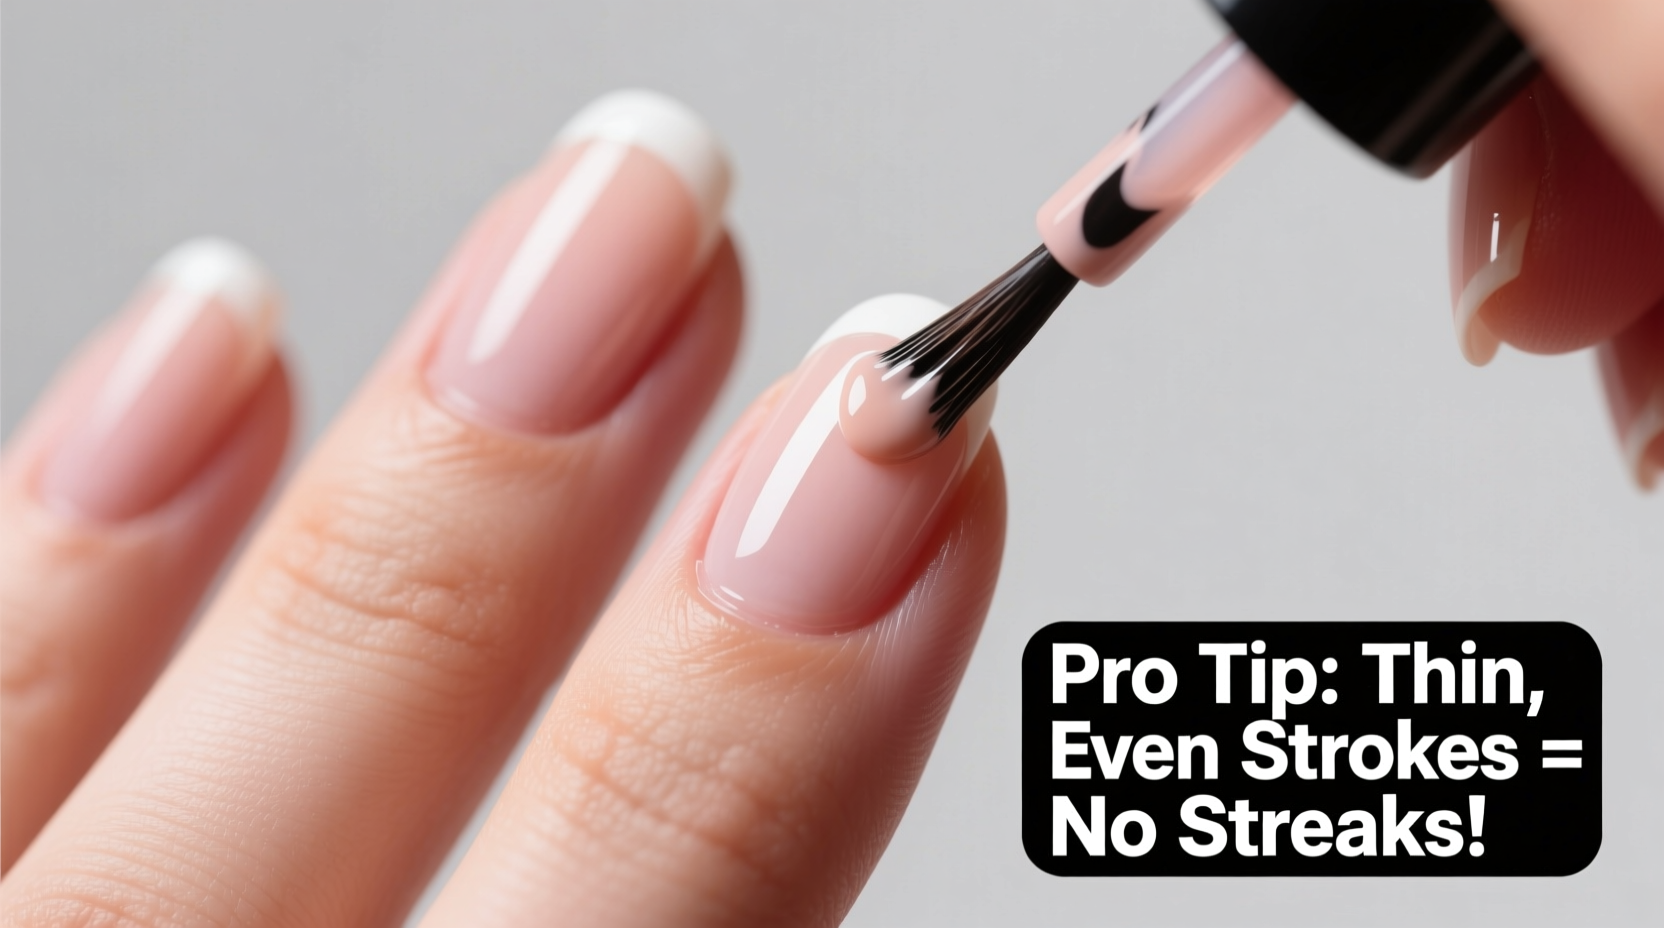
- Apply the first color coat using the “three-stroke method.”
The Three-Stroke Method Explained
This professional technique ensures full coverage with minimal overlap:
- Place the brush down the center of the nail, starting just above the cuticle without touching it.
- Sweep outward toward the free edge in one fluid motion.
- Use the left and right sides of the brush to fill in the sides of the nail, working from base to tip.
Keep each stroke light and deliberate. Don’t go back over areas unless absolutely necessary—the second pass creates streaks. If coverage is still thin, wait 3–5 minutes and apply a second coat using the same method.
Choosing the Right Drugstore Polish for Smooth Application
Not all budget polishes are created equal. Some drugstore brands now rival luxury lines in performance. Look for formulas labeled “creamy,” “high-shine,” or “smooth glide” rather than “matte” or “chunky glitter” for best results when learning streak-free application.
Here’s a comparison of popular drugstore brands based on ease of application and streak resistance:
| Brand | Best For | Streak Risk | Pro Tip |
|---|---|---|---|
| OPI Nail Lacquer (Drugstore availability varies) | All nail types, rich pigments | Low | Thin out older bottles with a few drops of polish thinner |
| Essie | Natural-looking pinks and nudes | Moderate | Apply two thin coats instead of one thick one |
| Revlon ColorStay | Long wear, opaque coverage | Low-Moderate | Let base coat dry fully before color |
| Maybelline Color Show | Bright colors, affordability | Moderate-High | Roll bottle before use; avoid shaking |
| Wet n Wild MegaLast | Vibrant shades, quick dry | High | Work fast and confidently—don’t hesitate mid-stroke |
When selecting a shade, remember that sheer or pastel colors almost always require more coats. Start with opaque reds, berries, or navies—they tend to level out better and hide imperfections.
“Most streaks come from applying too much polish at once. A thin, even layer dries smoother and reflects light evenly.” — Dana L., Professional Manicurist with 12 years of experience
Common Mistakes That Cause Streaks (And How to Avoid Them)
Even with quality polish, poor habits sabotage results. These errors are more common than you think—and easy to fix.
- Using an overloaded brush: Dipping too deep pulls up excess polish, leading to drips and uneven spreading. Wipe the brush on the bottle neck once after pulling it out.
- Rushing the drying time between coats: Applying a second coat too soon drags the first layer, creating visible lines. Wait at least 3–5 minutes.
- Skipping the base coat: Bare nails absorb polish unevenly, especially lighter shades. A clear base creates a uniform canvas.
- Reapplying immediately after a mistake: Trying to “fix” a streak by brushing over wet polish only makes it worse. Let it dry, then add a new thin coat.
- Ignoring brush condition: Frayed or stiff bristles distribute polish poorly. Replace old brushes or clean them regularly with nail polish remover.
Another overlooked factor is lighting. Poor visibility makes it hard to see streaks as they form. Always paint in bright, natural-like light—preferably near a window or under a daylight LED lamp.
Real Example: From Patchy to Perfect in One Weekend
Sarah, a 28-year-old teacher from Ohio, had given up on at-home manicures. “Every time I tried red polish, it looked like I’d painted with a crayon,” she said. After watching a tutorial on thin-layer application, she decided to test the three-stroke method with her existing Maybelline Ruby Wine shade.
She prepped her nails with rubbing alcohol, used a base coat, and applied the first color coat slower than usual—focusing on center placement and single strokes. She waited five minutes, then repeated. The result? Full, glossy coverage with no visible streaks. “I couldn’t believe it was the same polish,” she said. “It was all about how I applied it.”
She now does her own nails weekly and recommends others start with darker shades to build confidence before moving to nudes or whites.
Checklist for Flawless Drugstore Manicures
Use this checklist before every polish session to ensure optimal conditions:
- ✅ Remove all old polish
- ✅ Shape and file nails gently
- ✅ Push back cuticles and clean nail beds
- ✅ Wipe nails with alcohol or prep solution
- ✅ Apply a clear base coat and let dry
- ✅ Roll polish bottle (don’t shake)
- ✅ Wipe excess off brush
- ✅ Use the three-stroke method per finger
- ✅ Wait 3–5 minutes between coats
- ✅ Finish with a high-quality top coat
- ✅ Wash hands carefully after 20 minutes
Following this routine consistently eliminates most causes of streaking and dramatically improves the appearance of any drugstore polish.
Frequently Asked Questions
Can I fix streaks after the polish dries?
No—once polish is dry, you cannot brush over it without damaging the finish. Your best option is to apply another very thin coat over the entire nail to even out the surface. Alternatively, use a ridge-filling top coat next time to minimize visibility of underlying texture.
How many coats of drugstore polish should I apply?
Two thin coats are ideal for most shades. Three coats may be needed for sheer or light colors, but never apply more than three—thick layers chip faster and increase streak risk. Always let each coat dry before adding the next.
Does top coat help hide streaks?
A glossy top coat can reduce the appearance of minor streaks by leveling the surface and reflecting light uniformly. However, it won’t fix major unevenness. For best results, focus on perfecting your color application first, then seal with a quick-dry top coat like Seche Vite or Essie Gel Setter.
Final Tips for Lasting, Streak-Free Results
Consistency beats perfection. Even if your first attempt isn’t flawless, each manicure builds muscle memory. Over time, your hand-eye coordination improves, and the process becomes second nature.
Store your polishes upright in a cool, dark place to preserve their consistency. Heat and sunlight accelerate separation and thickening. And if a bottle gets too thick, revive it with a few drops of nail polish thinner (not remover) instead of tossing it.
Remember: great nails aren’t about the price tag on the bottle. They’re about patience, practice, and paying attention to the details that make a real difference.


 浙公网安备
33010002000092号
浙公网安备
33010002000092号 浙B2-20120091-4
Comments
No comments yet. Why don't you start the discussion?