
Painting your nails is more than a beauty routine—it’s a form of self-expression. But when you’re managing the process with only one hand due to injury, disability, or temporary limitation, traditional methods can feel frustrating or even impossible. The good news: with the right tools and technique, you can achieve clean, salon-quality results from home. One of the most effective strategies is using tape as a guide. This method stabilizes your hand, prevents smudging, and gives you control over polish placement—even if you're applying with your non-dominant hand or working around limited mobility.
Tape-guided nail painting isn’t just for those with physical challenges. It’s also a smart solution for anyone who wants sharper edges, cleaner cuticles, and fewer mistakes. In this guide, we’ll walk through everything you need to know—from choosing materials to executing flawless application—and show how simple adjustments can make all the difference.
Why Tape Works: The Science Behind Clean Nail Lines
When painting nails with one hand, the biggest challenge is stability. Small tremors, awkward angles, or lack of support can lead to streaks, uneven coats, and polish on the skin. Tape acts as a physical barrier that defines the edge of your nail, protecting surrounding skin and giving you a straight reference line.
The adhesive used in common household tapes—like painter’s tape or medical tape—is gentle enough not to damage delicate skin but strong enough to stay in place during application. When applied correctly, it creates a “mask” that allows you to paint confidently without worrying about cleanup afterward.
“Tape guides are a game-changer for adaptive beauty routines. They offer precision and reduce anxiety about making mistakes.” — Dr. Lila Nguyen, Occupational Therapist & Accessibility Advocate
This technique has been adopted by occupational therapists working with clients recovering from stroke, arthritis patients, and amputees who want to maintain personal grooming independence. Its simplicity belies its effectiveness: a small strip of tape can restore agency and confidence in daily care rituals.
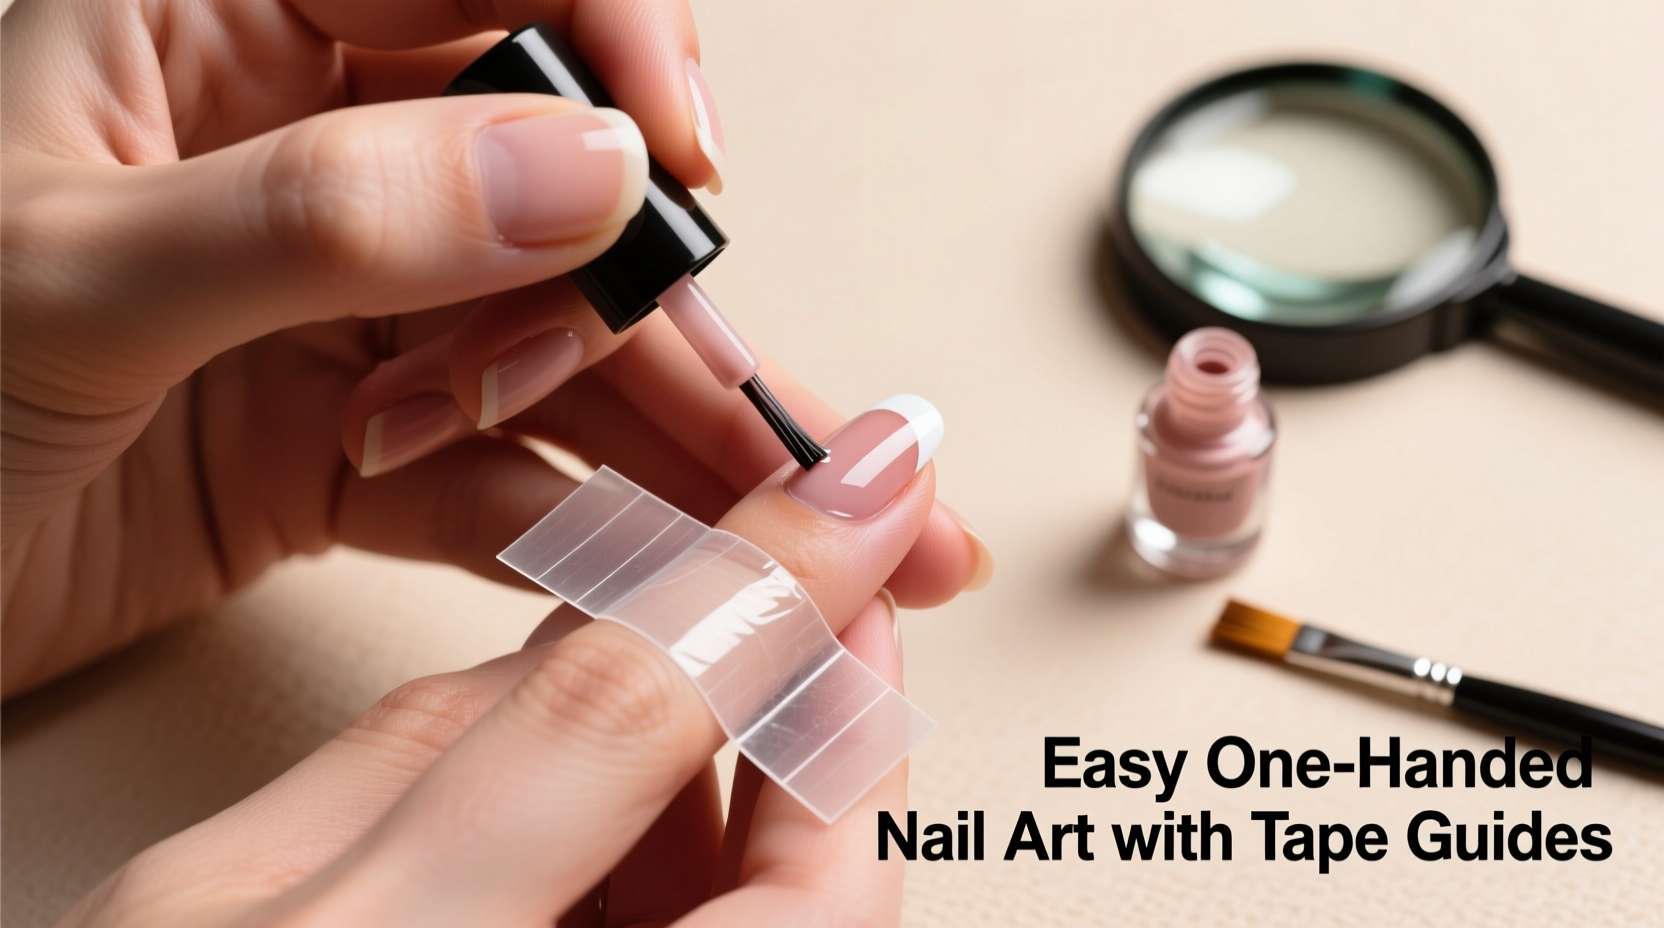
Step-by-Step Guide: Painting Nails with One Hand Using Tape
Follow this detailed sequence to achieve neat, professional-looking nails safely and efficiently. Each step accounts for reduced dexterity and maximizes leverage and control.
- Gather Your Supplies
Before starting, ensure everything is within reach. You’ll need:- Nail polish remover and cotton pads (or alcohol wipes)
- Base coat, color(s), and top coat
- Fine-tip nail art brush (optional, for corrections)
- Painter’s tape, medical tape, or nail-specific stencil tape
- Small scissors or nail clipper (for trimming tape)
- Nail file and buffer
- Lint-free wipe or tissue
- Prepare Your Nails
Use your dominant hand to remove old polish. If needed, use a single cotton pad soaked in remover and press it onto each nail, holding for 10–15 seconds before wiping away. File and shape your nails as desired. Buff lightly to smooth ridges and help polish adhere better. - Cut Tape Strips Ahead of Time
Pre-cut small strips of tape—about 1 inch long—so they’re easy to pick up and position. Avoid handling long pieces that may stick to themselves or be hard to manage with one hand. - Apply Tape Around Each Nail
Place a small piece of tape along the side of the nail, sticky side down, so it covers the skin next to the nail bed. Position it at a slight angle to follow the natural curve of your cuticle. Repeat for both sides of the nail. For the fingertip edge (if doing French tips), apply a tiny inverted “V” shape across the tip, leaving only the portion you want painted exposed. - Apply Base Coat
Hold the polish brush between thumb and forefinger, stabilizing the bottle against your leg or table edge. Apply a thin, even base coat to protect the nail and improve adhesion. Let dry completely—this usually takes 2–3 minutes. - Paint Your Color Coats
Apply the first color coat with steady strokes from cuticle to tip. Focus on covering the center first, then gently pull polish toward the taped edges. Don’t overload the brush; two thin layers are better than one thick one. Allow 3–4 minutes of drying time between coats. - Peel Off Tape While Polish Is Slightly Tacky
After your final color coat (but before applying top coat), carefully peel off the tape. Do this slowly at a 45-degree angle to avoid lifting wet polish. Removing tape now ensures crisp lines without disturbing the fresh top layer later. - Apply Top Coat
Seal your design with a clear top coat to prevent chipping and add shine. Be careful not to get too much product near the cuticle area, which can cause peeling. - Final Touch-Ups (Optional)
If any polish bled under the tape, dip a small brush in remover and trace along the edge for a clean finish.
Choosing the Right Tape: A Comparison Guide
Not all tapes are created equal. Some are too sticky and risk damaging skin; others are too weak and shift during painting. Here’s a breakdown of common options:
| Type of Tape | Pros | Cons | Best For |
|---|---|---|---|
| Painter’s Tape | Low adhesion, clean removal, widely available | May lift if handled too much | General use, beginners |
| Medical Paper Tape | Breathable, hypoallergenic, gentle on sensitive skin | Slightly less precise edge | Sensitive skin, frequent users |
| Nail Stencil Tape | Designed specifically for nail art, ultra-thin | More expensive, harder to find | Precision work, French tips |
| Clear Scotch Tape | Easily accessible | Leaves residue, often too sticky | Not recommended |
| Foil Tape (e.g., HVAC) | Highly malleable, conforms well | Can leave metallic dust, overkill for basic use | Advanced nail art |
Real-Life Example: Sarah’s Journey to Independent Manicures
Sarah, a graphic designer from Portland, lost partial use of her right hand after a car accident. She loved doing her nails weekly but found herself relying on salon visits or family members—both of which made her feel dependent. After discovering tape-guided painting through an online adaptive living forum, she began experimenting with different tapes and tools.
At first, she struggled with positioning the tape evenly. But by pre-cutting strips and using a magnifying mirror to see her fingertips clearly, she improved quickly. Within three weeks, she was able to complete a full manicure solo in under 30 minutes. “It gave me back a sense of normalcy,” she shared in a blog post. “Now I even try glitter gradients and ombres. The tape holds everything in place so I don’t have to worry about shaking.”
Sarah now teaches virtual workshops for people with limb differences, emphasizing preparation, patience, and the power of small adaptations.
Common Mistakes and How to Avoid Them
- Applying tape over wet polish: Always prep nails first. Moisture weakens adhesion and causes lifting.
- Using too much polish near edges: Overloading the brush leads to bleeding under the tape. Wipe excess off on the bottle neck.
- Leaving tape on too long: Wait until the color is tacky—not fully dry—before removing tape to avoid cracking.
- Skipping the base coat: Without protection, colored polish can stain the nail and chip faster.
- Trying complex designs too soon: Start with solid colors before attempting stripes or French tips.
“Adaptive beauty isn’t about perfection. It’s about access, dignity, and the freedom to express yourself on your own terms.” — Maya Torres, Founder of Inclusive Glam Collective
Checklist: Your One-Handed Nail Painting Routine
Keep this checklist handy for consistent results every time:
- ✅ Remove old polish and prep nails
- ✅ Cut 10 small tape strips in advance
- ✅ Position tape snugly beside each nail
- ✅ Apply base coat and let dry
- ✅ Paint 1–2 color coats with controlled strokes
- ✅ Remove tape while polish is still slightly wet
- ✅ Seal with top coat
- ✅ Do touch-ups with a cleanup brush if needed
- ✅ Wash hands carefully after full drying (wait 10+ minutes)
Frequently Asked Questions
Can I reuse tape for multiple nails?
No. Once tape loses its stickiness or picks up polish residue, it won’t seal properly. Always use fresh tape for each nail to ensure clean edges.
What if I don’t have painter’s tape?
Medical paper tape is a great alternative. If unavailable, masking tape works in a pinch—but test it first to make sure it doesn’t irritate your skin or leave residue.
How do I prevent my hand from shaking during application?
Rest your elbow on a stable surface and brace the hand you’re painting against your thigh or a pillow. You can also wrap a rubber band around the polish bottle for better grip control.
Making It Your Own: Customizing the Method
Once you’ve mastered the basics, experiment with variations. Try cutting tape into curved shapes for moon manicures, or use narrow strips to create geometric patterns. Layer different colors by re-taping between coats. With practice, you can achieve intricate designs that rival professional work—all with one hand.
For added ease, consider investing in adaptive tools like magnetic polish holders or suction-cupped trays that keep bottles upright and within reach. These small upgrades compound over time, turning a challenging task into a seamless ritual.
Conclusion: Confidence Starts with Control
Painting your nails with one hand doesn’t mean compromising quality or creativity. With tape as your guide, you gain precision, reduce frustration, and reclaim autonomy in your self-care routine. What might seem like a minor hack—a bit of adhesive and careful planning—can profoundly impact how you feel in your body each day.


 浙公网安备
33010002000092号
浙公网安备
33010002000092号 浙B2-20120091-4
Comments
No comments yet. Why don't you start the discussion?