
Applying nail polish seems simple—until you're trying to avoid smudging the cuticles or leaving streaks along the skin. Even experienced DIYers struggle with clean lines, especially when working without professional tools. But achieving salon-quality results at home isn’t out of reach. With the right preparation, technique, and a few clever tricks, you can paint your nails flawlessly—without a single drop of polish on your skin.
The key lies in understanding not just *how* to apply polish, but *when* and *where* to intervene during the process. From prepping the nail bed to post-application cleanup, every stage offers an opportunity to refine your precision. Whether you're using classic brush bottles or experimenting with new formulas, these methods will help eliminate messy edges and give you confidence in your at-home manicures.
Prep Like a Pro: The Foundation of Clean Application
Clean, well-prepared nails are essential for precise polish application. When debris, oils, or dry skin surround the nail plate, polish tends to spread unpredictably and adhere unevenly. This increases the likelihood of it creeping onto the skin.
Start by removing any old polish with an acetone-free remover to preserve natural moisture. Gently push back your cuticles using a wooden stick wrapped in cotton or a soft cuticle pusher. Avoid cutting cuticles unless absolutely necessary—this can cause irritation and make cleanup harder later.
Next, lightly buff the surface of each nail to remove shine. This helps the base coat adhere better, reducing the need for multiple thick layers that increase the risk of overflow. After buffing, wipe nails with isopropyl alcohol (70% or higher) to eliminate residual oils. Let them air dry completely before applying anything else.
Technique Matters: Brush Control and Stroke Strategy
The way you hold the brush and guide it across the nail makes all the difference. Most mistakes happen because users try to cover too much area in one stroke or press too hard, causing the bristles to splay and deposit polish outside the nail boundary.
Hold the polish bottle like a pencil, gripping it near the base for maximum control. Load the brush properly by wiping one side gently against the neck of the bottle—this removes excess product and prevents drips.
Begin each application with a center stroke: place the brush just above the cuticle (but not touching the skin), then pull it smoothly down to the tip. Use the natural curve of the brush to follow the shape of the nail. Next, do one stroke on each side—left and right—working from cuticle to tip. These three strokes should fully cover most nails without needing additional passes.
Keep your free hand steady by resting your pinky finger on a flat surface or against your other hand. Move slowly and deliberately. Rushing leads to shaky lines and accidental contact with the skin.
“Precision in nail painting comes from muscle memory. Practice controlled strokes daily, even if just on one nail, and you’ll see dramatic improvement within a week.” — Lila Nguyen, Professional Nail Technician & Educator
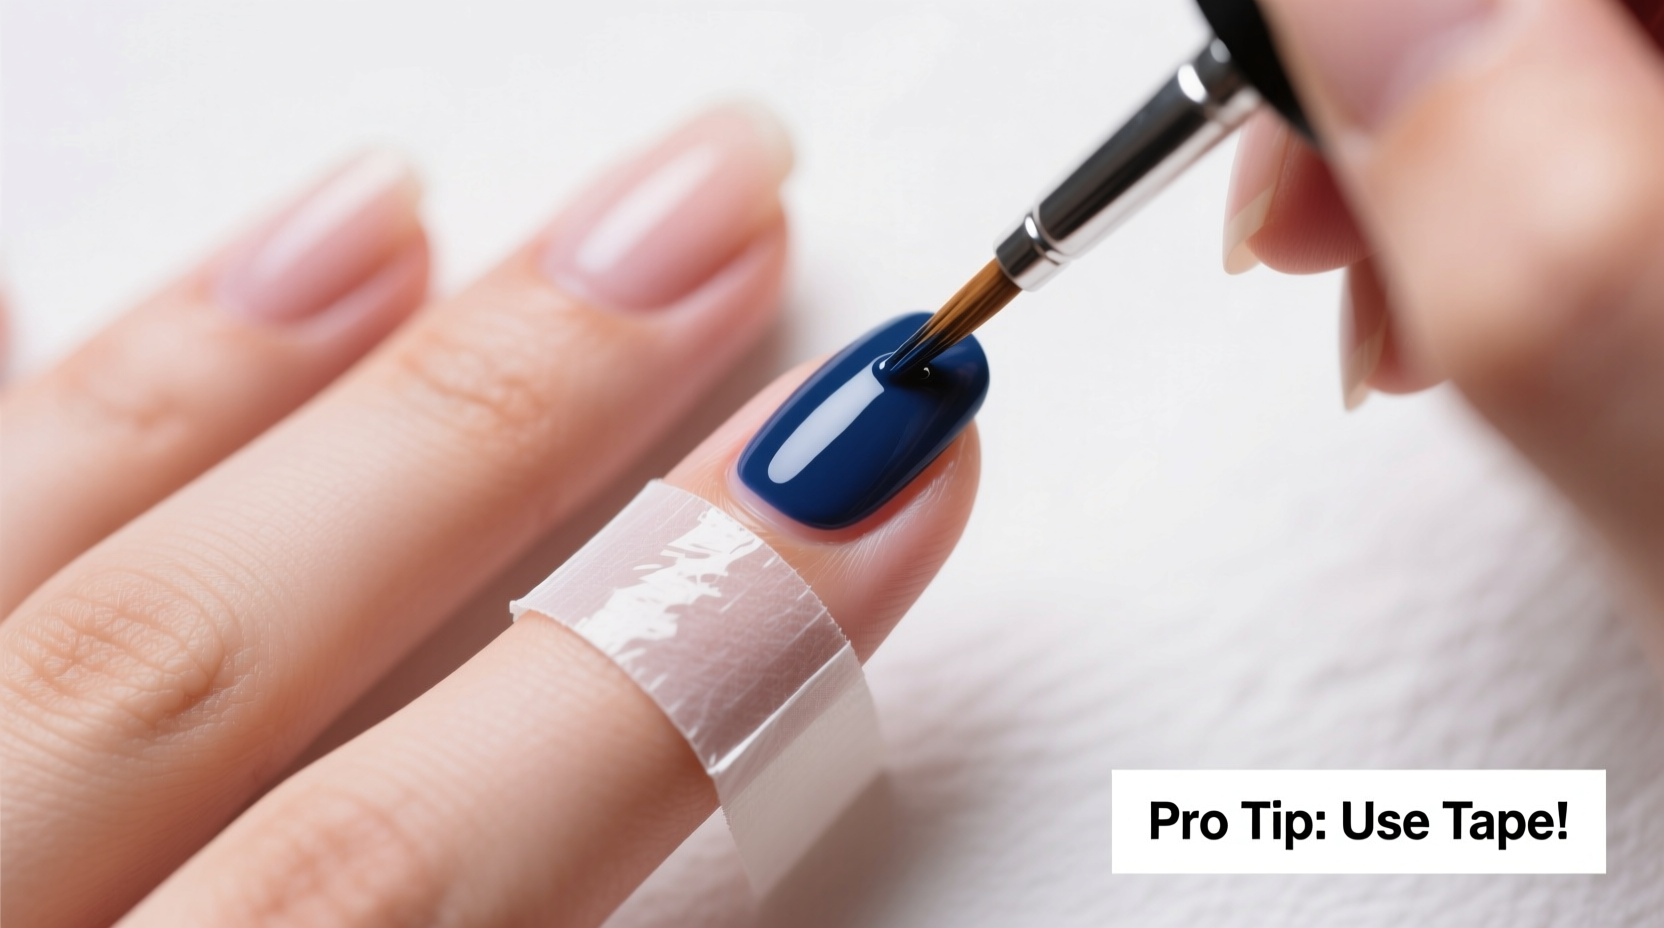
Use Barriers: Skin Guards and Tape Tricks
One of the most effective ways to prevent polish migration is to create a physical barrier between the nail and surrounding skin. While professionals often use specialized tools, there are affordable and accessible alternatives for home use.
Nail guides—reusable silicone stencils—are designed to fit snugly around each nail, shielding the cuticles and sidewalls. They’re easy to clean and work well for beginners. Alternatively, small pieces of scotch tape or painter’s tape can be placed around the nail, sticky side down, to catch overspray. Press the edges firmly to prevent seepage.
If you don’t have access to either, try this low-cost method: dip a cotton swab in a thin layer of petroleum jelly and lightly coat the skin around the nail. When polish lands on oiled areas, it wipes off easily after drying. Just be careful not to get jelly on the nail itself—it will ruin adhesion.
| Barrier Method | Best For | Pros | Cons |
|---|---|---|---|
| Silicone Nail Guides | Beginners, frequent painters | Reusable, precise, easy to clean | Initial cost, limited sizing |
| Tape (Scotch/Painter’s) | Quick fixes, bold colors | Inexpensive, widely available | Can lift cuticles if pulled too fast |
| Petroleum Jelly | Touch-ups, no-tool situations | Cheap, instantly accessible | Risky if applied to nail surface |
| None (freehand only) | Experienced users | No prep needed | Higher error rate, longer cleanup |
Step-by-Step Guide: Flawless Nails in 7 Stages
Follow this detailed sequence to minimize mistakes and maximize cleanliness throughout your manicure.
- Wash and dry hands – Remove dirt and oil. Dry thoroughly, especially under rings and between fingers.
- Remove old polish – Use a gentle remover. Allow nails to breathe for 5 minutes afterward.
- Shape and prep – File nails into desired shape (oval, square, etc.). Lightly buff surface and clean with alcohol.
- Apply base coat – One thin layer, staying strictly on the nail. Wait 2–3 minutes to dry.
- Paint color coats – Apply two thin layers, allowing 3–4 minutes between coats. Use the three-stroke method for accuracy.
- Clean up edges – Once final color is dry to touch, use a pointed brush dipped in remover to trace mistakes.
- Seal with top coat – Apply a quick-dry top coat, again avoiding skin contact. Let cure for 10–15 minutes undisturbed.
Real Example: Maria’s Weekend Manicure Transformation
Maria, a graphic designer from Austin, used to dread painting her nails at home. “I’d spend 20 minutes doing the actual polish job,” she said, “and another 30 cleaning up the mess around my cuticles.” Her turning point came when she started using nail tape before applying a vibrant red shade for a friend’s wedding.
She cut small strips of blue painter’s tape and carefully wrapped them around each nail, pressing the edges down. After painting, she peeled the tape away while the polish was still slightly wet. The result? Crisp, sharp edges that looked professionally done. “It felt like magic,” she recalled. “For the first time, I didn’t feel embarrassed showing my hands.” Now, she uses the tape method for bold colors and saves freehand for neutrals.
Her advice? “Don’t skip the prep. I used to think it was faster to just go for it, but skipping cleaning and shaping made everything sloppier. Ten extra minutes upfront saved me half an hour of cleanup.”
Do’s and Don’ts: Quick Reference Table
| Do’s | Don’ts |
|---|---|
| Use thin, even layers instead of thick globs | Apply thick coats that take forever to dry |
| Let each layer dry slightly before adding the next | Rush through coats and end up with smudges |
| Clean your brush after every dip into the bottle | Drag excess polish onto the nail |
| Use a cleanup brush and acetone for fine corrections | Dip a cotton swab directly into nail polish remover |
| Store polish in a cool, dark place to maintain consistency | Leave bottles open or expose them to sunlight |
Frequently Asked Questions
How do I fix polish on my skin without smudging the design?
Wait until the polish is completely dry to the touch. Then, dip a small angled brush (like an eyeliner or detail brush) into pure acetone or non-acetone remover and gently trace along the mistake. The precision tool allows you to remove stray polish without disturbing the nail art.
Can I use hand sanitizer to clean up edges?
No. While hand sanitizer contains alcohol, it also includes fragrances, gels, and thickeners that can smear wet polish or leave residue. Stick to pure acetone or dedicated nail polish remover for cleanup.
Why does my polish always bleed under the cuticle?
This usually happens due to overloading the brush or applying polish too close to the skin. Always leave a tiny gap—about the thickness of a hairline—between the polish and the cuticle. Also, ensure your cuticles aren’t swollen or lifted, as this creates pockets where polish can pool.
Final Thoughts: Precision Is a Skill, Not Luck
Painting your nails cleanly isn’t about having perfect hands or expensive products—it’s about consistent practice and smart technique. Every step, from prepping your nails to choosing the right cleanup method, contributes to a polished look that feels professional and put-together.
You don’t need a full kit to start improving. Begin with one change: maybe it’s switching to thinner coats, using tape for your next bright color, or simply cleaning your brush more often. Small adjustments compound over time, turning frustrating attempts into confident, beautiful results.
Remember, even pros make mistakes. What sets them apart is knowing how to fix them—and how to prevent them next time. With these strategies in your routine, you’re not just painting your nails; you’re mastering a craft.


 浙公网安备
33010002000092号
浙公网安备
33010002000092号 浙B2-20120091-4
Comments
No comments yet. Why don't you start the discussion?