
Choosing the right photo for a heart locket keychain is more than an emotional decision—it’s a technical one too. A poorly sized image can appear blurry, cropped awkwardly, or simply fail to fit. Whether you're personalizing a gift for a loved one or preserving a cherished memory, getting the dimensions exactly right ensures your photo looks crisp and meaningful every time it's opened. This guide walks you through the entire process, from selecting the ideal image to final resizing, so your locket displays your moment with precision and care.
Understand Your Locket’s Photo Dimensions
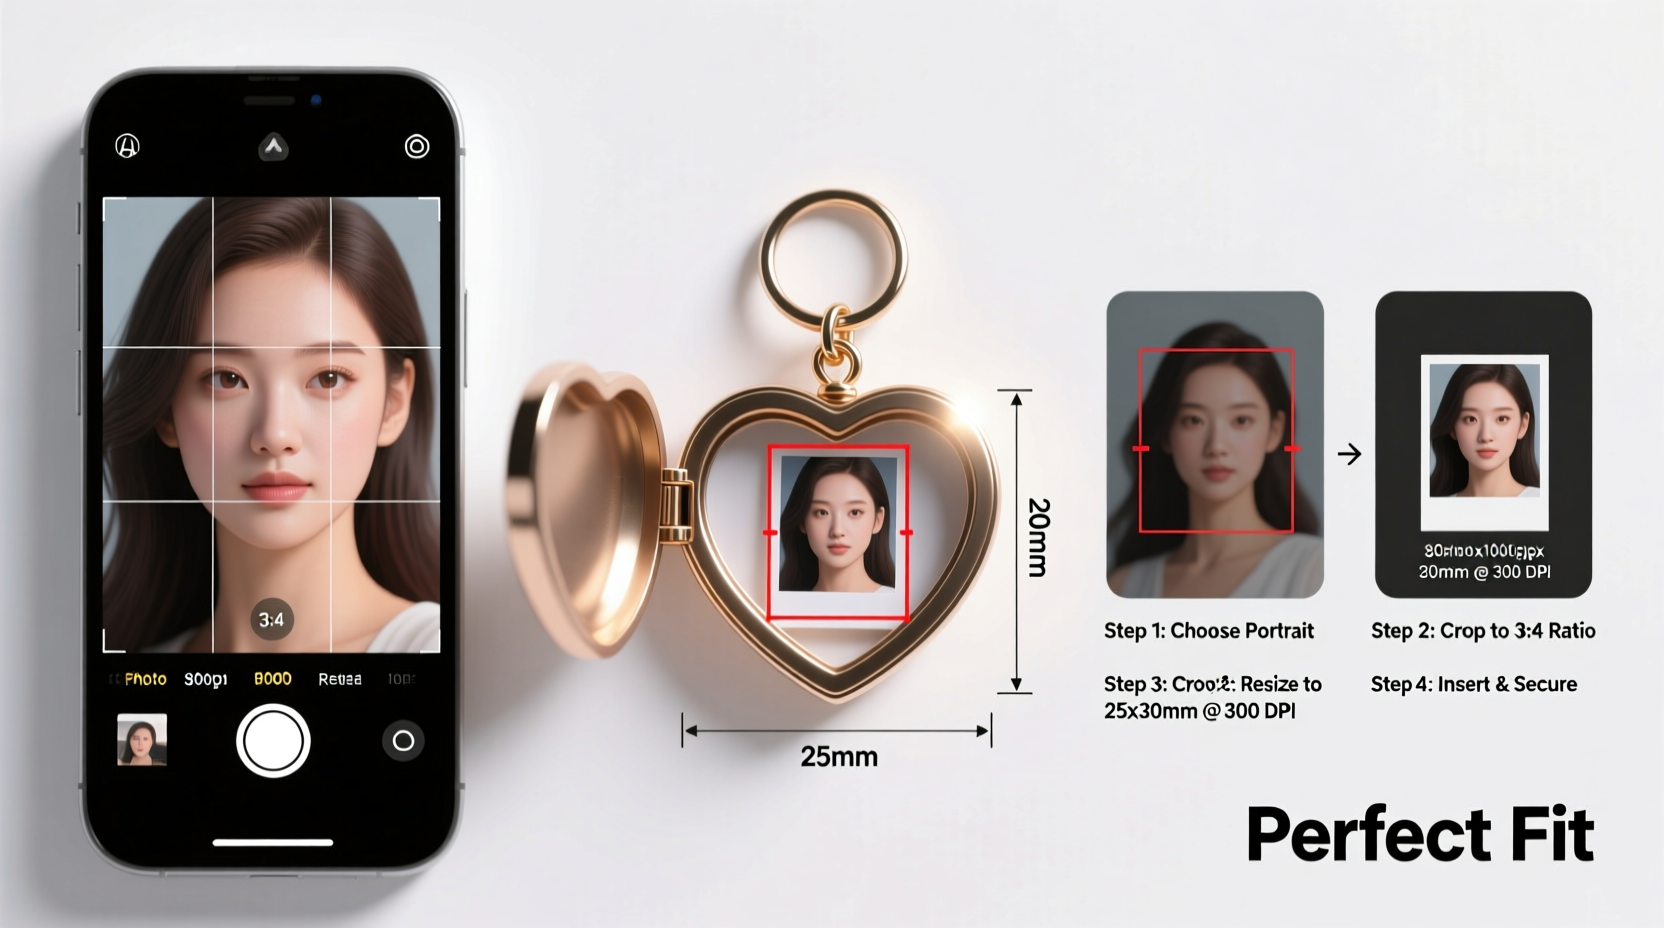
Not all heart lockets are created equal. Interior photo compartments vary significantly between models, brands, and materials. Before editing any photo, you must know the exact space available inside your locket. Most standard heart-shaped locket inserts measure between 0.75 inches and 1 inch in diameter, but some may be smaller—especially those designed for minimalist jewelry.
To determine your locket’s usable area:
- Open the locket carefully.
- Use a digital caliper or ruler to measure the inner frame where the photo sits.
- Note both width and height, even if the space is circular or oval.
For digital editing purposes, convert these measurements into pixels. At a standard print resolution of 300 DPI (dots per inch), a 1-inch circle requires a 300x300 pixel image. If your locket is 0.8 inches wide, aim for approximately 240x240 pixels.
Step-by-Step Guide to Resizing Your Photo
Resizing a photo correctly involves more than just shrinking it. Maintaining clarity, aspect ratio, and focal point integrity is essential. Follow these steps to ensure professional-quality results.
- Select the Right Photo: Choose a high-resolution image with good lighting and a clear focal point—ideally a close-up face or a well-composed couple shot.
- Duplicate the Original: Never edit your only copy. Save a duplicate specifically for locket use.
- Crop to Shape: Use software like Adobe Photoshop, GIMP, or Canva to crop the image to a square or circle, matching your locket’s internal shape.
- Resize Precisely: Enter the exact pixel dimensions based on your locket’s size and 300 DPI standard. Avoid stretching or distorting the image.
- Sharpen and Adjust Contrast: Small images lose detail easily. Slightly increase sharpness and contrast to keep facial features visible.
- Save in High-Quality Format: Export as PNG for transparency and lossless quality, or JPEG at maximum quality setting.
If printing at home, use photo paper and test print on regular paper first to verify sizing. If using a professional service, upload the file with a note specifying its intended use for a locket insert.
Do’s and Don’ts When Preparing Locket Photos
| Do’s | Don’ts |
|---|---|
| Use high-resolution photos (at least 1200x1200 pixels original) | Stretch or distort the image to fit |
| Crop tightly around the subject’s face or main feature | Crop during printing—always pre-crop digitally |
| Maintain 300 DPI resolution for clarity | Use low-quality phone thumbnails or social media exports |
| Test print on plain paper before final output | Assume all lockets fit “standard” sizes |
| Choose emotionally significant moments with clear visuals | Pick busy group shots where faces are too small |
Real Example: Sarah’s Custom Gift Success
Sarah wanted to surprise her grandmother with a locket containing a childhood photo of them together. She found a scanned image from an old album, but it was grainy and full of background clutter. Instead of inserting it as-is, she followed a careful process.
First, she measured the locket’s interior—0.85 inches in diameter. That translated to 255x255 pixels at 300 DPI. Using free editing software, she cropped tightly around their two faces, enhanced brightness, and applied mild sharpening. She printed three test versions on adhesive photo paper, trimming each to fit. The final version slid perfectly into place, and the details were clear even under dim light.
“I almost gave up when the original looked blurry,” Sarah said later. “But taking the time to resize it properly made all the difference. My grandma cried when she saw it.”
“Precision matters more than perfection. A well-sized, clearly focused image—even if simple—will always outperform a beautiful but poorly fitted one.” — Marcus Lin, Jewelry Design Consultant
Tips for Long-Term Preservation
Once your photo is in the locket, protect it from damage. Exposure to moisture, sweat, and sunlight can fade or warp even the best-prepared image.
- Avoid wearing the locket while swimming, showering, or exercising.
- Store it in a dry box when not in use, preferably with a silica gel packet.
- If the locket allows replacement, keep a backup printed copy sealed in a protective sleeve.
Frequently Asked Questions
Can I use a smartphone photo for a locket?
Yes, but ensure it’s taken in bright, natural light and saved at the highest resolution. Avoid digital zoom. Check your phone’s settings to confirm photos are saved in full quality, then resize appropriately before printing.
What if my locket is oval instead of round?
Oval compartments require rectangular crops. Measure both length and width, then match the aspect ratio in your editing tool. For example, a 0.8 x 1.0 inch oval needs a 240x300 pixel image at 300 DPI. Maintain the central focus along the vertical axis for best visual impact.
Is it better to print at home or use a professional service?
Professional photo labs often produce sharper, longer-lasting prints due to specialized equipment and archival paper. However, home printing works well if you have a high-quality inkjet printer and glossy photo paper. Test first, and always handle prints with clean hands to avoid smudges.
Final Checklist Before Inserting Your Photo
- ✅ Measured the locket’s interior dimensions accurately
- ✅ Selected a high-resolution, emotionally meaningful image
- ✅ Cropped to match the locket’s shape (circle, oval, or square)
- ✅ Resized to correct pixel dimensions at 300 DPI
- ✅ Enhanced brightness, contrast, and sharpness slightly
- ✅ Printed a test version and verified fit
- ✅ Cleaned the locket glass gently before insertion
- ✅ Allowed space for the frame to close without pressure on the photo
Conclusion
A heart locket keychain carries more than a photo—it holds emotion, memory, and connection. Taking the time to size your image correctly honors that significance. With accurate measurements, thoughtful editing, and attention to detail, your locket will display your chosen moment with clarity and care for years to come. Whether it’s a child’s smile, a partner’s gaze, or a beloved pet, the perfect fit makes the sentiment last longer than the metal itself.


 浙公网安备
33010002000092号
浙公网安备
33010002000092号 浙B2-20120091-4
Comments
No comments yet. Why don't you start the discussion?