
Capturing what’s on your iPhone screen can be essential for sharing information, documenting issues, or preserving digital content. While taking a screenshot is straightforward, many users struggle with the next step: printing it. Whether you're saving a receipt, sharing directions, or archiving an important message, knowing how to efficiently capture and print your iPhone screen enhances both productivity and convenience. This guide walks you through every stage—from taking a screenshot to holding a physical copy in your hands—using only built-in tools and widely available printers.
Understanding iPhone Screenshots
Before diving into printing, it's crucial to understand how screenshots work on iPhones. A screenshot is a digital image of whatever appears on your screen at the moment you take it. All modern iPhones support this feature, though the method varies slightly depending on the model. Once captured, the screenshot is automatically saved to your Photos app, where it can be edited, shared, or prepared for printing.
iPhones running iOS 14 and later include markup tools that allow you to annotate, crop, or highlight parts of the screenshot immediately after capture. This built-in functionality makes it easier to prepare visuals before printing, especially if you only need a portion of the screen or want to add explanatory notes.
Step-by-Step: Capturing a Screenshot on Any iPhone
The process for taking a screenshot depends on your iPhone model. Below is a universal guide covering all current configurations:
- For iPhone with Face ID (iPhone X and later): Press and quickly release the Side button and Volume Up button at the same time.
- For iPhone with a Home button (iPhone 8 and earlier): Press and quickly release the Top (or Side) button and the Home button simultaneously.
You’ll hear a camera shutter sound (if your phone isn’t muted), and a thumbnail will appear in the lower-left corner of the screen. Tap the thumbnail to open the editing interface, where you can mark up the image, crop it, or share it directly. If you don’t interact with the thumbnail, it will disappear and save automatically to your photo library.
Ensure your screen brightness is adequate before capturing. Dim screens produce low-contrast prints, making text difficult to read. For best results, increase brightness temporarily just before taking the screenshot.
Preparing Your Screenshot for Printing
Not every screenshot is print-ready out of the box. Consider these steps to optimize quality and layout:
- Crop unnecessary areas: Use the Markup editor to remove irrelevant sections and focus on the core content.
- Add annotations: Highlight key details using the pen or text tool, especially useful for instructional prints.
- Check file size: Very high-resolution screenshots may slow down wireless printing; cropping reduces file size without sacrificing readability.
- Rotate if needed: Ensure the image is oriented correctly (portrait vs. landscape) based on your printer settings.
If you’re printing multiple screenshots—such as a sequence of messages or app navigation steps—consider combining them into a single document using the Notes app or a third-party PDF creator. This keeps related information together and minimizes paper use.
| Action | Purpose | Tool Used |
|---|---|---|
| Crop | Focus on relevant content | Markup Editor |
| Annotate | Highlight or explain elements | Pen/Text Tool |
| Combine Screenshots | Create a multi-page reference | Notes or Files App |
| Export as PDF | Standardize format for printing | Share Sheet > Print > Save as PDF |
How to Print from iPhone Using AirPrint
AirPrint is Apple’s wireless printing technology, allowing iPhone users to print photos, documents, and web pages directly from their device to compatible printers. Most modern HP, Canon, Epson, and Brother printers support AirPrint.
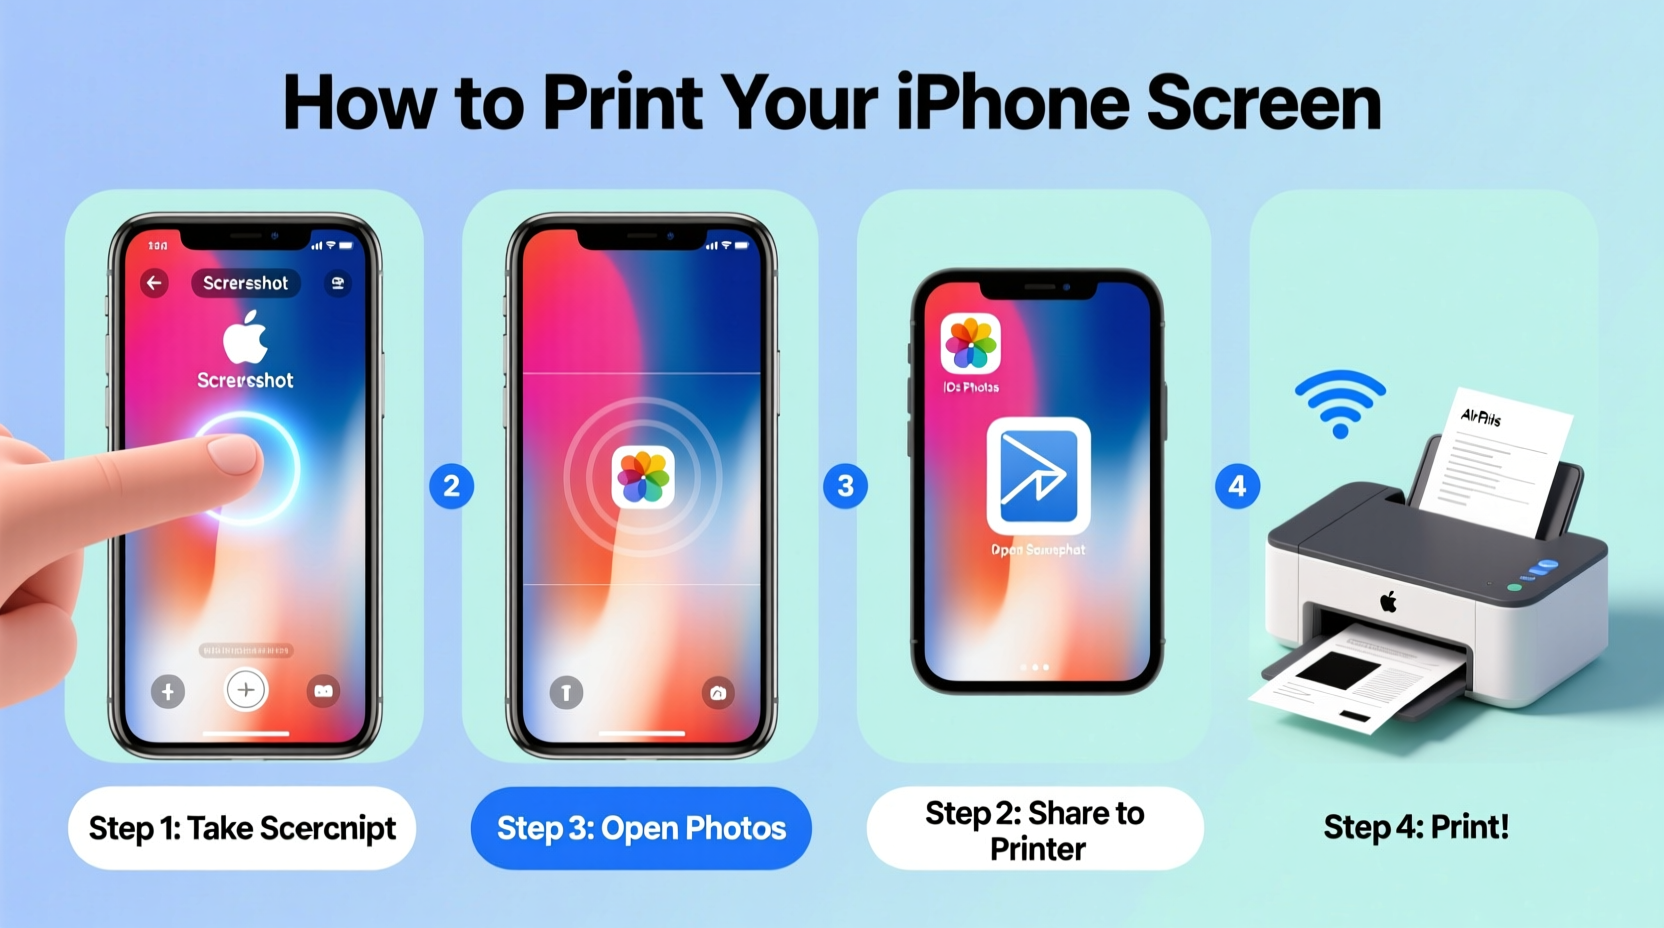
To print your screenshot:
- Open the Photos app and select the screenshot you want to print.
- Tap the Share icon (the square with an upward arrow).
- Select “Print” from the share menu.
- Tap “Select Printer” and choose your AirPrint-enabled device from the list.
- Adjust settings like number of copies, page range, and paper size if options are available.
- Tap “Print” in the top-right corner.
If your printer isn’t appearing, ensure both your iPhone and printer are connected to the same Wi-Fi network. Restarting the printer or rejoining the Wi-Fi network can resolve connectivity issues.
“We’ve seen a 60% increase in mobile printing over the past three years, driven largely by seamless integrations like AirPrint.” — Mark Reynolds, Senior Product Manager at HP Print Solutions
Troubleshooting Common Printing Issues
Even with AirPrint’s simplicity, problems can arise. Here are frequent issues and their solutions:
- Printer not found: Confirm Wi-Fi connectivity. Disable Bluetooth interference by turning it off temporarily.
- Blurry or pixelated output: The screenshot may be too small or zoomed in. Retake it with minimal zoom for sharper results.
- Wrong paper size or cropping: Adjust print settings via the preview screen. Choose “Scale to Fit” to prevent cut-off edges.
- Grayed-out Print option: This often happens when no AirPrint printer is detected. Double-check network status and printer power.
Alternative Printing Methods When AirPrint Isn’t Available
If your printer doesn’t support AirPrint, consider these alternatives:
- Email the screenshot: Attach it to an email and print from a computer.
- Use cloud services: Upload the screenshot to iCloud Drive, Google Drive, or Dropbox, then access and print from any internet-connected device.
- Third-party apps: Apps like PrinterPro or ePrint enable printing to non-AirPrint devices via USB or Ethernet adapters.
Real-World Example: Printing a Restaurant Reservation Confirmation
Sarah booked a table through an app and wanted a physical copy for her wallet. She opened the confirmation screen, increased her iPhone’s brightness, and took a screenshot using the Side and Volume Up buttons. She tapped the thumbnail, used the markup tool to crop out her phone’s status bar, and added a note: “Arrive by 7:15 PM.” Then, she accessed the Share menu, selected Print, and sent it to her home AirPrint-enabled HP Envy printer. Within 30 seconds, she had a clean, legible printout ready to go.
This scenario illustrates how combining basic screenshot techniques with AirPrint streamlines everyday tasks—without needing a computer or additional software.
FAQ
Can I print a screenshot without a wireless printer?
Yes. Transfer the screenshot to a computer via email, cloud storage, or cable sync, then print using standard desktop printing methods.
Why does my printed screenshot look blurry?
Blurriness usually occurs when the original screen content is small or zoomed in. For best results, display content at normal size before capturing.
Can I print multiple screenshots at once?
Directly, no—but you can create a PDF with multiple screenshots using the Notes app or a document tool, then print the entire PDF as one job.
Final Checklist: Print Your iPhone Screen Without Hassle
- Ensure your iPhone and printer are on the same Wi-Fi network.
- Capture the screenshot using the correct button combination for your model.
- Edit and crop the image using the Markup tool if necessary.
- Open the screenshot in Photos and tap Share > Print.
- Select your AirPrint-compatible printer and adjust settings.
- Press Print and collect your document.
- If AirPrint fails, fall back to email or cloud-based printing.
Conclusion
Printing your iPhone screen doesn’t require technical expertise or special equipment. With a few taps and an AirPrint-enabled printer, you can turn digital moments into tangible records instantly. From travel itineraries to customer service logs, the ability to capture and print on demand adds practical value to your daily routine. Mastering this simple workflow empowers you to stay organized, communicate clearly, and preserve important information—anytime, anywhere.


 浙公网安备
33010002000092号
浙公网安备
33010002000092号 浙B2-20120091-4
Comments
No comments yet. Why don't you start the discussion?