
Every December, thousands of homeowners transform their homes with synchronized light displays that pulse, chase, fade, and dance to music. What once required expensive commercial controllers and proprietary software is now within reach of hobbyists—thanks to the Raspberry Pi. This compact, affordable computer can drive dozens—or even hundreds—of individually addressable LEDs with precise timing, full-color control, and custom animations. More importantly, it does so using open-source tools, Python scripts, and hardware you can assemble in an afternoon. This guide walks through every critical stage: selecting compatible lights, wiring safely, installing real-time lighting frameworks, writing expressive animations, and deploying sequences that run reliably from November through New Year’s Day.
Understanding the Hardware Foundation
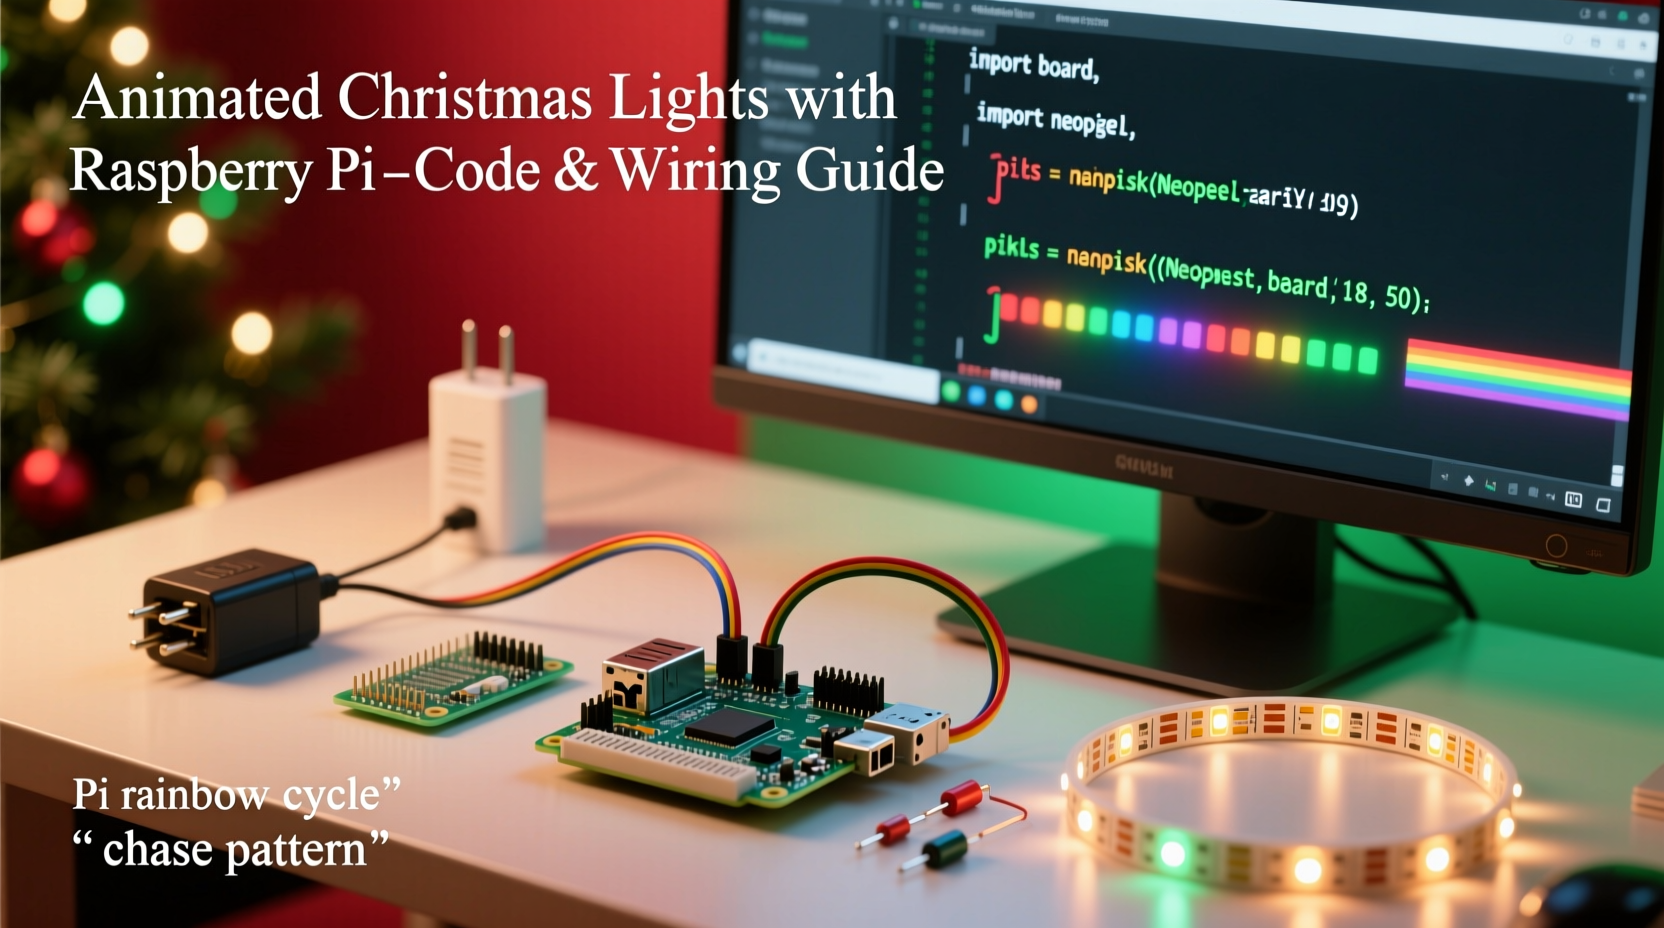
Not all LED strings work with Raspberry Pi-based controllers. The key distinction lies in *addressability*. Standard incandescent or non-addressable RGB strips treat all bulbs as one unit—you get one color for the entire string. For animation, you need *individually addressable* LEDs like WS2812B (NeoPixel), SK6812, or APA102 (DotStar). These chips embed a tiny controller in each LED, allowing independent red/green/blue values and brightness levels. The Raspberry Pi communicates with them via GPIO pins using protocols like PWM (for NeoPixels) or SPI (for DotStars).
WS2812B strips are the most popular choice: low cost, widely available, and well-supported in Python libraries. However, they demand precise timing—making them sensitive to CPU load and OS interrupts. That’s why real-time operation requires either kernel-level drivers (like rpi_ws281x) or careful process prioritization. APA102 strips, while slightly more expensive, use SPI clocking and are far more tolerant of system latency—ideal for beginners or complex multitasking setups.
Essential Components & Safety Checklist
Before writing code, gather and verify these components. Skipping verification at this stage leads to frustrating debugging later—especially when lights flicker or fail mid-sequence.
- Raspberry Pi 4 Model B (2GB minimum; 4GB recommended for audio sync)
- MicroSD card (16GB Class 10, preloaded with Raspberry Pi OS Lite 64-bit)
- WS2812B or APA102 LED strip (30–60 LEDs/meter; 100–300 total for most front-yard displays)
- 5V 10A+ regulated power supply (calculate: LED count × 0.06W per LED × 1.2 safety margin)
- Logic level shifter (required for WS2812B on Pi 4; optional but recommended for APA102)
- Heavy-gauge 16–18 AWG stranded wire for power distribution
- Heat-shrink tubing, screw terminals, and insulated crimp connectors
- Grounding wire connecting Pi chassis ground to PSU ground
“Addressable lighting isn’t about raw power—it’s about signal integrity. A single floating ground or undersized data line will corrupt your entire sequence.” — Dr. Lena Torres, Embedded Systems Instructor, University of Cambridge IoT Lab
Setting Up the Software Stack
Raspberry Pi OS Lite avoids desktop bloat and ensures consistent timing. After flashing the OS and enabling SSH, configure these critical settings before installing lighting software:
- Disable Bluetooth and WiFi if unused (
sudo systemctl disable bluetooth) - Increase GPU memory to 16MB (
sudo raspi-config → Advanced Options → Memory Split) - Enable SPI interface (
sudo raspi-config → Interface Options → SPI → Yes) - Set CPU governor to ‘performance’ (
echo 'performance' | sudo tee /sys/devices/system/cpu/cpu*/cpufreq/scaling_governor) - Disable HDMI blanking to prevent display-related CPU spikes (
sudo nano /boot/config.txt, addhdmi_blanking=1)
For WS2812B support, install the optimized rpi_ws281x Python library:
sudo apt update && sudo apt install python3-dev python3-pip
sudo pip3 install rpi_ws281x adafruit-circuitpython-neopixel
For APA102, use the SPI-native spidev library instead:
sudo pip3 install spidevBoth libraries expose identical high-level abstractions—meaning your animation logic stays portable across hardware platforms.
Writing Your First Animated Sequence
Animation begins not with flashy effects—but with structure. Every robust light show separates concerns: hardware abstraction, animation logic, and sequence scheduling. Here’s a minimal yet production-ready example that fades all LEDs from red to blue over five seconds:
import time
from rpi_ws281x import PixelStrip, Color

# Hardware config (adjust LED_COUNT and GPIO_PIN)
LED_COUNT = 150
LED_PIN = 10  # Must be GPIO10 (SPI MOSI) for WS2812B
strip = PixelStrip(LED_COUNT, LED_PIN)
strip.begin()

def fade_red_to_blue(duration_sec=5.0):
    steps = int(duration_sec * 50)  # 50fps target
    for i in range(steps):
        t = i / steps
        r = int(255 * (1 - t))
        g = 0
        b = int(255 * t)
        for j in range(LED_COUNT):
            strip.setPixelColor(j, Color(r, g, b))
        strip.show()
        time.sleep(duration_sec / steps)

if __name__ == \"__main__\":
    try:
        fade_red_to_blue()
    except KeyboardInterrupt:
        for i in range(LED_COUNT):
            strip.setPixelColor(i, Color(0,0,0))
        strip.show()
This script demonstrates three best practices: explicit cleanup on exit (critical for preventing ghost lighting), frame-rate-aware timing (not just time.sleep(0.02)), and separation of math from hardware calls. Real-world sequences layer multiple effects—chasing rainbows, fire simulation, or beat-synchronized pulses—using reusable classes like LightAnimator and EffectChain.
Advanced Sequencing: Syncing to Music & Scheduling
For true holiday impact, lights must respond to audio. The most reliable approach uses offline analysis—not real-time FFT—which eliminates latency and jitter. Tools like pydub and librosa extract amplitude envelopes and beat positions from MP3/WAV files. You then map those events to LED actions using time-stamped cue points.
A typical workflow:
- Load audio file and compute RMS energy every 10ms
- Detect peaks above threshold + apply hysteresis to avoid false triggers
- Generate a JSON timeline:
[{\"time_ms\": 1240, \"effect\": \"pulse\", \"intensity\": 0.8}, ...] - At runtime, interpolate between cues using monotonic clock (e.g.,
time.monotonic())
To run sequences automatically at sunset, integrate with cron and geolocation-aware tools like astral:
# In crontab (run daily at solar dusk)
0 16 * * * /usr/bin/python3 /home/pi/lights/sunset_show.py
For multi-day reliability, wrap your main script in a supervisor process. Systemd is ideal:
sudo nano /etc/systemd/system/xmas-lights.service
[Unit]
Description=Christmas Light Animator
After=network.target

[Service]
Type=simple
User=pi
WorkingDirectory=/home/pi/lights
ExecStart=/usr/bin/python3 /home/pi/lights/runner.py
Restart=on-failure
RestartSec=10

[Install]
WantedBy=multi-user.target
Then enable it: sudo systemctl daemon-reload && sudo systemctl enable xmas-lights.service.
Common Pitfalls & Troubleshooting Table
| Issue | Root Cause | Solution |
|---|---|---|
| First 10 LEDs lit, rest dark | Data line voltage drop or bad solder joint | Use logic level shifter; check continuity with multimeter; shorten data wire |
| Flickering during CPU-intensive tasks | OS interrupts disrupting WS2812B timing | Switch to APA102; use rpi_ws281x with DMA channel 10; avoid GUI |
| Colors appear washed out (e.g., yellow looks orange) | Gamma correction missing or incorrect white balance | Apply gamma table (e.g., adafruit-circuitpython-neopixel built-in gamma); calibrate with colorimeter |
| Random LEDs flash white on boot | GPIO pin floating before initialization | Add 10kΩ pull-down resistor between data pin and ground |
| Entire strip unresponsive after power cycle | No common ground between Pi and PSU | Connect Pi GND pin to PSU negative terminal with 18 AWG wire |
Real-World Example: The “Frosty Front Porch” Project
In Portland, Oregon, homeowner Maya Rodriguez automated her 200-LED porch railing using a Raspberry Pi 4 and two 100-LED WS2812B strips. Her goal: subtle, weather-appropriate animations—no strobing, no rapid flashes—that evoked snowfall and gentle wind. She avoided commercial controllers to retain full creative control and reduce long-term costs.
Her solution combined three techniques: (1) A temperature sensor (DS18B20) adjusted animation speed—slower pulses below 3°C, faster shimmer above 7°C; (2) An ambient light sensor (TSL2561) dimmed overall brightness at night and increased contrast during foggy days; (3) A pre-rendered 30-second “snowdrift” sequence used particle physics in Python to simulate individual snowflakes drifting downward at varying speeds.
The entire system runs headless, starts automatically at 4:30 PM, and shuts down at midnight. Total build time: 8 hours. Total parts cost: $42. Maya notes, “The biggest win wasn’t the lights—it was learning how to trust my own code. When neighbors ask ‘How’d you do that?’, I don’t say ‘I bought a box.’ I say ‘I wrote it.’”
FAQ
Can I control lights from my phone without opening ports?
Yes—use local network web interfaces with Flask or FastAPI. Serve a simple HTML dashboard that sends commands via Unix socket or MQTT to your lighting daemon. No public IP exposure needed. Example: http://raspberrypi.local/light-control serves a toggle button that writes to /tmp/light_cmd.
Do I need soldering skills?
Not for basic setups. Pre-wired WS2812B strips with JST connectors plug directly into screw terminals. Soldering becomes necessary only for custom PCBs, extending data lines beyond 1 meter, or repairing damaged strips. Crimp connectors and heat-shrink provide reliable alternatives for beginners.
What’s the maximum number of LEDs the Pi can handle?
With rpi_ws281x, 1,000–1,500 LEDs is realistic for static patterns. For complex real-time animations (e.g., per-LED physics), stay under 500. Beyond that, consider distributing load across multiple Pis or upgrading to a dedicated controller like the Falcon F16v3—but for 95% of residential displays, the Pi scales perfectly.
Conclusion
Programming a Raspberry Pi to control animated Christmas lights is less about technical wizardry and more about thoughtful iteration: choosing robust components, respecting electrical fundamentals, writing maintainable code, and testing incrementally. It transforms seasonal decoration into a personal engineering project—one where every fading gradient, every rhythmic pulse, and every synchronized chime reflects intention and care. You don’t need a degree in embedded systems. You need curiosity, a willingness to measure voltage before connecting wires, and the patience to watch a 150-LED strip light up exactly as you imagined.
Start small: get five LEDs working with a fade effect. Then add a second pattern. Then tie it to a timer. Then layer in sound. Each step builds confidence—and each completed sequence becomes part of your home’s story. This year, don’t just hang lights. Compose with them.


 浙公网安备
33010002000092号
浙公网安备
33010002000092号 浙B2-20120091-4
Comments
No comments yet. Why don't you start the discussion?