
Monstera deliciosa, commonly known as the Swiss cheese plant, has become a staple in modern indoor gardening. Its bold, fenestrated leaves bring a tropical flair to any space. But what makes this plant even more appealing is its ease of propagation. With just a few simple tools and some patience, you can multiply your monstera collection or share cuttings with friends. Propagation isn’t reserved for experienced gardeners—it’s accessible to anyone willing to learn. This guide walks you through every stage, from selecting the right stem to nurturing your new plant into maturity.
Why Propagate Monstera?
There are several compelling reasons to propagate your monstera. First, it's an economical way to expand your indoor jungle without purchasing new plants. Second, pruning and propagating encourage bushier growth in the parent plant by stimulating lateral branching. Third, sharing rooted cuttings makes thoughtful, living gifts. Finally, the process itself fosters a deeper connection with your plants—watching roots emerge from a cutting is a rewarding experience that teaches patience and attentiveness.
Propagation also allows you to preserve a plant you're emotionally attached to, especially if the original is struggling. Rather than losing it entirely, you can save genetic material through healthy cuttings.
Understanding Monstera Anatomy: What You Need to Know Before Cutting
To propagate successfully, it helps to understand the basic structure of a monstera stem. Unlike some plants that can grow from leaf cuttings alone, monsteras require a node—a small bump or scar on the stem where leaves and aerial roots originate. This node contains meristematic tissue capable of developing into new roots and shoots.
A viable cutting must include:
- A node – non-negotiable; no node means no roots.
- At least one leaf – provides energy via photosynthesis.
- An optional aerial root – speeds up establishment but isn’t required.
The stem section between two nodes is called an internode. While it supports the structure, only the node holds regenerative potential. Never confuse a leaf scar or sheath remnant with a true node—nodes are typically raised, often with a slight curve or ridge, and may already have a tiny root nub emerging.
“Propagation hinges on precision. One clean cut at the right spot can mean the difference between thriving growth and stagnation.” — Dr. Lena Torres, Botanist & Indoor Plant Specialist
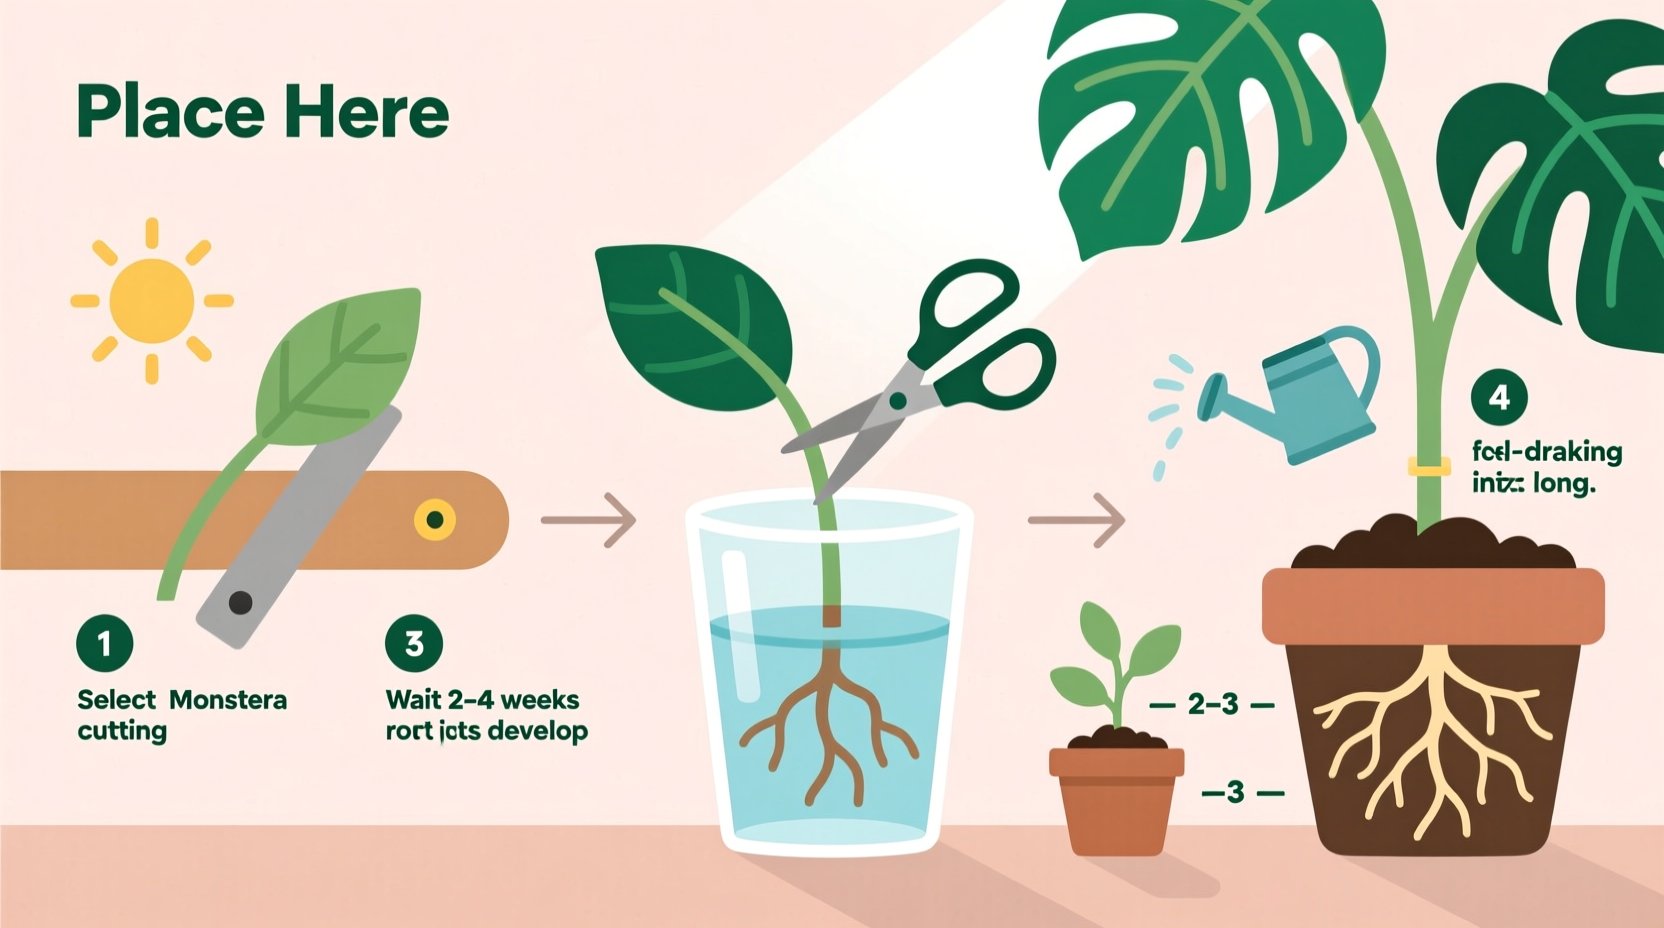
Step-by-Step Guide to Propagating Monstera in Water
Water propagation is the most beginner-friendly method. It allows you to monitor root development clearly and adjust conditions as needed.
- Gather Supplies: Sharp sterilized scissors or pruners, a clean glass jar, room-temperature water, and optionally, liquid rooting hormone.
- Locate a Healthy Stem: Choose a vine with at least one visible node and a mature leaf. Avoid yellowing or damaged foliage.
- Make the Cut: Cut about ½ inch below the node at a 45-degree angle. This increases surface area for water absorption and discourages rot.
- Remove Lower Leaves: Strip any leaves that would sit below the waterline. Submerged leaves decay quickly and promote bacterial growth.
- Place in Water: Submerge the node (and any existing aerial roots) in water. Keep the leaf above the surface.
- Position in Bright, Indirect Light: A north-facing window or a few feet from a south-facing one works best. Avoid direct sun, which overheats the water and stresses the cutting.
- Change Water Weekly: Fresh water prevents algae buildup and maintains oxygen levels. Rinse the jar and cutting gently each time.
- Wait for Roots: New roots typically appear in 2–6 weeks. Allow them to grow 2–3 inches before transplanting.
Soil vs. Water Propagation: Which Is Better?
Both methods work, but they come with different advantages and trade-offs. The choice depends on your preference, environment, and long-term goals.
| Method | Pros | Cons |
|---|---|---|
| Water Propagation | Easy monitoring of root growth; low setup cost; high visibility reduces guesswork | Roots adapted to water may struggle when transferred to soil; requires frequent maintenance |
| Soil Propagation | No transplant shock; roots develop directly in growing medium; less maintenance once established | Harder to track progress; overwatering risks rot; slower initial feedback |
If you prefer hands-off care after setup, soil propagation might suit you better. However, for beginners who want visual confirmation of progress, water remains the top recommendation.
Propagating Monstera in Soil: A Direct Approach
For those opting to skip the water stage, soil propagation offers a streamlined path.
- Prepare a Pot: Use a small container (4–6 inches) with drainage holes. Fill it with a well-draining mix—combine equal parts potting soil, perlite, and orchid bark.
- Take the Cutting: Follow the same steps as water propagation—ensure a node is present and make a clean cut below it.
- Dip in Rooting Hormone (Optional): Though not essential, a powdered or gel rooting hormone can accelerate root formation.
- Plant the Cutting: Insert the node into the soil, burying it about 1 inch deep. Support the stem upright using a small stake if needed.
- Maintain Moisture: Water lightly until the top inch of soil dries. Overly wet soil leads to rot—aim for consistent dampness, not sogginess.
- Create a Humid Microclimate: Cover the pot with a clear plastic bag or place it in a mini greenhouse. Open daily for airflow to prevent mold.
- Wait Patiently: Roots form in 3–8 weeks. Gently tug the stem after a month; resistance indicates root development.
Mini Case Study: Sarah’s First Monstera Propagation
Sarah, a first-time plant parent in Portland, decided to propagate her leggy monstera in spring. She selected a stem with two healthy leaves and a visible aerial root near a node. Using clean shears, she made a slanted cut just below the node and placed the cutting in a recycled glass bottle filled with filtered water.
She positioned it near her east-facing kitchen window and changed the water every Saturday morning—turning it into a ritual. Within three weeks, white root nubs appeared. By week five, the roots were over two inches long. She transplanted the cutting into a peat-based mix, keeping the soil moist and humid with regular misting.
Eight weeks post-transplant, the new plant produced its first split leaf. Sarah now has two thriving monsteras—and she gifted a second cutting to her neighbor.
Her secret? Consistency. “I treated it like caring for a pet,” she said. “Same time, same care, every week.”
Common Mistakes to Avoid
Even straightforward propagation can fail due to small errors. Watch out for these pitfalls:
- Cutting without a node – This is the most common reason for failure. No node = no chance of roots.
- Using dirty tools – Unsanitized scissors introduce pathogens that cause rot.
- Leaving submerged leaves – They decay and contaminate the water or soil.
- Impatience – Some cuttings take longer than others. Avoid constant tugging or moving.
- Overwatering in soil – Soggy medium suffocates developing roots and invites fungus.
“The key to successful propagation isn’t perfection—it’s observation. Pay attention, and your plant will tell you what it needs.” — Carlos Mendez, Urban Jungle Blog Contributor
Checklist: Your Monstera Propagation Success Plan
Follow this checklist to ensure every step is covered:
- ☑ Choose a healthy parent plant with mature leaves
- ☑ Identify a stem with at least one node and one leaf
- ☑ Sterilize your cutting tool with rubbing alcohol
- ☑ Make a clean, angled cut below the node
- ☑ Remove any leaves that would be below the water or soil line
- ☑ Place node in water or moist soil immediately
- ☑ Position in bright, indirect light (no direct sun)
- ☑ Change water weekly or keep soil evenly moist
- ☑ Wait for roots to reach 2–3 inches before transplanting (if in water)
- ☑ Transition to a well-draining potting mix when ready
Frequently Asked Questions
Can I propagate a monstera leaf without a node?
No. A leaf alone cannot produce roots or a new plant. It may survive for weeks and even grow a small root, but it will never develop into a full plant. Always ensure your cutting includes a node.
How long does it take for a monstera cutting to root?
In water, roots usually appear in 2–6 weeks. In soil, it may take 3–8 weeks due to less visibility and potentially slower oxygen exchange. Patience is essential—some cuttings take longer depending on temperature, light, and health.
When should I fertilize my propagated monstera?
Wait until the plant has established a strong root system and produces new growth—usually 4–6 weeks after transplanting. Use a balanced, diluted liquid fertilizer (e.g., 10-10-10) at half strength every 4–6 weeks during the growing season.
Final Tips for Long-Term Success
Once your propagated monstera is potted and settled, treat it like a young plant. Keep humidity above 50%, maintain warm temperatures (65–80°F), and avoid drafts. Rotate the pot occasionally to encourage even growth.
As it matures, consider staking with a moss pole to support upright development and encourage larger, fenestrated leaves. Remember, propagation isn’t a one-time event. As your parent plant grows, you’ll have more opportunities to take additional cuttings and continue expanding your green oasis.


 浙公网安备
33010002000092号
浙公网安备
33010002000092号 浙B2-20120091-4
Comments
No comments yet. Why don't you start the discussion?