
Pothos (Epipremnum aureum) is one of the most forgiving houseplants, known for its lush vines and resilience in low-light conditions. But even seasoned plant owners sometimes struggle when trying to propagate pothos in water. The cutting may survive for weeks without developing roots, or the stem might rot before any growth appears. The truth is, successful propagation isn’t just about placing a leaf in water—it’s about creating the right conditions for root initiation and sustained development. With the right approach, you can grow new, thriving pothos plants from cuttings that not only survive but flourish.
Why Water Propagation Works for Pothos
Pothos naturally grows along the forest floor in tropical regions, sending out aerial roots from nodes along its stems. These roots are primed to absorb moisture and nutrients from humid environments, making them highly adaptable to water-based propagation. When placed in water, the node—the small bump on the stem where leaves and roots emerge—responds to moisture and light by initiating root growth.
However, not all cuttings succeed. Many fail due to improper technique, poor water quality, or lack of patience. Understanding the biology behind the process increases your chances of success. Unlike soil propagation, water allows you to monitor root development in real time, adjust conditions quickly, and prevent issues like overwatering or fungal rot before they escalate.
Step-by-Step Guide to Propagating Pothos in Water
Follow this detailed sequence to ensure your pothos cuttings develop healthy roots and transition smoothly into long-term growth.
- Select a Healthy Stem: Choose a vine with at least 4–6 inches of length and 2–3 leaves. Avoid yellowing, damaged, or diseased foliage. The more vigorous the parent plant, the better the cutting will perform.
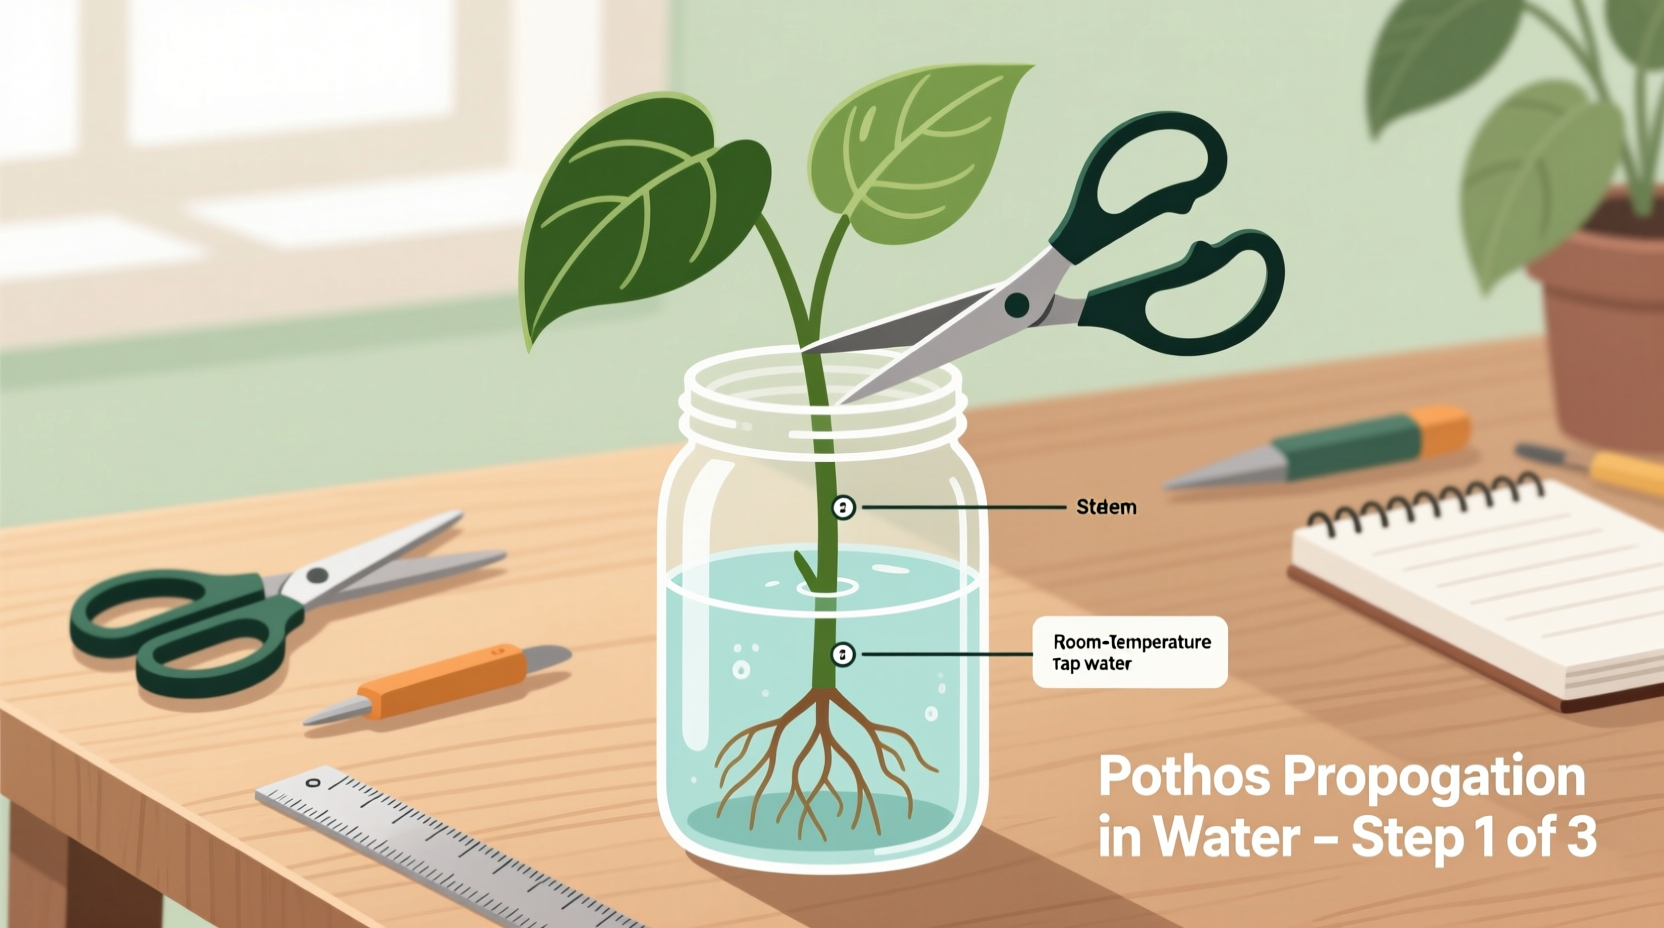
- Make the Cut Just Below a Node: Using clean, sharp scissors or pruning shears, cut about half an inch below a node—the small brownish bump where leaves attach to the stem. This is where roots will emerge. Ensure at least one node is submerged in water.
- Remove Lower Leaves: Strip off any leaves that would sit below the waterline. Submerged leaves decay quickly, promoting bacterial growth and rot.
- Place in Clean Water: Use a clear glass or jar filled with room-temperature water. Position the cutting so at least one node is fully submerged, while leaves remain above the surface.
- Choose the Right Location: Place the container in bright, indirect light. A north- or east-facing windowsill works well. Avoid direct sunlight, which can overheat the water and encourage algae.
- Change Water Weekly: Replace the water every 7–10 days to prevent stagnation, maintain oxygen levels, and reduce bacterial buildup. Rinse the jar and stem gently during each change.
- Wait Patiently: Root development typically begins within 7–14 days, though cooler temperatures or lower light may slow the process. Don’t discard the cutting too early—some take up to three weeks to show signs of growth.
- Transplant When Roots Are 1–2 Inches Long: Once roots are established and multiple white roots have formed, consider transferring to soil or continuing growth in water with liquid fertilizer.
Common Mistakes That Prevent Root Growth
Even with good intentions, many people sabotage their propagation efforts through simple oversights. Recognizing these pitfalls can dramatically improve your results.
| Mistake | Why It’s a Problem | Solution |
|---|---|---|
| No node submerged | Roots grow from nodes—not stems or leaves. Without a node in water, no roots will form. | Always ensure at least one node is underwater. |
| Leaves left in water | Submerged leaves rot, introducing bacteria that kill the cutting. | Carefully remove all leaves below the waterline. |
| Infrequent water changes | Stagnant water depletes oxygen and breeds harmful microbes. | Change water weekly and rinse the container. |
| Low light | Photosynthesis fuels root development. Too little light slows or stops growth. | Provide bright, indirect light for at least 6–8 hours daily. |
| Using cold or chlorinated water | Chlorine and temperature shock stress the cutting. | Use filtered or dechlorinated water at room temperature. |
Optimizing Conditions for Faster Root Development
While pothos is resilient, optimizing environmental factors accelerates root growth and improves overall health. Consider these advanced techniques to get stronger results.
- Add a Liquid Fertilizer (Diluted): After two weeks, add a drop of balanced liquid fertilizer (like 10-10-10) to the water monthly. This provides essential nutrients that support root cell division.
- Maintain Warm Temperatures: Ideal rooting occurs between 70°F and 80°F (21°C–27°C). Keep cuttings away from drafts, air conditioners, or cold windowsills.
- Use a Clear Container: Transparent glass allows light to reach the node and encourages root initiation. Opaque containers block this benefit.
- Aerate the Water: While not necessary, using an aquarium bubbler or changing water frequently increases dissolved oxygen, reducing rot risk.
- Rotate the Vessel Occasionally: Turn the jar slightly every few days to ensure even light exposure and prevent roots from growing lopsided.
“Water propagation success hinges on hygiene and consistency. A clean vessel, fresh water, and proper node placement are non-negotiable.” — Dr. Lena Torres, Urban Horticulturist & Plant Propagation Specialist
Real Example: From Failed Attempts to Thriving Cuttings
Jamie, a plant enthusiast in Portland, tried propagating pothos three times before succeeding. Her first attempt failed because she placed the cutting in a dark corner and didn’t change the water. The stem turned mushy within ten days. The second time, she forgot to remove the lower leaves, which rotted and contaminated the water.
On her third try, she followed a strict routine: she cut below a node, removed all submerged leaves, used filtered water, and placed the jar on a bright shelf away from direct sun. She changed the water every Sunday. Within nine days, tiny white roots appeared. By day 21, the roots were over an inch long. Today, that original cutting thrives in a hanging planter, and Jamie has propagated five more from its offspring.
Her breakthrough wasn’t luck—it was learning from mistakes and applying consistent care.
Checklist: How to Propagate Pothos in Water Successfully
Use this checklist each time you start a new propagation to ensure nothing is overlooked.
- ☐ Choose a healthy parent plant with vibrant green leaves
- ☐ Cut a 4–6 inch stem just below a visible node
- ☐ Remove all leaves that would be below the waterline
- ☐ Place the node fully underwater in a clean, clear container
- ☐ Fill with room-temperature, filtered or dechlorinated water
- ☐ Position in bright, indirect light (no direct sun)
- ☐ Change water every 7–10 days
- ☐ Inspect weekly for root development and signs of rot
- ☐ Wait until roots are 1–2 inches long before transplanting or feeding
- ☐ Optional: Add a diluted drop of liquid fertilizer after two weeks
Frequently Asked Questions
Can I propagate pothos in water indefinitely?
Yes, pothos can live in water permanently if cared for properly. However, growth may slow over time compared to soil-grown plants. To maintain vigor, add a diluted liquid fertilizer monthly and continue regular water changes.
Why isn’t my pothos cutting growing roots?
The most common reasons are: no node submerged, poor light, old or chlorinated water, or the cutting came from a weak part of the plant. Double-check your setup and give it at least three weeks before concluding failure.
Should I use rooting hormone?
Not necessary for pothos—they root easily on their own. However, a quick dip in powdered rooting hormone can speed up the process by 3–5 days, especially in less-than-ideal conditions.
When and How to Transition to Soil
While pothos can thrive in water, many gardeners prefer to transfer rooted cuttings to soil for fuller, bushier growth. The best time to transplant is when roots are 1–2 inches long and multiple roots have formed.
To transition successfully:
- Prepare a small pot with well-draining potting mix (a blend with perlite works well).
- Gently rinse the roots to remove any slime or residue.
- Dig a small hole and place the cutting, ensuring the node and roots are covered.
- Water thoroughly and keep the soil lightly moist for the first week.
- Keep in bright, indirect light and avoid fertilizing for 4–6 weeks.
Note: Some drooping after transplant is normal as the plant adjusts. This usually resolves within 7–10 days.
Conclusion: Start Propagating with Confidence
Propagating pothos in water isn’t complicated—but it does require attention to detail. The key lies in selecting the right cutting, maintaining clean conditions, and providing consistent care. Once you see those first delicate white roots emerging, you’ll understand why so many plant lovers find propagation deeply satisfying. Each new root is a sign of life responding to your effort.


 浙公网安备
33010002000092号
浙公网安备
33010002000092号 浙B2-20120091-4
Comments
No comments yet. Why don't you start the discussion?