
Pothos (Epipremnum aureum) is one of the most forgiving and widely grown houseplants, prized for its trailing vines, heart-shaped leaves, and ability to thrive in low light. But beyond its easy-care nature, one of its greatest strengths lies in propagation—especially in water. With the right technique, you can turn a single vine into dozens of new plants, all without soil or special equipment. The key isn’t luck; it’s precision, timing, and understanding the plant’s natural biology. Whether you're expanding your own collection or sharing cuttings with friends, mastering water propagation ensures strong, healthy roots and faster transplant success.
The Science Behind Water Propagation
Pothos naturally grows as a climbing vine in tropical forests, often clinging to trees where its aerial roots absorb moisture from the air and rainwater pooling in bark crevices. This adaptation makes it exceptionally responsive to water-based rooting. When a cutting is placed in water, the submerged nodes trigger callus formation—a biological response that precedes root development. Within days, tiny root primordia emerge, drawing nutrients and oxygen from the water to fuel growth.
Unlike many plants that struggle in water due to rot or oxygen deficiency, pothos thrives because of its efficient vascular system and resistance to pathogens. However, success isn't guaranteed by simply dropping a stem in a glass. Variables like node placement, water quality, and light exposure play decisive roles. Understanding these factors transforms propagation from a hopeful experiment into a repeatable process.
“Water propagation works so well with pothos because their nodes are biologically programmed to produce roots when exposed to moisture.” — Dr. Lila Nguyen, Botanist & Indoor Plant Researcher
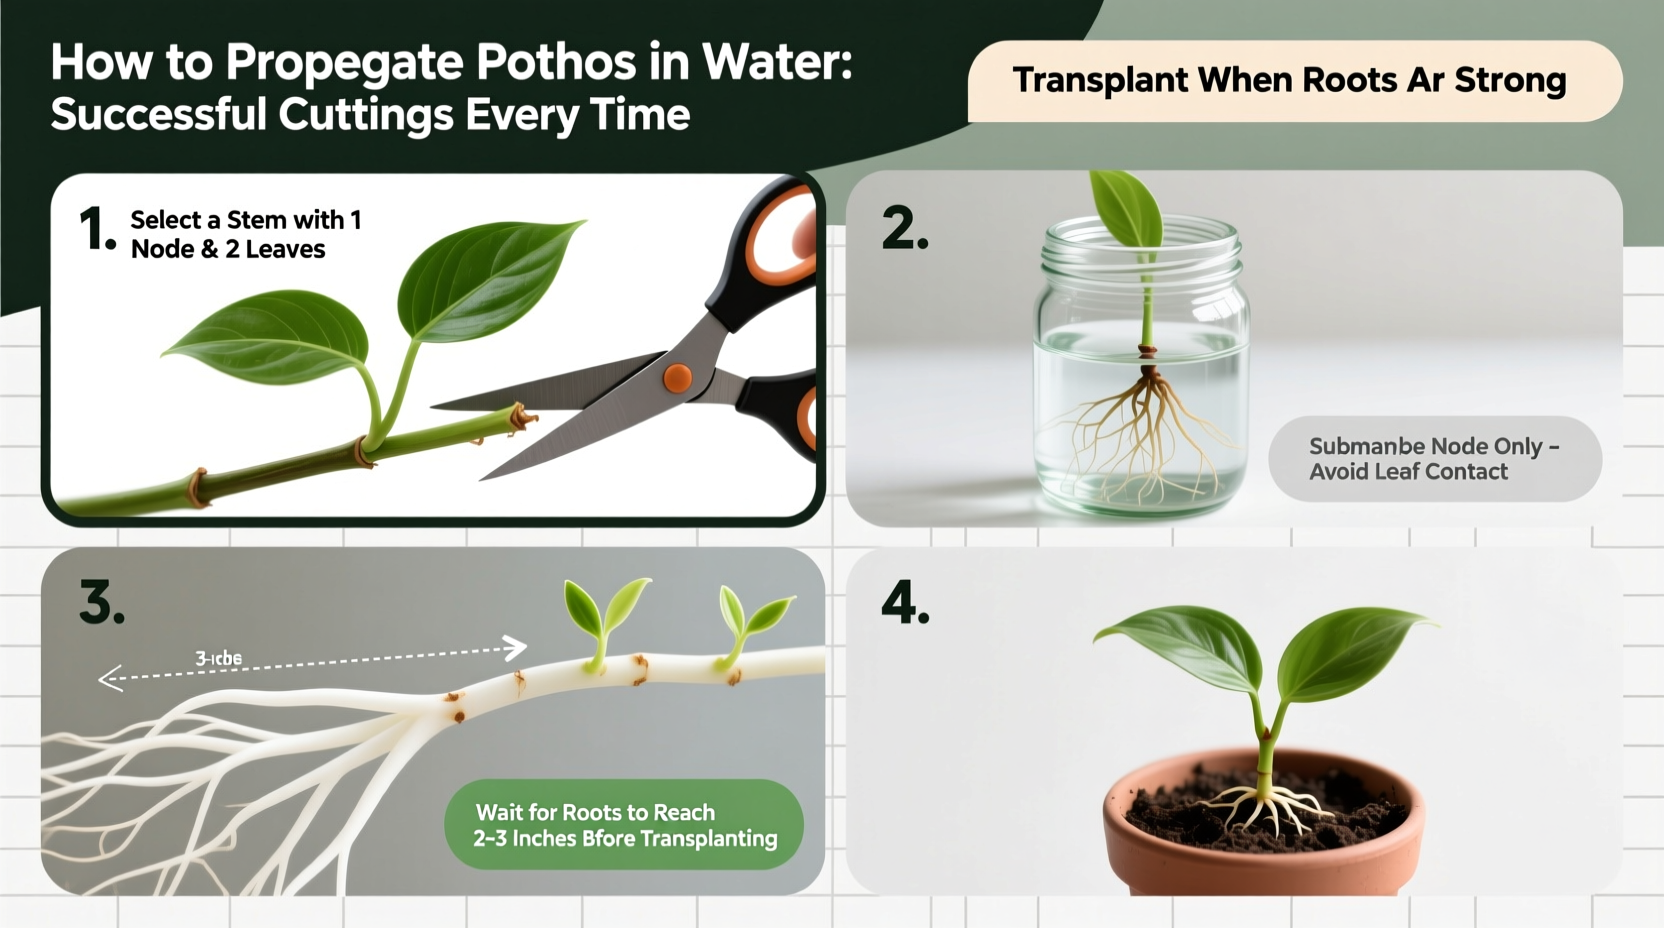
Step-by-Step Guide to Propagating Pothos in Water
Follow this detailed sequence to maximize your chances of success. Each step addresses a critical factor in root development, ensuring cuttings don’t just survive but flourish.
- Select a Healthy Parent Plant
Choose a mature pothos with vibrant green leaves and no signs of yellowing, pests, or disease. Strong parent stock produces stronger cuttings. Avoid using weak or leggy stems unless rejuvenation is the goal. - Gather Clean Tools
Use sterilized scissors or pruning shears. Wipe blades with rubbing alcohol to prevent transferring bacteria or fungi. A clean cut reduces shock and infection risk. - Make the Cutting Below a Node
Identify a node—these appear as small brown or tan bumps along the stem, usually opposite a leaf. Cut ½ inch below the node at a 45-degree angle. This increases surface area for water absorption and encourages faster root initiation. - Include Leaves and Nodes Strategically
Each cutting should have 2–4 leaves and at least one visible node. Remove any leaves that would sit below the waterline to prevent rot. The top leaves will continue photosynthesis, fueling root growth. - Place in Clear Container with Room-Temperature Water
Use a clean glass, jar, or bottle. Fill with filtered or distilled water if your tap water is heavily chlorinated. Spring water is ideal. Submerge only the node(s)—not the leaves. - Position in Bright, Indirect Light
Set the container near an east- or north-facing window. Avoid direct sunlight, which can overheat the water and encourage algae. Consistent, moderate light supports photosynthesis without stressing the cutting. - Change Water Weekly
Replace the water every 7 days to maintain oxygen levels and prevent bacterial buildup. Rinse the container and gently wipe the stem base if slime forms. Fresh water keeps the environment hospitable for root growth. - Wait Patiently for Roots
Roots typically appear within 7–14 days. Initial growth may be fine and white; over time, they thicken and branch. Wait until roots are at least 1–2 inches long before considering transplanting.
Common Mistakes and How to Avoid Them
Even experienced growers sometimes fail at water propagation due to subtle errors. These pitfalls are avoidable with awareness.
- No node included – The most common reason for failure. Without a node, no roots will form. Always verify the presence of a node before placing a cutting in water.
- Leaves left in water – Submerged foliage decomposes quickly, promoting mold and bacteria that can infect the stem.
- Using dirty containers – Residual soap, minerals, or biofilm can inhibit root development. Wash jars with hot, soapy water and rinse thoroughly.
- Infrequent water changes – Stagnant water becomes anaerobic, starving developing roots of oxygen and encouraging pathogens.
- Low light conditions – While pothos tolerates low light, propagation requires energy. Insufficient light slows or halts root production.
| Mistake | Consequence | Solution |
|---|---|---|
| Cutting above the node | No root formation | Cut directly below the node |
| Direct sun exposure | Algae growth, overheated water | Use bright, indirect light |
| Waiting too long to change water | Bacterial bloom, stem rot | Weekly water replacement |
| Transplanting too early | Poor establishment in soil | Wait for 1–2 inch roots |
Optimizing Conditions for Faster Root Development
While basic propagation works under average conditions, optimizing the environment accelerates results. These enhancements are simple but effective.
Water Quality: Tap water often contains chlorine and fluoride, which can delay root emergence. Let tap water sit uncovered for 24 hours to allow chlorine to evaporate, or use filtered water. Avoid softened water, which contains salts harmful to plants.
Temperature: Pothos roots best between 68°F and 77°F (20–25°C). Keep cuttings away from cold drafts, radiators, or air conditioning vents. A consistent warm room speeds metabolic activity.
Oxygenation: Although not required, gentle aeration via an aquarium bubbler can boost root growth by increasing dissolved oxygen. Alternatively, shaking the water vigorously during changes introduces fresh oxygen.
Optional Additives: Some gardeners add a single drop of liquid seaweed extract or diluted hydrogen peroxide (1 part peroxide to 10 parts water) to prevent microbes and stimulate growth. Use sparingly—overuse can damage delicate tissues.
Real Example: From Office Desk to Full Collection
Sarah, a teacher in Portland, started with one struggling pothos on her classroom windowsill. After learning about water propagation, she took three cuttings during spring break. She used clean jars, changed the water weekly, and placed them in a bright hallway away from direct sun. Within ten days, white roots appeared. By week six, each had a dense root system. She transplanted two into pots for the classroom and gifted the third to a colleague. Over the next year, she repeated the process, eventually growing 14 new plants from the original. Today, her home is filled with thriving pothos in hanging baskets, shelves, and terrariums—all descendants of that first cutting.
Her success wasn’t accidental. It came from consistency: weekly maintenance, attention to nodes, and patience. She now teaches her students how to propagate, turning it into a hands-on science lesson on plant biology and sustainability.
When and How to Transition to Soil
While pothos can remain in water indefinitely, most growers eventually transfer cuttings to soil for fuller growth and easier care. Timing and method matter.
Wait until roots are 1–2 inches long and multiple roots have formed. Sudden shifts from water to dry soil can shock the plant. To ease the transition:
- Prepare a pot with well-draining mix (equal parts potting soil, perlite, and orchid bark).
- Gently rinse the roots to remove any slick biofilm.
- Plant the cutting so the node is buried and roots spread naturally.
- Water lightly and keep the soil consistently moist—not soggy—for the first two weeks.
- Keep in the same bright, indirect location to minimize stress.
Expect slight drooping in the first few days. This is normal. Avoid fertilizing for at least four weeks. Once new leaves emerge, the plant has acclimated.
Alternative: Continue Growing in Water Long-Term
Some prefer to keep pothos in water permanently. This works well with proper maintenance:
- Use a nutrient solution formulated for hydroponics (¼ strength monthly).
- Top off with fresh water as it evaporates.
- Prune regularly to prevent overcrowding.
- Clean the container and roots every 4–6 weeks.
In this setup, pothos remains compact and tidy, ideal for desks, bathrooms, or kitchens.
Propagation Checklist
- ✅ Choose a healthy stem with visible nodes
- ✅ Sterilize cutting tools
- ✅ Cut ½ inch below a node at a 45° angle
- ✅ Remove lower leaves that would touch water
- ✅ Place node in clean, room-temperature water
- ✅ Position in bright, indirect light
- ✅ Change water weekly
- ✅ Monitor for root growth (7–14 days)
- ✅ Wait for 1–2 inch roots before transplanting
- ✅ Transfer to soil or maintain in water with nutrients
Frequently Asked Questions
Can I propagate pothos in dirty water?
No. Dirty or stagnant water promotes bacterial and fungal growth, which can rot the stem before roots form. Always use clean water and refresh it weekly.
Why aren’t my cuttings growing roots?
The most likely reasons are: no node was included, the water is too cold, light is insufficient, or the parent stem was unhealthy. Double-check each factor and restart if necessary.
Do different pothos varieties propagate differently?
All pothos varieties—Golden, Marble Queen, Neon, Jade, and Pearls and Jade—propagate the same way in water. Variegated types may grow slightly slower due to reduced chlorophyll, but the process is identical.
Final Tips for Guaranteed Success
Timing enhances outcomes. Spring and early summer are ideal for propagation, as the plant is in active growth mode. Hormonal activity is highest, and environmental conditions naturally support faster rooting. However, pothos can be propagated year-round indoors with proper lighting and temperature control.
Don’t discard long vines during pruning. Instead, segment them into multiple cuttings. A single 12-inch vine can yield 3–4 viable cuttings, each capable of becoming a full plant. This approach multiplies your collection rapidly and sustainably.
Lastly, share what you grow. Pothos cuttings make thoughtful, living gifts. Wrap them in recycled glass bottles with a handwritten care note. You’re not just giving a plant—you’re passing on the joy of growth and renewal.
“The beauty of pothos propagation is that it turns abundance into generosity. One plant becomes many, and each new root tells a story of resilience.” — Maya Tran, Urban Horticulturist
Start Your Propagation Journey Today
Propagating pothos in water isn’t just simple—it’s deeply satisfying. With minimal tools and clear steps, you unlock the plant’s natural ability to regenerate. Every cutting is a small act of creation, a testament to life’s persistence. Whether you're revitalizing a sparse shelf, greening up your workspace, or sharing greenery with others, the process connects you to nature in a tangible way.


 浙公网安备
33010002000092号
浙公网安备
33010002000092号 浙B2-20120091-4
Comments
No comments yet. Why don't you start the discussion?