
Sansevieria, commonly known as the snake plant, is one of the most resilient houseplants available. With its upright, sword-like leaves and tolerance for low light and infrequent watering, it's no surprise that it’s a favorite among new and experienced plant owners alike. But beyond its durability, one of the most rewarding aspects of owning a snake plant is the ability to propagate it—creating new plants from an existing one. Propagation is not only cost-effective but also deeply satisfying, allowing you to expand your indoor garden or share greenery with friends and family.
Despite its reputation for being nearly indestructible, many beginners hesitate to propagate snake plants due to uncertainty about the best method or fear of harming the parent plant. The truth is, propagation can be straightforward if you understand the plant’s biology and follow proven techniques. This guide walks you through every step, from selecting healthy foliage to nurturing young cuttings into mature plants, using methods suitable for all skill levels.
Understanding Snake Plant Biology
Before diving into propagation, it helps to understand what makes the snake plant unique. Native to West Africa, Sansevieria thrives in arid environments with minimal water and indirect sunlight. It grows from thick rhizomes—underground stems that store nutrients and send up new shoots. These rhizomes are key to successful propagation, as they contain the energy needed for new growth.
The plant’s leaves are succulent-like, storing water in their tissues, which contributes to its drought tolerance. However, this same trait means overwatering is the most common cause of failure during propagation. Unlike many other houseplants, snake plants do not root readily in water unless specific conditions are met, and even then, soil-based methods tend to yield better long-term results.
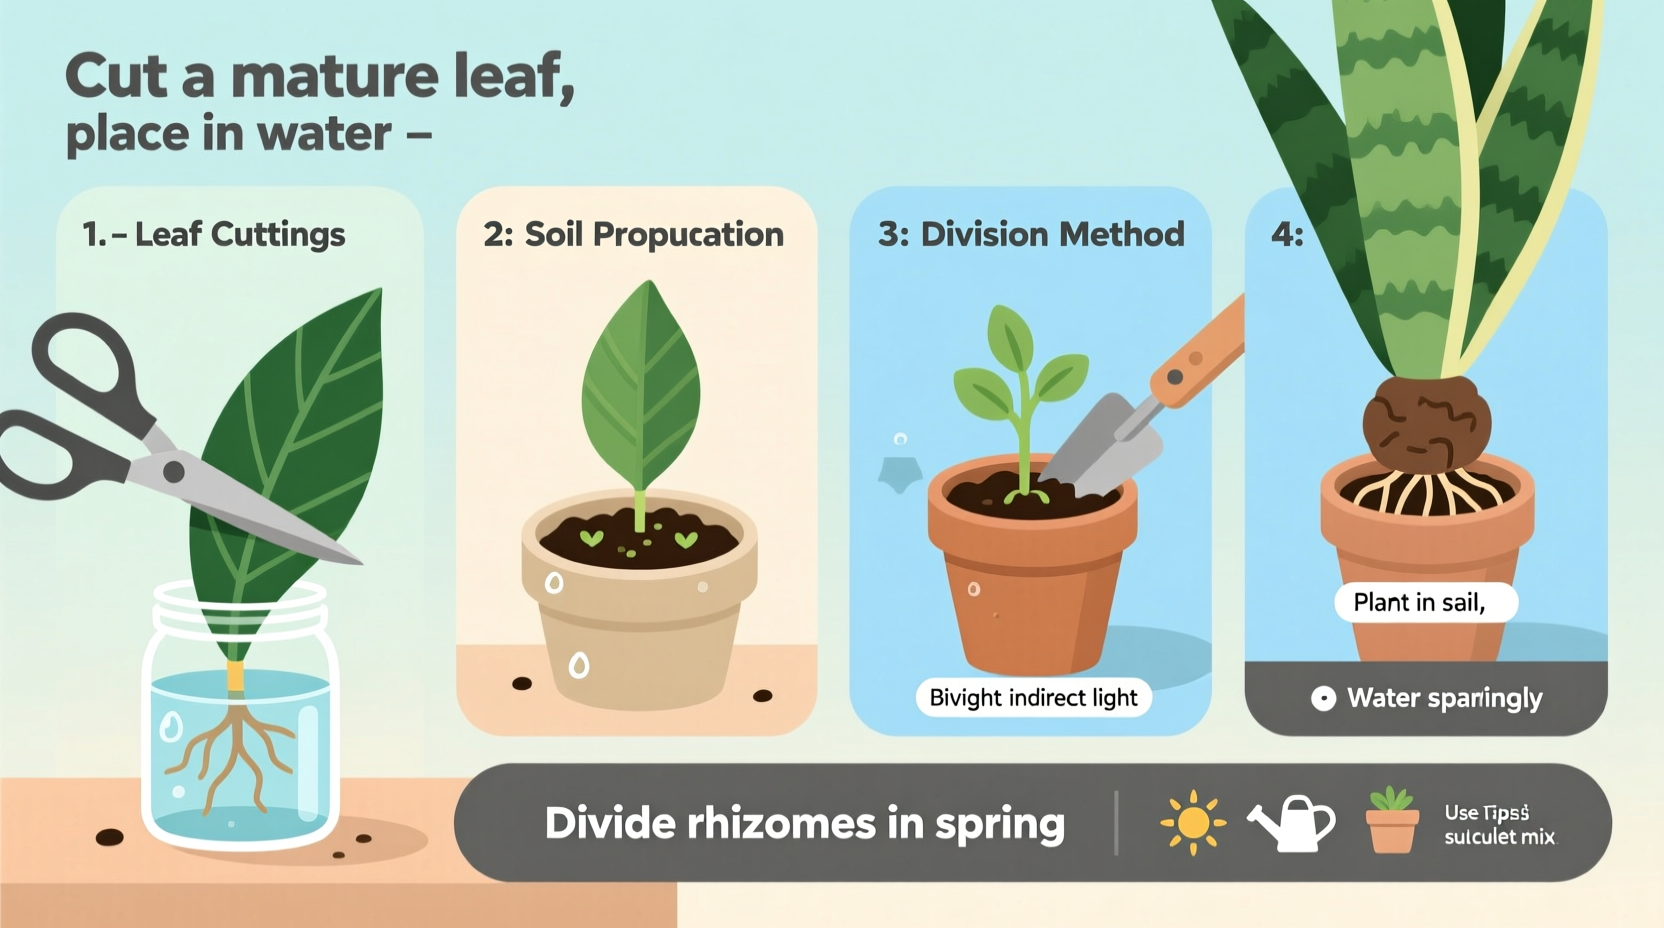
Snake plants can be propagated in three primary ways: leaf cuttings, division, and rhizome cuttings. Each method has its advantages and ideal timing. Knowing when and how to use each will increase your chances of success.
Propagation Method 1: Leaf Cuttings in Soil
Leaf cuttings are the most popular method for beginners because they require only a single healthy leaf and basic supplies. While this method takes longer than division, it allows you to multiply your plant without removing entire sections.
- Select a firm, upright leaf from the outer edge of the plant. Avoid damaged or yellowing leaves.
- Using a clean, sharp knife or scissors, cut the leaf close to the soil line.
- Divide the leaf into 3–4 inch segments, making sure to note which end was closest to the soil (the bottom).
- Allow the cut ends to callous over for 1–2 days in a dry, shaded area.
- Insert the bottom end of each segment about 1 inch deep into moist, well-draining potting mix.
- Place the pot in bright, indirect light and keep the soil lightly damp but not wet.
- Patiently wait 4–8 weeks for roots and new shoots to emerge.
This method produces genetically identical clones of the parent plant, preserving variegation patterns in varieties like ‘Laurentii’ or ‘Moonshine’. However, because leaf cuttings rely on stored energy rather than active rhizomes, growth is slower. Some cuttings may fail, especially if the leaf was weak or the soil too wet.
Propagation Method 2: Division (Best for Mature Plants)
If your snake plant has grown into a full, crowded pot with multiple shoots, division is the fastest and most reliable way to propagate. This method separates established sections of the plant, each with its own rhizome and root system, ensuring immediate vigor.
“Division mimics how snake plants reproduce in nature. When done correctly, it causes minimal stress and yields instant results.” — Dr. Lena Patel, Botanist & Indoor Plant Specialist
To divide your snake plant:
- Water the plant lightly a day before to ease removal from the pot.
- Gently tip the plant out and shake off excess soil to expose the rhizome network.
- Look for natural separations where clusters of leaves emerge from distinct rhizome sections.
- Using a sterilized knife, cut through connecting rhizomes, ensuring each division has at least one healthy leaf and some roots.
- Replant each section in its own container with fresh, well-draining soil.
- Water sparingly for the first week, then resume normal care.
Divided plants typically show new growth within 2–3 weeks, much faster than leaf cuttings. This method is ideal for spring or early summer when the plant is entering its active growing season.
Propagation Method 3: Rhizome Cuttings
A less common but highly effective technique involves cutting the rhizome itself. This method combines the benefits of division and leaf propagation by generating new plants directly from underground stems.
Steps:
- Carefully remove the plant from its pot and locate the horizontal rhizomes beneath the soil.
- Cut a 2–3 inch section of rhizome that includes at least one growth node (a bump where leaves emerge).
- Lay the rhizome horizontally on top of moist soil or bury it just below the surface.
- Maintain warmth (70–80°F) and indirect light.
- New leaves should appear in 3–6 weeks.
This method is particularly useful for rejuvenating leggy or declining plants. By removing older rhizomes and propagating younger ones, you can revitalize the entire specimen while creating backups.
Do’s and Don’ts of Snake Plant Propagation
| Do’s | Don’ts |
|---|---|
| Use clean, sterilized tools to prevent disease transmission | Use dull or dirty knives that can crush tissue |
| Let cuttings callous before planting to reduce rot risk | Plant freshly cut leaves immediately in wet soil |
| Provide bright, indirect light during rooting | Place in direct sunlight, which can scorch cuttings |
| Use a well-draining soil mix (cactus/succulent blend works well) | Use heavy garden soil that retains too much moisture |
| Be patient—snake plants grow slowly, especially from leaf cuttings | Overwater in hopes of speeding up growth |
Real Example: A Beginner’s First Propagation Success
Sophie, a first-time plant owner in Portland, Oregon, inherited a large snake plant from her grandmother. After two years of steady growth, the plant filled its pot and began producing smaller pups around the edges. Inspired by online forums, she decided to try propagation.
She chose the division method, carefully removing the plant in late May. To her surprise, the root ball revealed three distinct rhizome clusters. She separated them, repotted each in cactus mix, and placed them near a north-facing window. Within ten days, all three showed signs of new growth. Six months later, one had doubled in size. “I didn’t realize how easy it could be,” she said. “Now I’ve gifted two of the new plants to coworkers, and they’re thriving too.”
Sophie’s experience highlights a key point: even novice gardeners can succeed with basic observation and gentle handling. The plant’s natural resilience does much of the work.
Tips for Maximizing Success
Additionally, avoid fertilizing newly propagated plants for at least 6–8 weeks. Their developing root systems are sensitive to salts and chemicals. Wait until you see clear signs of new leaf growth before introducing a diluted, balanced fertilizer.
Frequently Asked Questions
Can I propagate a snake plant in water?
Yes, but with caution. While some people report success placing leaf cuttings in water, the risk of rot is high due to the leaf’s susceptibility to prolonged moisture. If attempting this method, change the water weekly, ensure only the very bottom touches the liquid, and transplant to soil as soon as roots form (about 1–2 inches). Soil propagation remains more reliable.
How long does it take for a snake plant cutting to grow?
Root development typically begins in 3–5 weeks for division, 4–8 weeks for leaf cuttings, and 3–6 weeks for rhizome cuttings. Visible new leaves may take several additional weeks. Patience is essential—snake plants are slow starters but long-lived once established.
Why is my snake plant cutting turning yellow or mushy?
This usually indicates overwatering or poor drainage. Remove the affected cutting immediately to prevent spread. Ensure future cuttings are planted in fast-draining soil and water only when the top inch of soil is dry. Also, confirm the cutting wasn’t planted upside down—only the end that was closest to the roots should go into the soil.
Step-by-Step Checklist for Beginners
- Preparation Phase
- ☐ Choose a healthy parent plant with no signs of pests or disease
- ☐ Gather clean tools: sharp knife or scissors, rubbing alcohol for sterilization
- ☐ Prepare pots with drainage holes and fill with cactus or succulent mix
- Propagation Phase
- ☐ Select method: leaf cutting, division, or rhizome cutting
- ☐ Make clean cuts and allow leaf/rhizome pieces to callous for 24 hours
- ☐ Plant cuttings in soil with correct orientation (bottom end down)
- Aftercare Phase
- ☐ Place in bright, indirect light—avoid direct sun
- ☐ Water lightly every 7–10 days, depending on humidity and temperature
- ☐ Wait 4+ weeks before checking for roots (tug gently—if resistance, roots have formed)
- ☐ Begin regular care once new leaves emerge
Final Thoughts and Encouragement
Propagating a snake plant is more than a gardening task—it’s a lesson in patience, observation, and connection with living things. Whether you're multiplying a cherished heirloom plant or experimenting for the first time, each cutting represents potential. The methods outlined here are time-tested, accessible, and forgiving, making them perfect for beginners.
Start small. Try one leaf cutting or a single division. Learn from the process—what works, what doesn’t, how your environment affects growth. Over time, you’ll develop an intuitive sense for your plants’ needs. And when you see that first tiny shoot rise from the soil, you’ll understand why so many plant lovers find propagation endlessly rewarding.


 浙公网安备
33010002000092号
浙公网安备
33010002000092号 浙B2-20120091-4
Comments
No comments yet. Why don't you start the discussion?