
Succulents are among the most forgiving and rewarding plants to grow, especially for those just starting their indoor gardening journey. Their fleshy leaves store water, making them resilient to neglect, and their compact forms add charm to any space. But one of the most exciting aspects of owning succulents is how easily they can multiply. Propagation from a single leaf is not only possible—it’s surprisingly simple.
With minimal tools and a bit of patience, you can turn one healthy leaf into an entire new plant. This method works particularly well with rosette-forming succulents like Echeveria, Graptopetalum, and Sedum. Unlike more complex propagation techniques, leaf propagation requires no cuttings or rooting hormones. It’s nature’s way of cloning, and it’s accessible to anyone willing to try.
This guide walks through every step of the process, from selecting the right leaf to nurturing your new seedlings. Whether you're looking to expand your own collection or share baby succulents with friends, this is a sustainable, cost-effective, and deeply satisfying practice.
Why Propagate Succulents from Leaves?
Leaf propagation isn’t just a clever trick—it’s a fundamental part of how many succulents reproduce in the wild. When a leaf breaks off due to wind or animal contact, it can take root and grow into a new plant if conditions are right. Gardeners have simply learned to replicate this natural process indoors.
There are several compelling reasons to try leaf propagation:
- No cost involved – Use leaves from plants you already own or receive from friends.
- Eco-friendly – Reduce waste and avoid purchasing new plants.
- High success rate – With proper care, most healthy leaves will produce roots and new growth.
- Therapeutic and educational – Watching a tiny plant emerge from a single leaf is a powerful reminder of nature’s resilience.
“Succulent leaf propagation is one of the most accessible entry points into plant propagation. It teaches patience and observation—two essential skills for any gardener.” — Dr. Lena Torres, Botanist and Horticulture Educator
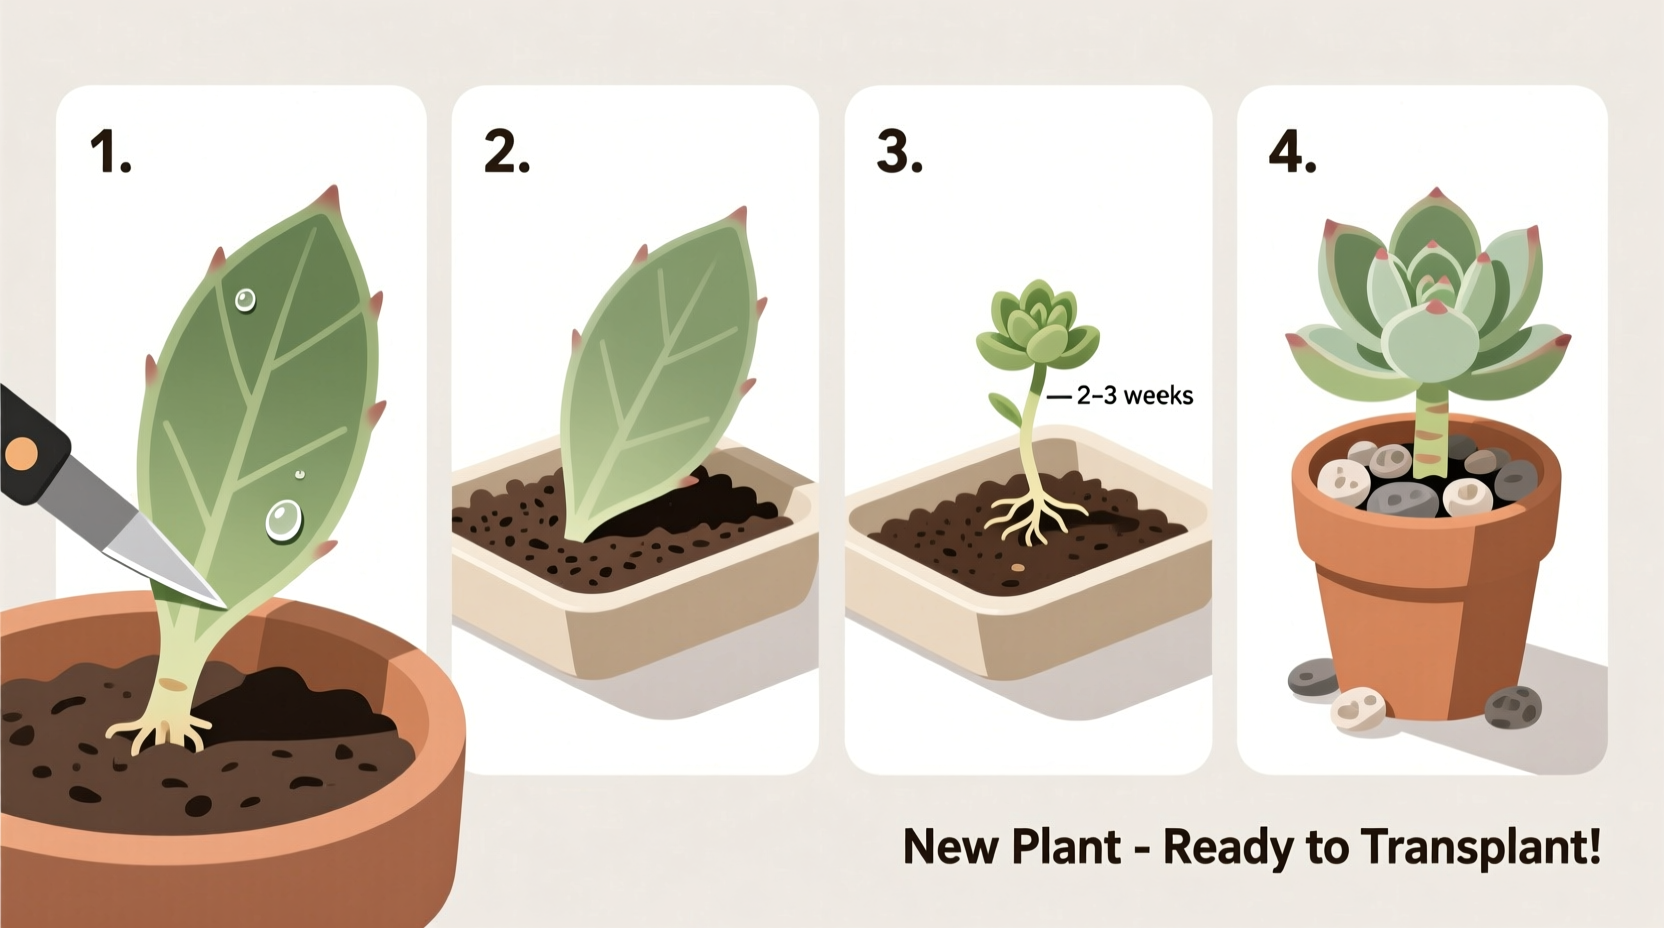
Step-by-Step Guide to Leaf Propagation
Follow these clear, sequential steps to give your succulent leaves the best chance of developing into full-grown plants.
- Select a healthy parent plant. Choose a mature, disease-free succulent with plump, firm leaves. Avoid plants that are stretched (etiolated) or showing signs of rot.
- Choose the right leaves. Focus on outer, fully grown leaves near the base. They should be intact, without tears or blemishes. Smaller inner leaves are less likely to succeed.
- Remove leaves carefully. Gently wiggle the leaf side to side until it detaches cleanly at the stem. A clean pull ensures the entire leaf comes off—any breakage reduces success rates.
- Let leaves callus over. Place the removed leaves on a dry surface out of direct sunlight. Wait 3–5 days for the broken end to form a callus. This prevents rot when placed on soil.
- Prepare the growing medium. Use a fast-draining mix such as cactus soil blended with perlite or pumice. Fill a shallow tray or pot and lightly moisten the surface.
- Place leaves on top of soil. Lay each callused leaf flat on the soil surface—do not bury it. Roots will emerge from the base, and new growth will follow.
- Mist sparingly. After 7–10 days, begin misting the soil lightly once a week. Overwatering is the leading cause of failure.
- Wait patiently. Rooting can take 2–6 weeks. Tiny pink or white roots appear first, followed by a miniature rosette.
- Transplant when ready. Once the mother leaf shrivels and the baby plant has 4–6 leaves, gently transfer it to its own pot.
Best Succulent Varieties for Leaf Propagation
Not all succulents propagate equally well from leaves. Some rely more on stem cuttings or offsets. The following table highlights the top performers for leaf propagation and notes common challenges.
| Variety | Success Rate | Time to New Growth | Notes |
|---|---|---|---|
| Echeveria | High | 4–8 weeks | Produces tight rosettes; sensitive to overwatering |
| Graptopetalum (Ghost Plant) | Very High | 3–6 weeks | Pale leaves root quickly; ideal for beginners |
| Sedum (e.g., Burro’s Tail) | High | 5–9 weeks | Leaves must stay dry during callusing |
| Kalanchoe | Moderate | 6–10 weeks | Some species produce plantlets along leaf edges |
| Haworthia | Low–Moderate | Rarely successful | Best propagated via offsets; avoid leaf attempts |
| Aloe | Very Low | Not recommended | Use pups instead of leaves for reliable results |
Stick to high-success varieties when starting out. As you gain confidence, experiment with more challenging types.
Common Mistakes and How to Avoid Them
While leaf propagation is straightforward, small errors can derail the process. Awareness of common pitfalls increases your chances of success.
- Using damaged or unhealthy leaves – Only use plump, unblemished leaves. Thin or yellowing ones lack energy reserves.
- Skipping the callusing step – Freshly picked leaves are prone to rot if placed directly on moist soil.
- Overwatering – Misting too frequently drowns emerging roots. Wait until the soil is completely dry before re-misting.
- Burying the leaf – Burying encourages rot. Always place the leaf flat on the surface.
- Impatience – Some leaves take weeks to show signs of life. Don’t discard them too soon.
- Too much sun – While succulents love light, newly propagated leaves need bright, indirect light to avoid scorching.
Real Example: Sarah’s First Propagation Success
Sarah, a first-time plant owner in Portland, Oregon, inherited a large Echeveria ‘Perle von Nürnberg’ from her grandmother. Over time, the lower leaves began to drop naturally. Instead of discarding them, she decided to try propagation after reading about it online.
She carefully removed six healthy purple-gray leaves, let them dry for four days on a windowsill, and placed them on a tray of cactus mix. She lived in a humid climate, so she kept the tray in a bright but shaded corner and misted the soil lightly every 10 days.
After five weeks, she noticed fine white roots emerging from three of the leaves. By week eight, two had developed tiny rosettes. Today, those original two babies are thriving in individual pots, and Sarah has shared cuttings with three friends. “It felt like magic,” she said. “I didn’t think a dead-looking leaf could come back to life.”
Her story reflects a common experience: success often comes not from perfection, but from consistency and attention to detail.
Essential Checklist for Beginners
Use this checklist to ensure you cover every critical step before starting your propagation project.
- ☐ Choose a healthy succulent with mature outer leaves
- ☐ Gently remove 5–6 leaves with a clean twist
- ☐ Allow leaves to callus for 3–5 days in a dry, shaded area
- ☐ Prepare a shallow tray with well-draining succulent mix
- ☐ Place callused leaves on top of soil (not buried)
- ☐ Position tray in bright, indirect light
- ☐ Wait 7–10 days before first misting the soil
- ☐ Monitor weekly for roots and new growth
- ☐ Transplant baby plants once the mother leaf dries up
- ☐ Water new plants sparingly and increase light gradually
Frequently Asked Questions
How long does it take for a succulent leaf to grow a new plant?
The timeline varies by species and environment. Most successful leaves develop roots in 2–6 weeks and produce visible baby rosettes within 6–12 weeks. Full maturity takes 6–12 months.
Can I water the leaves directly?
No. Avoid getting water on the leaf itself, especially during early stages. Moisture trapped between the leaf layers can cause rot. Always mist the soil, not the foliage.
What if the leaf shrivels but no plant grows?
Shriveling is normal—it means the leaf is transferring its stored energy to the new plant. However, if no roots or rosettes appear after 10–12 weeks, the leaf likely failed. Discard it and try again with fresher leaves.
Final Thoughts and Encouragement
Propagating succulents from leaves is more than a gardening technique—it’s a lesson in patience, observation, and trust in natural processes. Each leaf holds the quiet potential for new life, waiting only for the right conditions and a little attention.
You don’t need special equipment, a greenhouse, or years of experience. All you need is one healthy leaf, a container, some soil, and the willingness to wait. Many beginners are surprised by how quickly they succeed, often producing multiple new plants from a single session.
As you build confidence, consider sharing your extra baby succulents with others. A rooted leaf in a tiny pot makes a heartfelt gift. Or start a propagation station on your windowsill—a living display of growth and renewal.


 浙公网安备
33010002000092号
浙公网安备
33010002000092号 浙B2-20120091-4
Comments
No comments yet. Why don't you start the discussion?