
Propagating succulents from leaves is one of the most rewarding and cost-effective ways to grow your indoor garden. Unlike traditional plant reproduction that relies on seeds, succulents can regenerate entire new plants from a single healthy leaf. This method is not only simple but also deeply satisfying—watching tiny roots and leaves emerge from what looks like a discarded piece of foliage feels like witnessing nature’s quiet magic.
For beginners, the process may seem delicate or uncertain, but with the right approach, nearly anyone can succeed. Whether you're looking to expand your collection, share plants with friends, or simply enjoy the therapeutic rhythm of gardening, leaf propagation offers an accessible entry point into plant care.
Why Propagate Succulents from Leaves?
Succulents are known for their resilience and low maintenance, but their ability to reproduce asexually through leaves sets them apart from many other houseplants. Leaf propagation allows you to multiply your favorite varieties without purchasing new plants. It's especially useful when you have a particularly striking Echeveria, Graptopetalum, or Sedum that you’d love to see more of.
Beyond economy, propagation deepens your understanding of plant biology. You’ll learn to recognize signs of health, root development, and environmental needs—all while building confidence in your gardening skills.
“Leaf propagation turns a single plant into a legacy. One healthy leaf today can become a dozen thriving plants in six months.” — Dr. Lila Nguyen, Botanist & Horticulture Educator
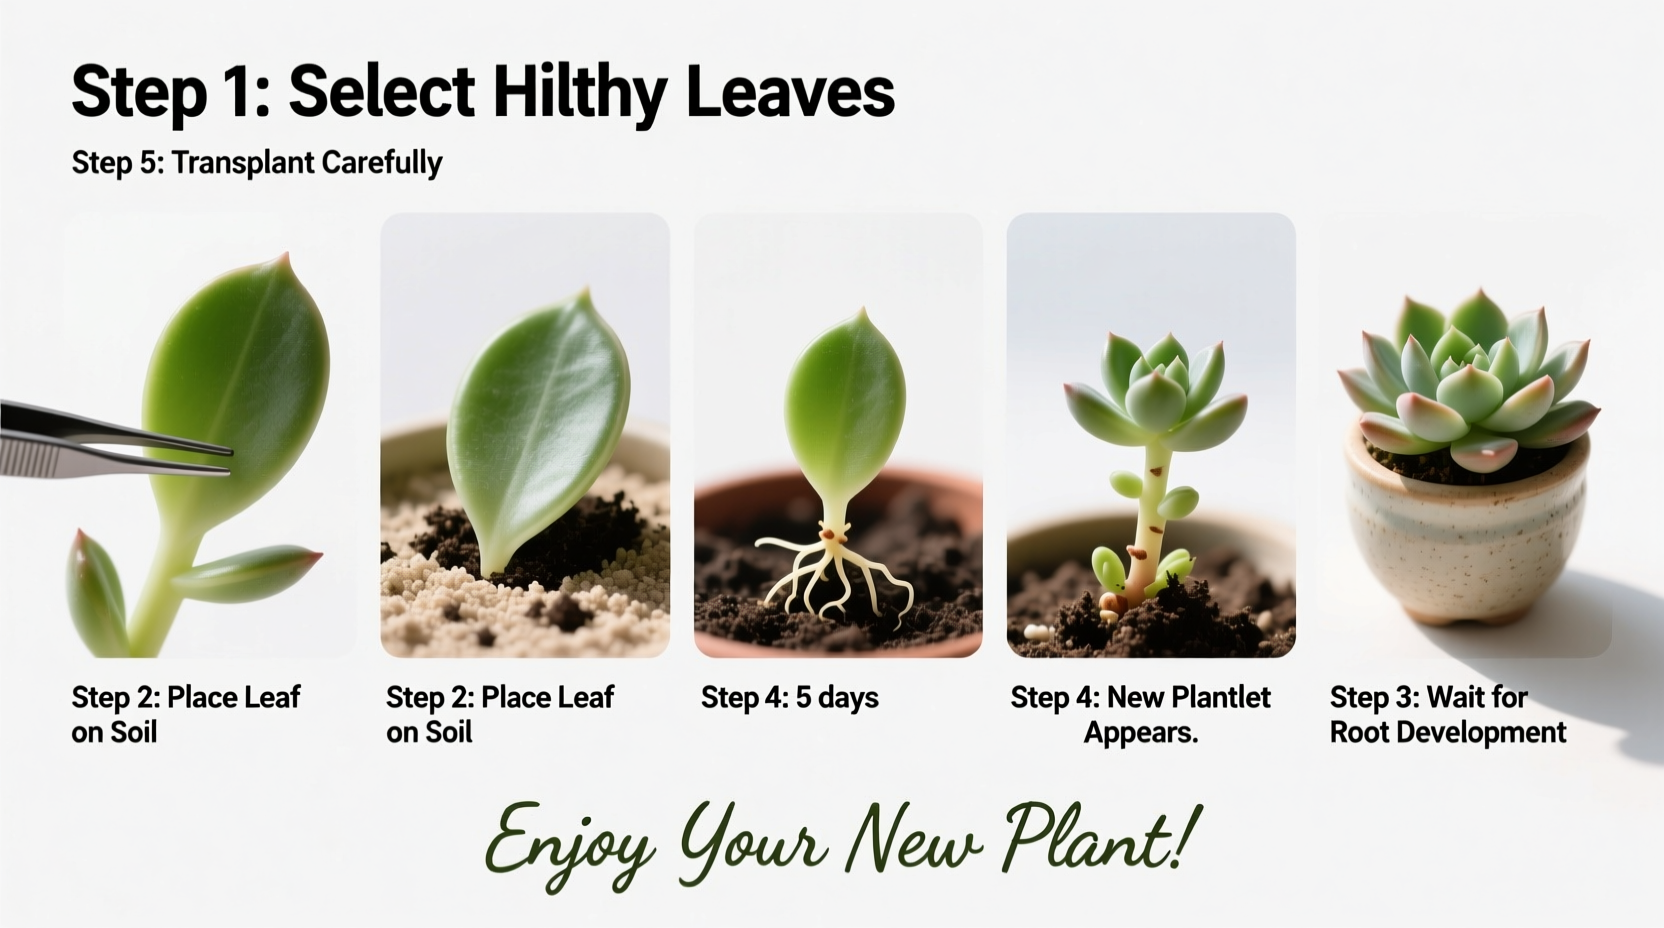
Step-by-Step Guide to Propagating Succulents from Leaves
Follow this detailed timeline to ensure the highest success rate when starting your propagation journey. Patience is key—this process takes weeks, not days, but the results are worth the wait.
- Select Healthy Parent Plants: Choose mature, well-hydrated succulents free from pests or disease. Avoid stressed or leggy plants.
- Remove Leaves Carefully: Gently twist a lower or middle leaf from the stem. It should come off cleanly at the base. If it tears, it may not propagate successfully.
- Let Leaves Callous Over: Place the detached leaves on a dry surface out of direct sunlight. Wait 3–5 days until the broken end forms a callus (a dry, hardened tip). This prevents rot when placed on soil.
- Prepare the Growing Medium: Use a well-draining mix such as cactus soil blended with perlite or pumice. Fill shallow trays or small pots and lightly moisten the surface.
- Position Leaves Properly: Lay the calloused leaves flat on the soil surface. Do not bury them. Ensure the callused end has light contact with the soil but isn’t pressed in.
- Provide Ideal Conditions: Place trays in bright, indirect light. A south-facing windowsill with filtered sun works well. Avoid direct afternoon sun, which can scorch tender tissue.
- Wait and Monitor: For 2–6 weeks, resist watering. Roots and pups (tiny new plants) will begin to form naturally. Only mist lightly if the environment is extremely dry.
- Begin Light Watering: Once roots and small rosettes appear, use a spray bottle to lightly dampen the soil every 7–10 days. Let it dry completely between sessions.
- Pot Up New Plants: After 6–8 weeks, when the mother leaf shrivels and the pup has several leaves and a strong root system, transplant it into its own pot.
- Resume Normal Care: Treat the new plant like a mature succulent—water deeply but infrequently, and provide plenty of light.
Best Succulent Varieties for Leaf Propagation
Not all succulents propagate equally well from leaves. Some species rely more on stem cuttings or offsets. The following genera have high success rates with leaf propagation and are ideal for beginners:
| Genus/Species | Propagation Success Rate | Time to Root Development | Notes |
|---|---|---|---|
| Echeveria spp. | High | 3–5 weeks | Produces compact rosettes; sensitive to overwatering |
| Graptopetalum paraguayense (Ghost Plant) | Very High | 2–4 weeks | Easy to propagate; thrives in bright shade |
| Sedum morganianum (Burro’s Tail) | Moderate | 4–6 weeks | Fragile leaves—handle with care during removal |
| Kalanchoe tomentosa (Panda Plant) | High | 3–6 weeks | Fuzzy leaves; allow extra drying time before placing on soil |
| Crassula ovata (Jade Plant) | Moderate | 4–8 weeks | Slow starter; requires patience |
Stick to these beginner-friendly types until you gain experience. Once confident, you can experiment with rarer or more finicky cultivars.
Common Mistakes to Avoid
Even experienced growers sometimes fail at propagation due to preventable errors. Here are the most frequent pitfalls—and how to avoid them:
- Watering Too Early: Applying moisture before roots form causes leaves to rot. Wait until you see tiny white roots or new growth.
- Using Poor Drainage Soil: Standard potting soil retains too much water. Always use a gritty, fast-draining mix.
- Placing in Direct Sunlight: Intense UV rays can fry delicate calluses and emerging roots. Opt for bright, indirect light.
- Burying the Leaves: Burying or pressing leaves into the soil increases rot risk. Keep them resting on the surface.
- Impatience: Some succulents take over a month to show signs of life. Don’t discard “inactive” leaves too soon.
Essential Propagation Checklist
Use this checklist before beginning your next propagation session to ensure all conditions are optimized:
- ✅ Choose plump, undamaged leaves from healthy parent plants
- ✅ Twist leaves cleanly—no tearing at the base
- ✅ Allow 3–5 days for callusing in a dry, shaded area
- ✅ Prepare shallow container with cactus-perlite mix
- ✅ Position leaves on soil surface, callused end slightly touching medium
- ✅ Place in bright, indirect light (no direct sun)
- ✅ Avoid watering for at least 2–3 weeks
- ✅ Monitor daily for root and pup formation
- ✅ Begin misting only after roots appear
- ✅ Transplant pups once mother leaf dries up completely
A Real Beginner’s Experience: Maria’s First Propagation Attempt
Maria, a novice gardener from Portland, decided to try propagating her pink blush Echeveria after seeing a friend’s thriving tray online. She carefully removed five large lower leaves, laid them on top of regular potting soil, and watered them lightly every few days, thinking they needed consistent moisture.
After two weeks, three leaves had turned mushy and black at the base. Discouraged, she researched further and learned about callusing and overwatering. She tried again with three new leaves, this time letting them dry for four days and using a perlite-sand mix. She placed them near a north-facing window and didn’t water at all for three weeks.
To her delight, four tiny green dots appeared on one leaf, followed by fine white roots on another. By week six, two viable pups were ready to pot. “I realized I was caring too much,” she said. “Sometimes, the best thing you can do is leave them alone.”
Maria now maintains a propagation station on her apartment balcony and shares baby succulents with coworkers each spring.
Frequently Asked Questions
Can all succulents be propagated from leaves?
No. While many rosette-forming succulents like Echeveria and Graptopetalum respond well to leaf propagation, others such as Haworthia or Aloe are better suited to offset division. Always research your specific species before attempting leaf propagation.
How long does it take for roots to appear?
Most successful propagations show root development within 2–6 weeks, depending on temperature, humidity, and species. Cooler environments slow the process; warmth accelerates it. Be patient—some jade plant leaves take 8 weeks to initiate growth.
What should I do if the leaf shrivels but no pup forms?
Shriveling is normal—it means the leaf is transferring stored energy to the new plant. However, if no roots or pups appear after 8 weeks, the leaf likely failed. Common causes include poor callusing, excessive moisture, or using a weak parent leaf.
Optimizing Environmental Conditions
Temperature and humidity play crucial roles in successful propagation. Ideal conditions include:
- Temperature: 65°F–75°F (18°C–24°C). Avoid cold drafts or sudden drops below 50°F.
- Humidity: Low to moderate. High humidity increases mold and rot risk unless there’s excellent airflow.
- Ventilation: Gentle air movement discourages fungal growth. A small fan nearby (not blowing directly) helps.
- Light Duration: 6–8 hours of bright, indirect light per day. Rotate trays weekly for even exposure.
In cooler climates, consider using a heat mat set to low under propagation trays during winter months. This can significantly improve success rates.
When and How to Transplant Pups
The moment you’ve been waiting for—your tiny pup has grown a few leaves and developed a small root system. Now it’s time to give it its own home.
Wait until the mother leaf has fully dried and withered. This indicates it has transferred all possible nutrients. Using a small spoon or tweezers, gently lift the pup along with its roots. Handle by the roots or base—not the fragile new leaves.
Plant in a small pot (2–3 inches in diameter) filled with well-draining succulent mix. Water lightly after planting, then wait 5–7 days before watering again to let any minor root damage heal. Keep the newly potted pup in indirect light for 1–2 weeks before gradually introducing it to brighter conditions.
Final Thoughts and Encouragement
Propagating succulents from leaves is more than a gardening technique—it’s a lesson in patience, observation, and trust in natural processes. Each attempt teaches you something new, whether it succeeds or fails. Even experienced horticulturists lose batches to rot or dehydration; what matters is persistence and learning from each cycle.
You don’t need fancy equipment or a greenhouse. All you need is a few healthy leaves, a bit of grit, and the willingness to wait. Over time, your windowsills will fill with offspring of your original plants, each carrying the same genetic beauty passed down from a single leaf.


 浙公网安备
33010002000092号
浙公网安备
33010002000092号 浙B2-20120091-4
Comments
No comments yet. Why don't you start the discussion?