
A well pump system is a critical component of off-grid or rural water supply, quietly delivering pressurized water to homes without access to municipal lines. At the heart of this system lies the pressure tank, which uses a combination of water and compressed air to maintain steady water pressure and reduce the frequency with which the pump cycles on and off. Over time, however, the air charge in the tank can diminish—a condition known as “waterlogging”—leading to short cycling, increased pump wear, inconsistent water pressure, and premature system failure. Recharging the air in your well tank isn’t complicated, but doing it correctly is essential for long-term reliability. This guide walks through the science, tools, steps, and best practices for properly adding air to your well pump tank.
Understanding How a Well Pressure Tank Works
Most modern well systems use a bladder-type pressure tank, where an internal rubber diaphragm separates water from the air chamber. When the pump pushes water into the tank, the bladder expands, compressing the air above it. That compressed air provides the force that pushes water through your plumbing when you turn on a faucet. Once pressure drops to a preset cut-in level (typically 40 psi), the pump kicks back on.
If the air charge is too low, the bladder doesn’t have enough resistance, causing the tank to fill quickly with water and the pump to cycle on and off rapidly. This short cycling accelerates motor wear, increases energy consumption, and can damage the pressure switch. Conversely, overcharging the tank leads to reduced usable water volume and excessive pressure that may strain plumbing fixtures.
“Maintaining the correct air charge is just as important as maintaining the pump itself. A properly charged tank can double the operational life of a well system.” — James Ralston, Certified Water Systems Technician, National Ground Water Association
When and Why to Add Air to Your Well Tank
You should check and adjust the air charge in your pressure tank at least once a year, or more frequently if you notice warning signs such as:
- Pump turning on and off every few seconds (short cycling)
- Fluctuating water pressure in showers or faucets
- Reduced water flow despite normal pump operation
- Unusual noise from the pump or tank
- Water hammer (loud banging in pipes after faucet shut-off)
These symptoms often point to a compromised air charge. In older tanks without bladders (called captive-air or plain steel tanks), air can gradually dissolve into the water and escape, requiring periodic recharging. Even bladder tanks can lose air due to diaphragm leaks or valve issues.
Step-by-Step Guide to Adding Air to Your Well Pump Tank
Follow these steps carefully to safely and effectively recharge your well tank’s air pressure.
- Turn Off the Power: Shut off electricity to the well pump at the circuit breaker to prevent accidental startup.
- Drain the System: Open a faucet at the lowest point in your home (e.g., basement sink or outdoor spigot) to release water and pressure from the tank. Leave it open until water stops flowing.
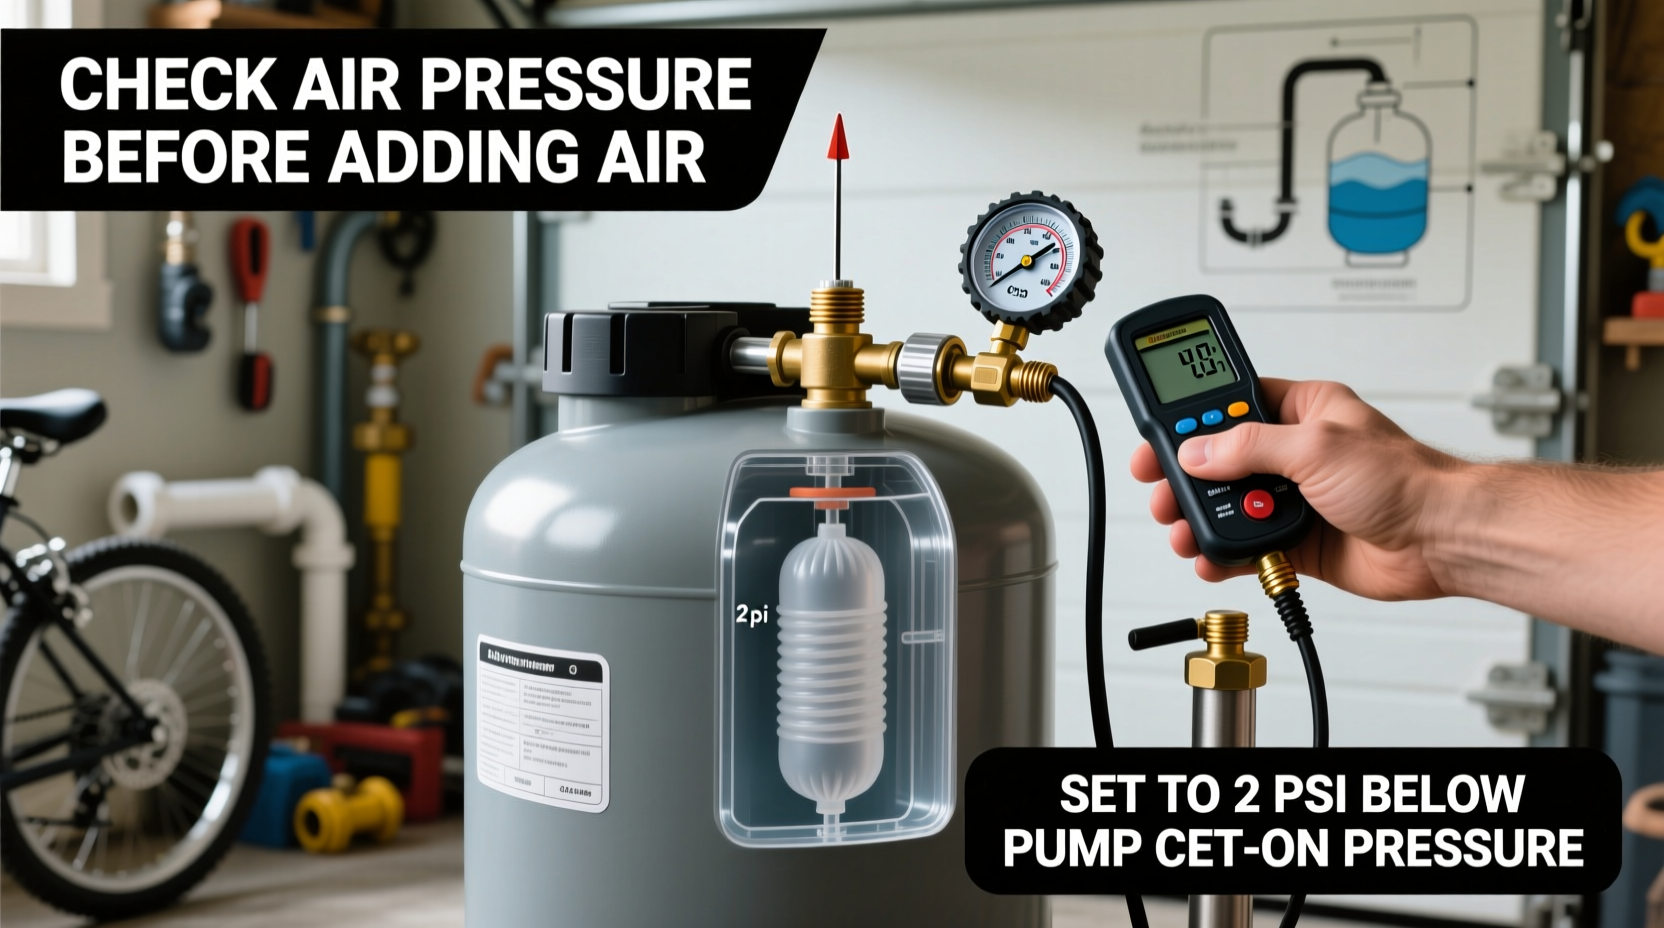
- Locate the Air Charging Valve: On most tanks, this is a Schrader valve (like a tire valve) on the top or side. Remove the plastic cap.
- Check Current Pressure: Use a calibrated air pressure gauge to measure residual air in the tank. If there’s no reading, the tank may be fully waterlogged.
- Set the Correct Pressure: The air charge should be 2 psi below the pump’s cut-in pressure. For a standard 40/60 psi system, set the tank to 38 psi. For a 30/50 system, set to 28 psi.
- Add Air Gradually: Use a hand pump or small compressor to inject air into the valve. Check pressure frequently to avoid overinflation.
- Close Faucet and Restore Power: Once charged, close the drain faucet, replace the valve cap, and restore power to the pump.
- Test the System: Turn on a faucet and observe the pump cycle. It should start at the cut-in pressure, run for several seconds, and stop at the cut-out pressure without rapid cycling.
Do’s and Don’ts of Tank Air Maintenance
| Do’s | Don’ts |
|---|---|
| Use a high-quality, digital pressure gauge for accuracy | Never add air while the tank is under system pressure |
| Recharge annually or at first sign of short cycling | Don’t exceed 2 psi below the cut-in pressure setting |
| Inspect the Schrader valve for leaks or corrosion | Don’t use shop air compressors with unregulated output |
| Record pressure settings and service dates for tracking | Don’t ignore persistent pump cycling after recharging (may indicate a ruptured bladder) |
Mini Case Study: Resolving Chronic Short Cycling in a Rural Home
A homeowner in central Pennsylvania had been experiencing frequent pump failures—replacing their submersible pump twice in three years. Each time, the diagnosis was “burned-out motor.” After consulting a well technician, the root cause was identified: a waterlogged pressure tank. The 86-gallon bladder tank had dropped to just 12 psi of air charge, far below the required 28 psi for its 30/50 pressure switch. The pump was cycling every 45 seconds, drastically shortening its lifespan. After draining the tank, refilling it to 28 psi, and replacing a faulty pressure switch, the system stabilized. The pump now runs only 6–8 times per day, and water pressure remains consistent. Two years later, no further issues have occurred.
Frequently Asked Questions
Can I use a bicycle pump to add air to my well tank?
Yes, a hand-operated bike pump with a pressure gauge can work, especially for small adjustments. However, it’s labor-intensive for large tanks. A small 12V air compressor is more efficient and recommended for regular maintenance.
What if my tank won’t hold air after charging?
This usually indicates a ruptured bladder or a leak in the air valve. If air escapes within hours or days, the tank likely needs replacement. Try tightening the valve core first—if that doesn’t help, the internal diaphragm has failed.
Is it possible to overcharge the tank?
Absolutely. Overcharging reduces the available water drawdown and increases stress on the system. For example, a tank set to 50 psi in a 40/60 system will never allow the pump to start (since the cut-in is 40), leading to no water delivery until pressure drops—which it won’t, because the tank can’t accept more water. Always follow the 2 psi rule.
Maintenance Checklist for Optimal Tank Performance
- ✅ Turn off power to the pump
- ✅ Drain all water from the tank via a low-point faucet
- ✅ Verify current air pressure using a reliable gauge
- ✅ Inflate to 2 psi below the pump’s cut-in pressure
- ✅ Use regulated, low-pressure air source to avoid damage
- ✅ Recheck pressure after restoring system and letting it cycle
- ✅ Log the service date and pressure reading for future reference
Conclusion: Protect Your Investment with Simple, Regular Care
Your well pump system represents a significant investment in your home’s infrastructure. While the pressure tank operates out of sight, its condition directly affects efficiency, comfort, and cost. Taking one hour each year to inspect and recharge the air in your tank can prevent thousands of dollars in premature repairs and extend the life of your entire system. Proper air pressure ensures smooth pump operation, consistent water delivery, and peace of mind. Don’t wait for a breakdown—schedule your annual tank maintenance today and keep your well system running like new.


 浙公网安备
33010002000092号
浙公网安备
33010002000092号 浙B2-20120091-4
Comments
No comments yet. Why don't you start the discussion?