
Losing an important note on your iPhone can feel like losing a piece of your day. Whether it was a grocery list, meeting summary, or personal journal entry, the frustration is real. The good news? Deleted notes aren’t always gone for good. Thanks to Apple’s ecosystem, there are multiple reliable ways to retrieve them—often within minutes.
With the right approach, you can restore notes even if you didn’t realize they were missing until hours—or days—later. This guide walks through proven recovery methods, backed by technical insight and real-world usability. No tech jargon overload—just clear, actionable steps that work.
Understanding How iPhone Notes Work
Before attempting recovery, it helps to understand how notes are stored and synced across devices. Most users don’t realize that the Notes app isn’t just a simple text container—it’s integrated with iCloud, email accounts, and local storage depending on settings.
If you use iCloud for Notes (the default on most iPhones), your notes sync across all Apple devices. When you delete one, it doesn’t vanish immediately. Instead, it moves to the \"Recently Deleted\" folder, where it stays for up to 30 days. This grace period is your best chance at recovery without backups.
However, if you’ve turned off iCloud syncing for Notes and rely only on local storage, deletion may be more permanent unless you have a recent backup via iTunes or Finder.
“Apple’s multi-layered storage system gives users several safety nets—but only if they act before the 30-day window closes.” — Jordan Lee, iOS Data Recovery Specialist
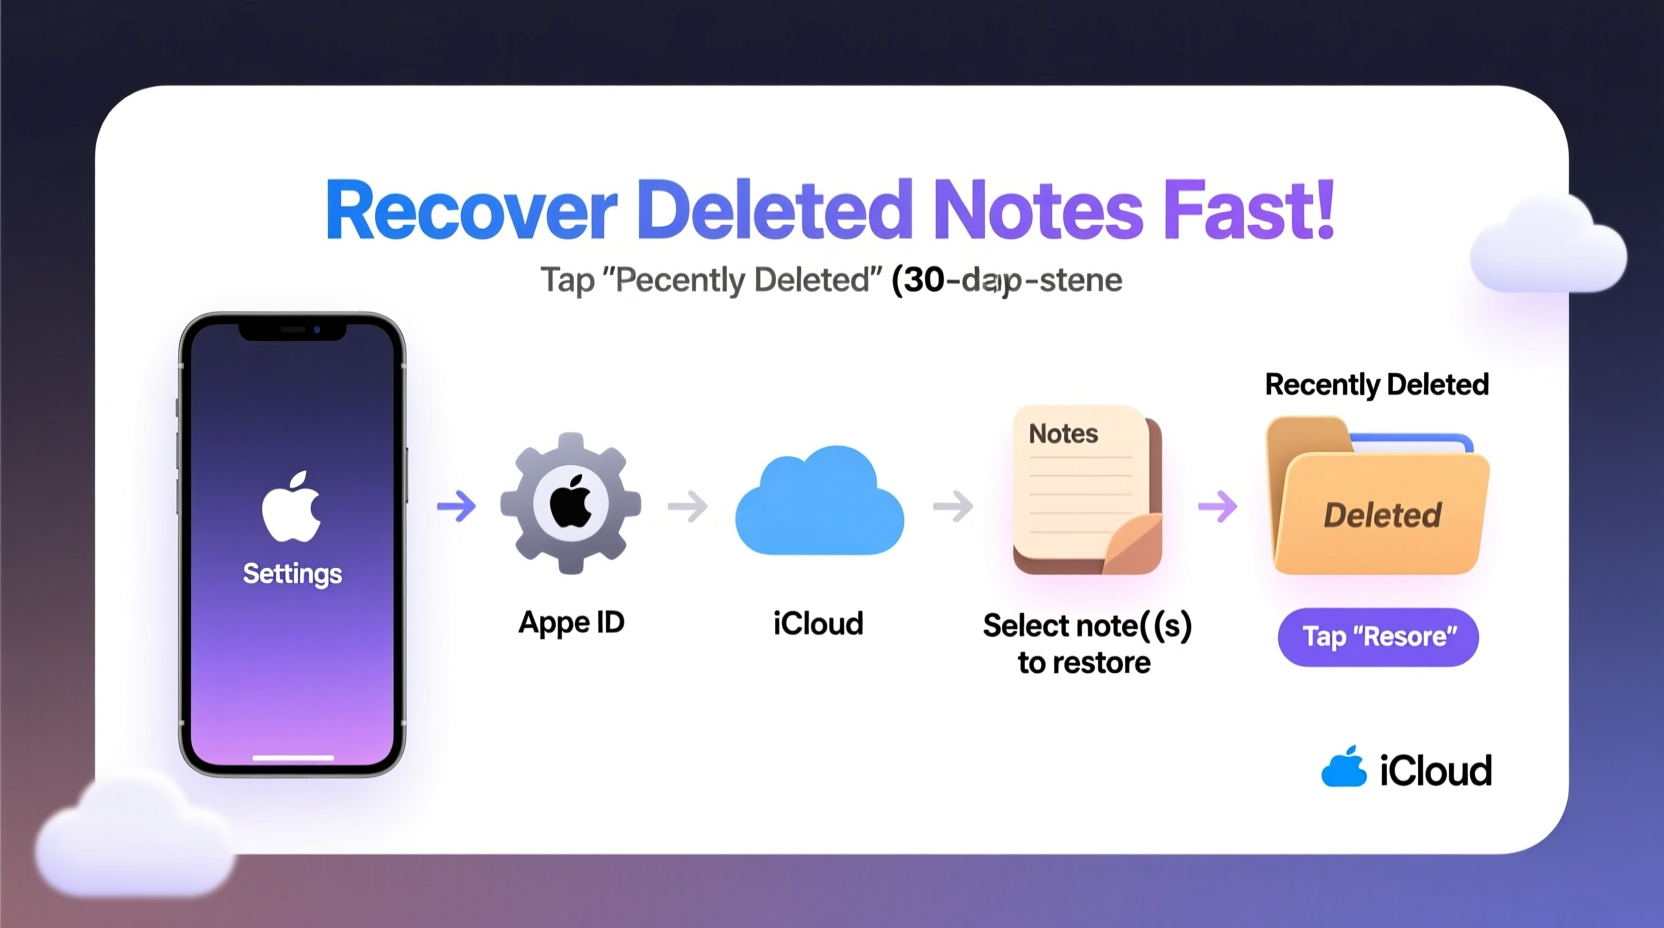
Step-by-Step: Recover Notes Using Recently Deleted Folder
The fastest and most effective way to recover a deleted note is through the built-in Recently Deleted folder. This method works whether the note was removed accidentally or during a cleanup session.
Follow these steps carefully:
- Open the Notes app on your iPhone.
- Tap Folders at the bottom-left corner.
- Scroll down and select Recently Deleted.
- Browse through the list to find the note you want to restore.
- Tap the note to open it, then tap Move (the folder icon).
- Choose the destination folder (e.g., “On My iPhone” or “iCloud”) and confirm.
If you need to recover multiple notes at once:
- While in the Recently Deleted folder, tap Select in the top-right corner.
- Check each note you wish to restore.
- Tap Move, choose a location, and confirm.
Restore Notes from iCloud Backup
If the note has been gone longer than 30 days or the Recently Deleted folder was cleared, your next best option is restoring from an iCloud backup. This method restores your entire device state—including apps, settings, and notes—to a previous point in time.
This approach should be used cautiously, as it overwrites your current data. Make sure to back up your current device first if possible.
Steps to Restore from iCloud:
- Go to Settings > [Your Name] > iCloud > Manage Storage > Backups.
- Find your iPhone under “Backups” and check the date and size of the latest backup.
- If the backup predates the note loss, proceed.
- Turn off your iPhone, then turn it back on and follow setup prompts until you reach the “Apps & Data” screen.
- Select Restore from iCloud Backup.
- Sign in with your Apple ID and choose the appropriate backup.
- Wait for the process to complete—this may take several minutes to hours, depending on backup size and internet speed.
Once restored, open the Notes app and verify whether the missing note reappears.
“Restoring from iCloud is powerful but disruptive. Only use it when other options fail—and always know what you're replacing.” — Maria Tran, Mobile Forensics Analyst
Use iTunes or Finder to Recover from Local Backup
If you regularly connect your iPhone to a Mac or PC using a cable, you might have automatic iTunes (Windows) or Finder (Mac) backups enabled. These local backups often contain full copies of your notes, even if iCloud syncing is disabled.
Recovery Process via Computer:
- Connect your iPhone to your computer using a USB cable.
- Open Finder (macOS Catalina and later) or iTunes (older macOS/Windows).
- Select your device when it appears.
- Under the General tab, locate the “Backups” section.
- Click Restore Backup… and choose the most relevant backup based on date and size.
- Confirm restoration. Your iPhone will restart and begin loading data.
Note: Like iCloud restoration, this replaces your current device data with the backup. Any new messages, photos, or notes created after the backup will be lost unless separately backed up.
Alternative Method: Check Linked Email Accounts
Many users don’t realize that the Notes app can link to third-party email accounts like Gmail, Outlook, or Yahoo. If your notes were stored under such an account instead of iCloud or “On My iPhone,” deletion behavior changes slightly.
In some cases, deleting a note from the iPhone may not remove it from the email server immediately. You may be able to access it via webmail.
How to Verify:
- Log into your associated email account (e.g., Gmail.com) from a browser.
- Look for a folder labeled “Notes” or similar.
- Search for keywords from the missing note using the search bar.
- If found, copy the content manually back into your iPhone Notes app.
This method won’t recover formatting or attachments reliably, but it can salvage critical text.
| Recovery Method | Speed | Success Rate | Data Risk |
|---|---|---|---|
| Recently Deleted Folder | Fast (under 2 min) | High (if <30 days) | None |
| iCloud Backup Restore | Slow (10 min–2 hrs) | High (if backup exists) | Overwrites current data |
| Local Backup (iTunes/Finder) | Moderate (5–60 min) | High | Same as iCloud |
| Email Account Sync | Variable | Low–Medium | Partial recovery only |
Mini Case Study: Recovering a Lost Wedding Planning Note
Sarah, a wedding planner in Portland, accidentally deleted her master vendor contact list while organizing folders. The note contained phone numbers, contracts, and special instructions for caterers, florists, and musicians—all due to be contacted the next day.
Panicked, she remembered reading about the Recently Deleted folder. She opened the Notes app, navigated to Folders > Recently Deleted, and found the note still intact—deleted just two hours earlier. With relief, she tapped Move and restored it to her main iCloud folder.
She later set up a rule to export critical notes as PDFs and store them in cloud drives as a preventive measure. “I learned my lesson,” she said. “Now I treat every important note like a contract.”
Prevention Checklist: Avoid Future Losses
Once you've recovered your notes, take steps to protect against future deletions. Use this checklist to build resilience into your workflow:
- ✅ Enable iCloud syncing for Notes in Settings > [Your Name] > iCloud > Notes.
- ✅ Regularly review the Recently Deleted folder to ensure no accidental removals.
- ✅ Export critical notes as PDFs and save them to Google Drive, Dropbox, or email.
- ✅ Set up automatic backups on both iCloud and computer.
- ✅ Use strong passwords and two-factor authentication to protect Apple ID access.
- ✅ Label important notes with tags or titles like “[DO NOT DELETE]” as a visual reminder.
Frequently Asked Questions
Can I recover a note deleted more than 30 days ago?
Yes, but only if you have a backup—either via iCloud or a computer—that was created before the note was deleted. Without a backup, permanent loss is likely.
Why don’t I see a Recently Deleted folder?
The folder appears automatically once you delete a note. If it’s missing, either no notes have been deleted recently, or your account settings are misconfigured. Ensure Notes are enabled under Settings > Passwords & Accounts for your email services.
Will restoring from backup delete my new photos or messages?
Yes. Restoring from any backup replaces your current device data with the saved version. Anything created after the backup date will be lost unless previously synced elsewhere.
Conclusion: Act Fast, Save Smarter
Recovering deleted notes from your iPhone doesn’t require advanced skills—just timely action and awareness of Apple’s built-in safeguards. The Recently Deleted folder alone rescues thousands of notes every day, quietly working behind the scenes.
But recovery is only half the battle. True peace of mind comes from proactive habits: enabling syncs, maintaining backups, and treating digital notes with the same care as physical documents.
If you’ve ever lost something important, now’s the time to lock in those protections. Take five minutes today to check your iCloud settings, test a backup, or export a key note. That small effort could save you hours of stress tomorrow.


 浙公网安备
33010002000092号
浙公网安备
33010002000092号 浙B2-20120091-4
Comments
No comments yet. Why don't you start the discussion?