
Losing precious photos—whether from a vacation, family event, or everyday moments—can be distressing. On Samsung devices, the Gallery app includes a built-in trash feature that temporarily stores deleted images for up to 30 days. But what happens when those have been permanently erased or the time window has passed? And what if you never set up cloud backups through Google Photos or Samsung Cloud?
The good news is that recovery is still possible. When a photo is deleted from your Samsung phone, it isn’t instantly wiped from the device’s storage. Instead, the system marks the space as available for new data. Until that space is overwritten, the original file remains intact and potentially retrievable. This article explores practical, effective strategies to recover deleted photos from Samsung Gallery without relying on any prior backup.
Understanding How Photo Deletion Works on Android
Before attempting recovery, it's crucial to understand what happens behind the scenes when you delete a photo. Most users assume deletion means immediate erasure, but that’s rarely the case on modern smartphones.
When you remove a photo from the Samsung Gallery:
- The file is moved to the “Trash” folder within the Gallery app (if enabled), where it stays for up to 30 days.
- If you bypass the trash or empty it manually, the reference to the file is removed from the system index.
- The actual data remains on the internal storage until new files overwrite that memory block.
This behavior creates a critical recovery window. The sooner you act after deletion, the higher your chances of success. Delaying recovery efforts increases the risk that system updates, app installations, or routine usage will overwrite the lost data.
“Data isn’t truly gone until it’s overwritten. On Android, there’s often a silent grace period where deleted files are still accessible with the right tools.” — Dr. Alan Reyes, Mobile Forensics Analyst
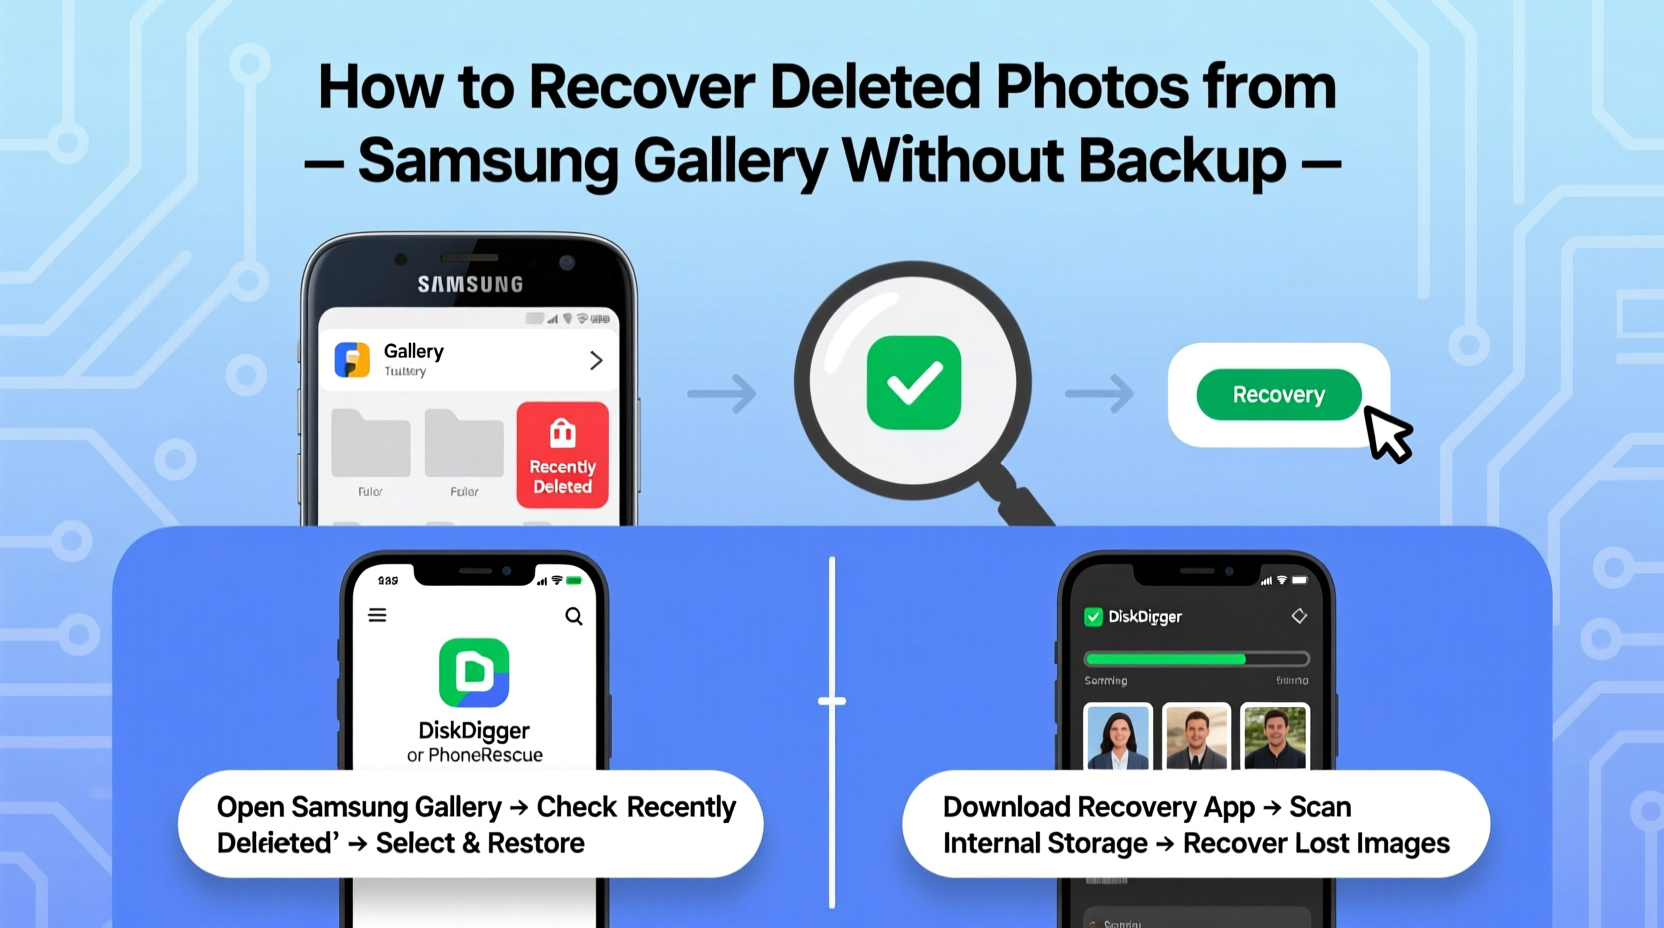
Step-by-Step: Recover Deleted Photos Using Built-In Gallery Trash
Your first line of defense should always be the Samsung Gallery’s native trash feature. Even if you didn’t back up your photos elsewhere, this temporary holding area can save the day—if you act quickly.
- Open the Samsung Gallery app on your device.
- Tap the three-dot menu in the top-right corner.
- Select Trash from the dropdown menu.
- Browse the list of recently deleted photos. Items remain here for up to 30 days.
- Tap and hold the photo(s) you wish to restore.
- Tap Restore at the bottom of the screen.
Photos restored this way return to their original albums and folders. If the Trash option is missing or empty, proceed to external recovery methods.
Using Third-Party Recovery Software
Once photos are purged from the Gallery Trash, your best chance lies in specialized recovery software. These tools scan your phone’s internal storage at a deeper level, searching for residual traces of deleted files.
Because Android restricts access to raw storage for security reasons, most recovery apps require root access to function fully. However, some tools offer limited scanning even on non-rooted devices by analyzing accessible cache and media directories.
Top Tools for Non-Rooted Samsung Devices
| Tool | Root Required? | Free Version Available? | Success Rate (Est.) |
|---|---|---|---|
| DiskDigger (Basic Mode) | No | Yes | Medium |
| PhotoRec (via PC) | Yes | Yes | High |
| Dr.Fone - Data Recovery | No (limited mode) | No (trial only) | High |
| EaseUS MobiSaver | No | Yes | Medium-High |
How to Use DiskDigger Without Rooting
DiskDigger offers a unique “basic scan” mode that works on unrooted Android phones by leveraging cached image thumbnails and media store remnants.
- Install DiskDigger Photo Recovery from the Google Play Store.
- Launch the app and select Basic Scan.
- Grant required permissions when prompted.
- Wait while the app scans your device’s DCIM and Pictures folders.
- Preview recoverable images from thumbnails.
- Select the ones you want and choose a safe location to save them (preferably an SD card or computer).
Note: The quality of recovered images may vary. Full-resolution recovery typically requires root access.
Recovery via Computer: Advanced Method Using PhotoRec
For users comfortable with technical processes, recovering photos using a computer offers greater control and higher success rates. One of the most powerful free tools is PhotoRec, part of the TestDisk suite. It bypasses the Android OS and directly analyzes storage dumps.
What You’ll Need
- A Windows, Mac, or Linux computer
- A USB cable
- ADB (Android Debug Bridge) installed
- At least 5GB of free space on your computer
Step-by-Step Guide
- Enable Developer Options on your Samsung phone: Go to Settings > About Phone > Tap “Build Number” seven times.
- Go to Settings > Developer Options and enable USB Debugging.
- Connect your phone to the computer via USB.
- On your computer, open a terminal or command prompt and type
adb devicesto confirm connection. - Run
adb shell df /datato check available storage and ensure data partition is accessible. - Use
adb pull /dev/block/platform/*/by-name/userdatato create a partial image of your internal storage (requires root for full access). - Download and install PhotoRec from cgsecurity.org.
- Run PhotoRec and load the extracted storage image or connect the device directly (if supported).
- Select the partition containing user data and choose file types (JPEG, PNG, etc.).
- Start the deep scan. This may take hours depending on storage size.
- Save recovered files to a dedicated folder on your computer.
This method is highly effective but technically demanding. Success depends heavily on whether the deleted files have been overwritten.
“Computer-based recovery tools like PhotoRec can retrieve files even when mobile apps fail, provided the storage hasn’t been reused.” — Lena Patel, Digital Forensics Consultant
Mini Case Study: Recovering Wedding Photos from a Galaxy S21
Mark, a photographer based in Portland, accidentally deleted a folder of wedding candid shots from his Samsung Galaxy S21 after transferring only part of the collection to his laptop. He had no cloud backup enabled and assumed the photos were lost forever.
Within 48 hours, he stopped using the phone entirely and connected it to his MacBook using ADB. With guidance from an online forum, he performed a partial storage dump and ran PhotoRec. After a six-hour scan, the tool recovered 87% of the missing images—mostly in full resolution. While some corrupted thumbnails appeared, the majority were usable and later delivered to the couple.
Key takeaway: Immediate action and avoiding further device usage were critical to preserving the data.
Checklist: What to Do Immediately After Deleting Photos
To maximize recovery odds, follow this checklist as soon as you realize photos are missing:
- ✅ Stop using the phone for photos, downloads, or app updates.
- ✅ Check the Gallery Trash folder immediately.
- ✅ Turn on Airplane Mode to prevent background syncs that write data.
- ✅ Avoid restarting the device unnecessarily.
- ✅ Connect to a computer only when ready to attempt recovery.
- ✅ Never save recovered files back to the same phone without external verification.
Common Mistakes That Reduce Recovery Chances
Certain behaviors can permanently eliminate the possibility of retrieving lost photos. Be aware of these pitfalls:
- Continuing to use the phone normally: Every new photo, message, or app download risks overwriting deleted files.
- Clearing cache or storage manually: This accelerates data loss by triggering system cleanup routines.
- Installing recovery apps directly on the device: The installation process itself writes data and may destroy evidence.
- Performing factory resets before recovery: This significantly reduces the likelihood of successful retrieval.
Frequently Asked Questions
Can I recover photos deleted more than 30 days ago?
Yes, but not through the Gallery Trash. Recovery depends on whether the storage sectors were overwritten. Using forensic tools like PhotoRec offers the best chance, especially if the phone hasn’t been heavily used since deletion.
Do I need to root my Samsung phone to recover deleted photos?
Root access improves recovery success by allowing full storage access, but it’s not mandatory. Apps like DiskDigger (basic mode) and EaseUS MobiSaver offer limited functionality on non-rooted devices by scanning accessible media directories.
Will recovery software work on all Samsung models?
Most tools support recent Galaxy devices (S series, Note, Z Fold/Flip, A series). Compatibility varies based on Android version, security patches, and OEM restrictions. Always verify tool specifications before downloading.
Final Thoughts and Recommendations
Recovering deleted photos from Samsung Gallery without a backup is challenging but far from impossible. The key factors are timing, device usage after deletion, and the method chosen. Built-in trash recovery is the simplest solution if acted upon early. For older deletions, third-party tools and computer-based scanning provide viable alternatives—even without rooting.
While technology offers second chances, prevention remains the best strategy. Consider enabling automatic backups to Google Photos or Samsung Cloud with high-quality settings. Regularly transfer important memories to external drives or computers. Treat your smartphone like a primary camera—not just a communication tool—and manage its storage accordingly.
Whether it’s a child’s first steps, a travel moment, or a spontaneous laugh captured perfectly, photos carry emotional weight that transcends pixels. By understanding how deletion works and acting swiftly, you can reclaim what was nearly lost.


 浙公网安备
33010002000092号
浙公网安备
33010002000092号 浙B2-20120091-4
Comments
No comments yet. Why don't you start the discussion?