
Makeup brushes are essential tools for achieving a flawless finish, but over time they accumulate product buildup, oils, and bacteria. This not only affects their performance but can also lead to skin irritation and breakouts. While many assume that professional cleaning solutions are necessary, the truth is you can effectively refresh old makeup brushes using common items already in your kitchen or bathroom. With the right techniques, even stiff, discolored, or smelly brushes can be revived—saving money and reducing waste.
Regular maintenance keeps bristles soft, improves application, and prolongs the lifespan of your brushes. Whether you're a daily makeup user or an occasional wearer, learning how to deep-clean and condition your tools with everyday ingredients is both practical and empowering.
Why Old Makeup Brushes Need Refreshing
Makeup brushes endure constant exposure to foundation, concealer, powders, and creams. Each use deposits layers of pigment, facial oils, and dead skin cells into the bristles. Over weeks and months, this residue hardens, especially near the ferrule—the metal part connecting the bristles to the handle. When neglected, brushes become:
- Stiff and scratchy on the skin
- Ineffective at blending or applying product evenly
- Breeding grounds for bacteria and mold
- Potential triggers for acne and dermatitis
A study published in the *Journal of Cosmetic Dermatology* found that over 70% of used makeup brushes harbor harmful microbes, including staphylococcus and E. coli. Regular cleaning isn’t just about aesthetics—it’s a hygiene necessity.
“Brushes should be cleaned every 7–10 days for daily users. Even occasional use requires monthly deep-cleaning to prevent microbial growth.” — Dr. Lena Patel, Board-Certified Dermatologist
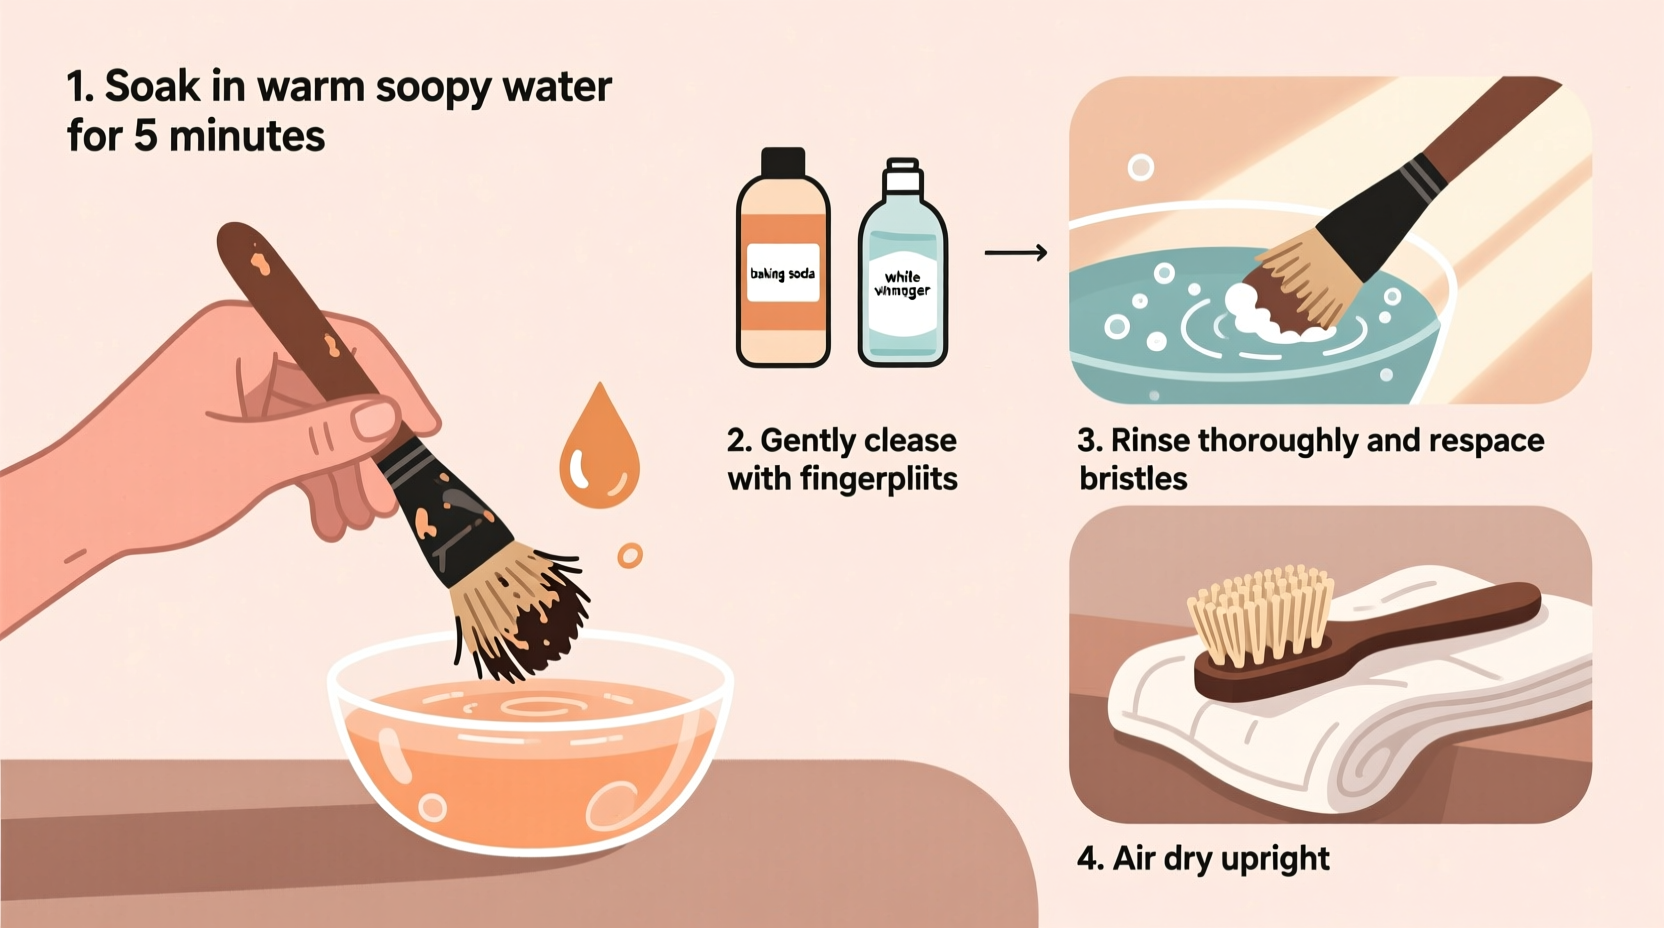
Step-by-Step Guide to Refreshing Old Makeup Brushes
Reviving old brushes doesn’t require expensive kits. Most effective cleaners are already in your pantry. Follow this detailed process to restore your brushes to near-new condition.
Step 1: Gather Your Supplies
You’ll need only a few household items:
- Mild dish soap (like Dawn or Fairy Liquid)
- White vinegar or apple cider vinegar
- Olive oil or coconut oil (for conditioning)
- Hand soap or baby shampoo (gentle alternative)
- A small bowl or cup
- Clean towel or paper towels
- Hair conditioner (optional, for extra softness)
Step 2: Initial Rinse and Soap Wash
- Hold the brush under lukewarm running water, wetting only the bristles. Keep the handle upright to prevent water from seeping into the ferrule.
- Place a dime-sized amount of dish soap in your palm or a small bowl.
- Gently swirl the brush in the soap, working up a lather by massaging the bristles in circular motions against your hand or the bottom of the bowl.
- Rinse thoroughly until the water runs clear. Repeat if residue persists.
Dish soap is particularly effective because it’s designed to cut through grease—ideal for removing oily foundation and sunscreen buildup.
Step 3: Deep Clean with Vinegar Solution
For older brushes with stubborn stains or odor, a vinegar soak breaks down deep-set grime and disinfects naturally.
- Mix equal parts white vinegar and lukewarm water in a glass or cup.
- Submerge only the bristles (not the entire brush) for 15–20 minutes.
- Swirl gently to loosen debris. You may notice discoloration in the liquid—this is the trapped makeup releasing.
- Rinse completely under running water.
Vinegar acts as a natural antibacterial agent and helps dissolve protein-based residues like dried mucus or sweat, which often accumulate on blush or powder brushes.
Step 4: Condition the Bristles
After deep cleaning, bristles can feel dry or brittle. Conditioning restores softness and prevents shedding.
- Apply a tiny drop of olive oil or coconut oil to your fingertip.
- Gently work it into the tips of the bristles—avoid the ferrule to prevent loosening the glue.
- Leave for 5–10 minutes, then rinse lightly with cool water and mild soap to remove excess oil.
- Lay flat on a clean towel to dry.
Alternatively, a small amount of hair conditioner can be used for synthetic bristles. It smooths frayed ends and reduces static.
Step 5: Dry and Reshape
Proper drying ensures longevity and maintains shape.
- Lay brushes flat on a towel with the bristles hanging slightly off the edge to allow airflow.
- Avoid standing them upright while wet—water can pool in the ferrule and weaken the adhesive.
- Reshape the brush head with your fingers before drying.
- Allow 6–12 hours to fully dry, depending on thickness.
Do’s and Don’ts of Brush Cleaning
| Do’s | Don’ts |
|---|---|
| Use lukewarm water to avoid damaging glue | Soak the entire brush, especially the handle and ferrule |
| Clean brushes every 1–2 weeks for daily use | Use harsh detergents like bleach or laundry soap |
| Condition natural bristles monthly | Store brushes damp—this promotes mold growth |
| Reshape bristles after washing | Rub brushes aggressively on surfaces, causing splaying |
| Use a gentle swirling motion when cleaning | Let brushes air-dry upright in a cup while still wet |
Real Example: Reviving a 3-Year-Old Foundation Brush
Sophie, a freelance makeup artist in Manchester, had a favorite dense kabuki brush she’d used nearly every day for three years. Over time, it became stiff, held onto foundation unevenly, and developed a faint sour smell. She assumed it was beyond saving and almost threw it out.
Instead, she tried the vinegar-and-dish-soap method described above. After soaking the bristles in a 50/50 vinegar-water solution for 20 minutes and following up with a gentle dish soap wash, she noticed dark brown residue—old foundation—washing out. She conditioned the brush with a drop of coconut oil, reshaped it, and let it dry overnight.
The next morning, the brush felt softer than it had in years. “It applied foundation like new,” Sophie said. “I saved £25 and kept a tool I was emotionally attached to.”
This case illustrates how deeply embedded product can be removed without commercial products, restoring both function and hygiene.
Checklist: How to Refresh Old Makeup Brushes at Home
- ☐ Gather dish soap, vinegar, oil, and a clean towel
- ☐ Wet only the bristles under lukewarm water
- ☐ Lather with dish soap and swirl gently
- ☐ Soak in vinegar solution for 15–20 minutes
- ☐ Rinse thoroughly until water runs clear
- ☐ Apply a drop of oil or conditioner to bristle tips
- ☐ Reshape brush head with fingers
- ☐ Lay flat to dry for 6–12 hours
- ☐ Store in a clean, dry container once fully dry
How Often Should You Refresh Your Brushes?
Frequency depends on usage:
- Daily use: Clean weekly for face brushes (foundation, concealer, powder), bi-weekly for eye brushes.
- Occasional use: Clean every 4–6 weeks, even if they look clean.
- After illness: Sanitize immediately after recovering from colds or infections to avoid reinfection.
Signs your brushes need immediate attention include:
- Visible color staining
- Unpleasant odor
- Bristles that don’t spring back
- Breakouts after makeup application
FAQ: Common Questions About Brush Cleaning
Can I use baking soda to clean makeup brushes?
Yes, but sparingly. Baking soda is mildly abrasive and can help lift stains when mixed with a few drops of water and soap. However, frequent use may wear down delicate bristles, especially natural hair. Use it no more than once every few months for tough buildup.
Is it safe to use vinegar on synthetic brushes?
Absolutely. Vinegar is safe for both synthetic and natural bristles. Its acidity helps dissolve residue without degrading the fibers. Just ensure thorough rinsing afterward to eliminate any lingering scent.
What if my brush still smells after cleaning?
Residual odor usually means moisture is trapped in the ferrule. Let the brush dry completely in a well-ventilated area. If the smell persists, repeat the vinegar soak and consider replacing the brush, as mold may have formed inside the handle.
Conclusion: A Simple Habit for Healthier Skin and Better Makeup
Refreshing old makeup brushes at home is not only possible—it’s easy, affordable, and essential for maintaining both cosmetic performance and skin health. With nothing more than dish soap, vinegar, and a little patience, you can restore brushes to their prime, avoiding unnecessary replacements and reducing environmental waste.
The methods outlined here are proven, dermatologist-approved, and accessible to anyone. By incorporating regular cleaning into your routine, you protect your skin, enhance your makeup results, and get full value from your tools.


 浙公网安备
33010002000092号
浙公网安备
33010002000092号 浙B2-20120091-4
Comments
No comments yet. Why don't you start the discussion?