
Stale chips and crackers are a common kitchen frustration. Whether it's a forgotten bag of tortilla chips at the back of the pantry or a sleeve of saltines exposed to humidity, moisture loss is the enemy of crispiness. The good news? You don’t need professional equipment—or even an oven—to revive them. With simple household tools and smart techniques, you can restore that satisfying crunch. This guide delivers practical, science-backed methods to refresh your favorite snacks, including a reliable microwave hack for fast results.
Why Chips and Crackers Go Stale (And How to Reverse It)
Contrary to popular belief, staling isn't just about drying out—it’s a process called retrogradation, where starch molecules in foods like chips and crackers recrystallize after cooling, making them tough and leathery. While moisture absorption from humid air contributes, the main issue is structural change in the starch. The key to reviving them lies in reintroducing controlled heat to disrupt those rigid bonds and evaporate excess moisture.
Heat gently re-gelatinizes the starch, restoring texture. However, too much heat or uneven application can burn or over-dry the snack. That’s why technique matters more than power. Whether using ambient heat, dry air, or microwaves, the goal is to re-crisp without compromising flavor or integrity.
Reviving Stale Snacks Without an Oven
Not everyone has access to an oven, especially in dorms, small apartments, or during summer months when heating the kitchen is undesirable. Fortunately, several effective alternatives exist. These methods rely on low, consistent heat and airflow to draw out moisture without burning.
Air Fryer Method
The air fryer is one of the most efficient tools for crisping stale snacks. Its rapid convection heating circulates hot air evenly, mimicking oven conditions at a faster rate.
- Preheat the air fryer to 300°F (150°C) for 2–3 minutes.
- Spread chips or crackers in a single layer—do not overlap.
- Heat for 2–4 minutes, checking every minute after the first two.
- Remove when crisp, then cool completely before tasting (cooling completes the crisping).
This method works best for thicker snacks like kettle chips or cheese crackers. Delicate items like soda crackers may require lower temperatures (275°F) and shorter times.
Toaster Oven Technique
If you have a toaster oven but not a full-sized oven, this method offers excellent control. Toasters heat up quickly and use less energy.
- Set the toaster oven to “toast” or 300°F.
- Place snacks on the rack or a baking sheet in a single layer.
- Toast for 2–3 minutes, watching closely to prevent browning.
- Cool for 2–3 minutes—texture improves as they cool.
For extra protection against burning, place a small oven-safe dish of water inside to regulate humidity while still allowing drying.
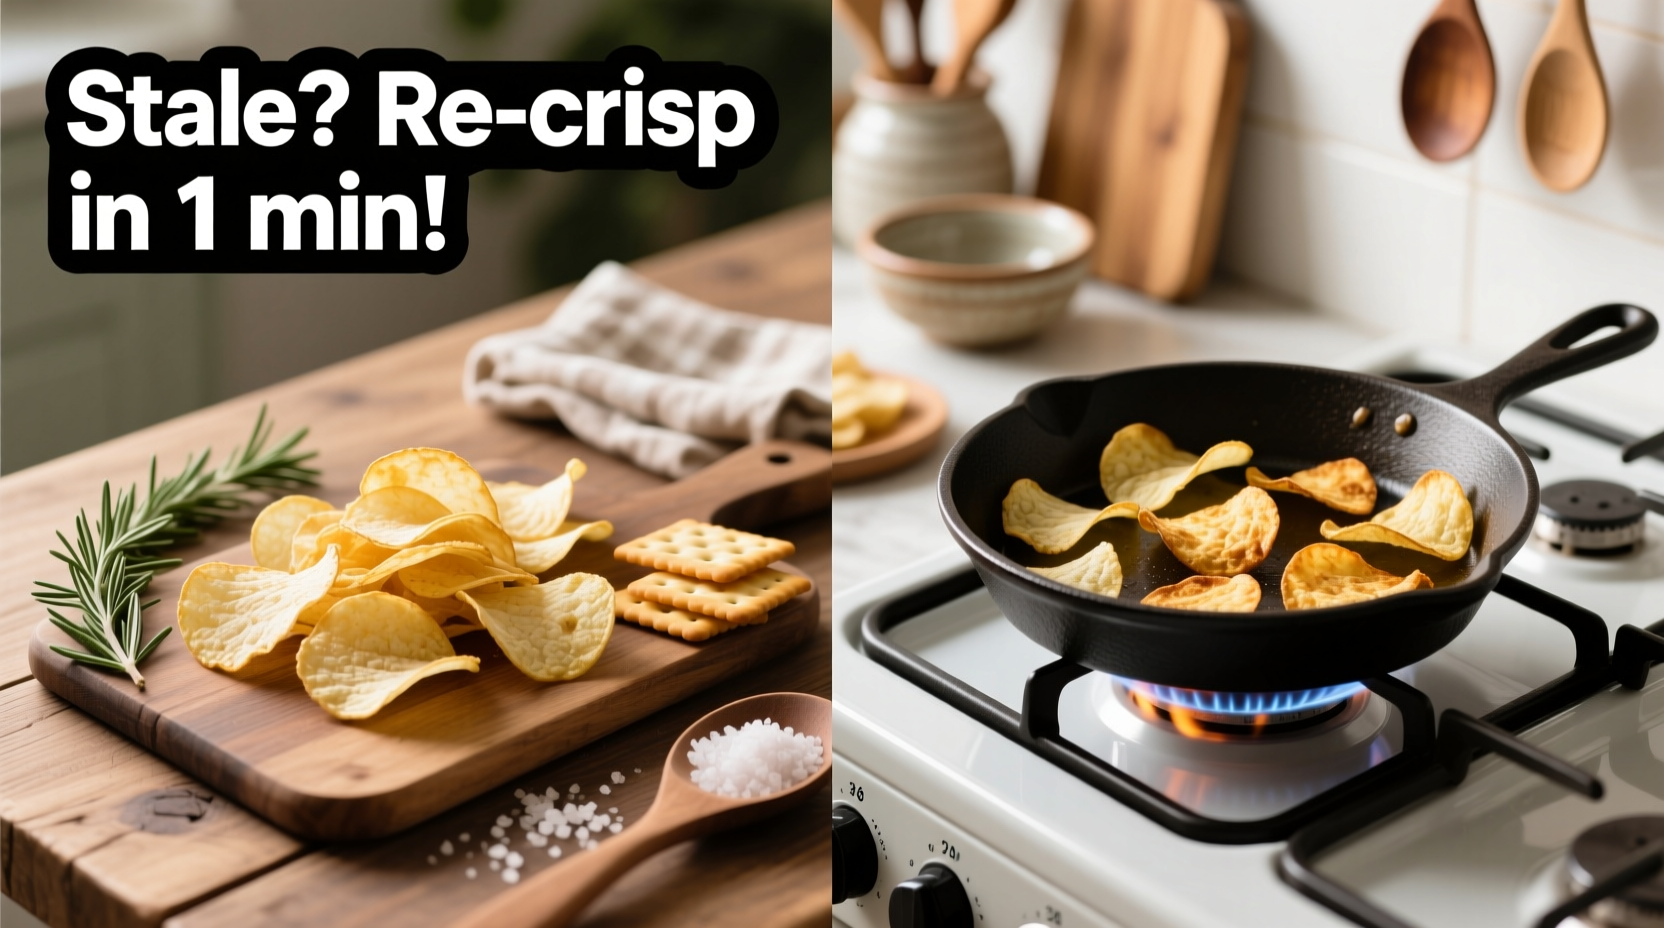
Dry Pan Revival (Stovetop)
No electricity? No problem. A dry skillet on the stove can effectively re-crisp snacks using conductive heat.
- Use a nonstick or well-seasoned pan over low heat.
- Add chips or crackers in a single layer.
- Heat for 1–2 minutes per side, flipping gently with a spatula.
- Remove once lightly warm and crisp—overheating causes brittleness.
This method works particularly well for hard taco shells, pretzels, or thick crackers. Avoid high heat, which leads to scorching before internal moisture is expelled.
Microwave Hack: Fast and Effective Crisp Restoration
The microwave is often dismissed for crisping tasks because it tends to make food soggy. But with the right approach, it can be a powerful tool for reviving stale snacks—especially when time is limited.
The trick? Use short bursts and a moisture-absorbing aid. Paper towels are essential here—they absorb surface moisture while allowing heat to penetrate evenly.
Step-by-Step Microwave Revival
- Lay a dry paper towel on the microwave plate.
- Spread a single layer of stale chips or crackers on top.
- Cover with another paper towel to trap steam and prevent splatter.
- Microwave on high for 20 seconds.
- Check texture. If still soft, continue in 10-second increments.
- Let rest for 1 minute after heating—crispness develops during cooling.
Most snacks require only 30–60 seconds total. Over-microwaving leads to overheating and potential burning, especially with cheese-based crackers.
Why this works: Microwaves excite water molecules. By surrounding the snacks with absorbent paper, moisture is wicked away as it’s released, preventing reabsorption. The brief heat exposure disrupts starch retrogradation without cooking the food further.
“Microwaves can actually reverse staling if used correctly. Short pulses with moisture-wicking materials are key.” — Dr. Lena Torres, Food Scientist at the Institute of Food Stability
Comparison Table: Methods at a Glance
| Method | Time Required | Best For | Limitations |
|---|---|---|---|
| Air Fryer | 2–4 minutes | Thick chips, cheese crackers, tortilla chips | Requires appliance; small capacity |
| Toaster Oven | 3–5 minutes | All types, especially large batches | Slower preheat; uses more energy |
| Stovetop Dry Pan | 2–4 minutes | Taco shells, pretzels, hearty crackers | High risk of burning; requires attention |
| Microwave + Paper Towel | 30–60 seconds | Thin chips, saltines, snack mix | Poor results if overheated; not ideal for oily snacks |
| Ambient Air + Desiccant | Several hours to overnight | Lightly stale items; no heat available | Slow; inconsistent; limited effectiveness |
Real Example: The Camping Trip Rescue
During a weekend camping trip, Sarah opened a half-used bag of corn chips only to find them limp and chewy from exposure to morning dew. With no oven or electricity at the campsite, she improvised. She placed a handful of chips between two paper towels and heated them in her portable microwave for 30 seconds. After letting them sit for a minute, the chips were nearly as crisp as fresh. She repeated the process throughout the trip, extending the life of her snack stash without needing to buy new ones. This simple fix saved both money and waste.
Sarah’s experience highlights how accessible tools—like a basic microwave and paper towels—can solve real-world problems efficiently, even outside the home kitchen.
Pro Tips for Long-Term Prevention
While revival methods work well, preventing staleness in the first place is even better. Once a bag is opened, exposure to air begins the degradation process. Here’s how to extend shelf life:
- Seal tightly: Use chip clips, ziplock bags, or vacuum-sealed containers.
- Store in cool, dry places: Avoid pantries near stoves or sinks where humidity fluctuates.
- Use oxygen absorbers: Small packets placed inside storage containers slow oxidation and moisture buildup.
- Buy smaller packages: If you don’t consume snacks quickly, opt for single-serving sizes.
- Freeze extras: Yes, really. Unopened or sealed bags can be frozen for up to 3 months. Thaw at room temperature and crisp briefly if needed.
Frequently Asked Questions
Can I use the microwave method for cheesy or flavored chips?
Yes, but with caution. Cheesy coatings can melt and re-solidify into clumps if overheated. Use 10-second bursts and inspect frequently. If oil separates, it’s overdone.
Will these methods work on completely soft or moldy snacks?
No. If a snack is mushy, slimy, or shows signs of mold, it should be discarded. Revival techniques only work on structurally intact but texturally stale items.
How long will revived chips stay crisp?
Typically 1–3 days if stored properly in an airtight container. They won’t last as long as fresh ones due to prior moisture exposure, so consume quickly.
Final Checklist: How to Refresh Stale Chips & Crackers
- Inspect snacks for spoilage—discard if moldy or rancid.
- Choose your method based on available tools and snack type.
- Spread in a single layer to ensure even heating.
- Use low-to-medium heat or short microwave bursts.
- Always allow cooled resting time for maximum crispness.
- Store revived snacks in airtight containers to prolong freshness.
- Label revived batches with dates to track shelf life.
Conclusion: Waste Less, Enjoy More
Stale doesn’t have to mean ruined. With the right knowledge, even forgotten snacks can regain their crunch. Whether you're using a microwave hack for speed or relying on stovetop precision, these methods empower you to reduce food waste and stretch your grocery budget. The next time you reach for a limp bag of chips, pause before tossing it. A minute of effort could bring it back to life. Start applying these techniques today—and share your success stories with others who’ve written off stale snacks too soon.


 浙公网安备
33010002000092号
浙公网安备
33010002000092号 浙B2-20120091-4
Comments
No comments yet. Why don't you start the discussion?