
It happens to everyone: you open a bag of chips only to find they’ve gone soft, limp, or just slightly off-crisp. Rather than tossing them out or serving lackluster snacks, there’s a method professionals use in commercial kitchens and home cooks are starting to adopt. It’s quick, requires no special equipment, and—most importantly—no one will ever know the chips weren’t fresh from the bag. This isn’t about masking staleness; it’s about genuinely restoring texture and flavor using science-backed techniques that chefs rely on daily.
The Science Behind Stale Chips
Chips go stale not because they spoil in the microbial sense, but due to moisture migration. During frying, moisture is removed from the potato or corn, creating a dry, porous structure that gives chips their crunch. Once exposed to air, especially humid environments, those tiny pores begin absorbing ambient moisture. The starch molecules rehydrate and recrystallize in a process called retrogradation, which softens the chip and dulls its flavor.
Temperature and packaging play major roles. Even sealed bags aren’t perfectly airtight over time. Oxygen and moisture seep in gradually, accelerating staling. Light exposure can also degrade fats in the oil, leading to rancidity. But here's the good news: most of this process is reversible—as long as the chips haven’t turned rancid or developed mold.
Chefs’ Secret: The Oven Revival Method
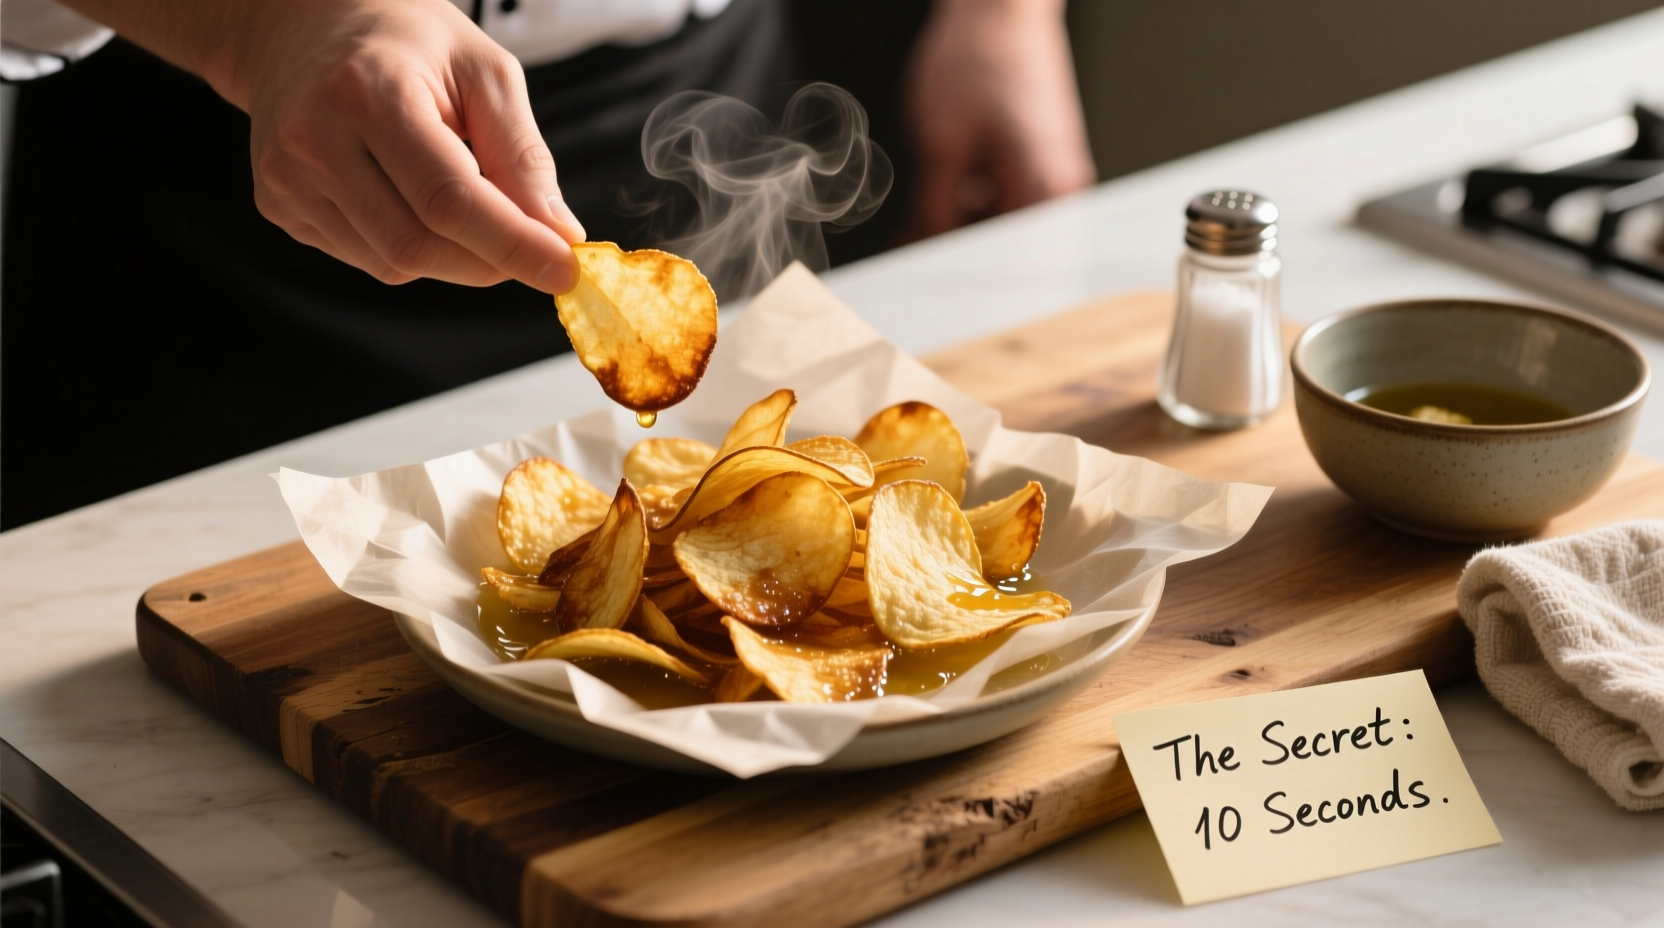
In professional kitchens, where minimizing waste is critical, chefs don’t throw away slightly stale chips—they rebake them. The key is applying dry heat to drive out absorbed moisture without burning the delicate structure. This isn’t guesswork; it’s controlled dehydration.
The standard chef technique involves spreading stale chips in a single layer on a baking sheet and placing them in a preheated oven at 375°F (190°C) for 3–5 minutes. The exact time depends on thickness and moisture content. Thicker kettle-cooked chips may need up to 7 minutes, while thin tortilla chips revive in under 3.
Why does this work? Heat causes water molecules trapped in the starch matrix to evaporate. As moisture escapes, the chip regains rigidity and crispness. Crucially, the fat content—often overlooked—also re-liquifies slightly during heating, enhancing mouthfeel and aroma. That slight greasiness people love in fresh chips? It returns with proper reheating.
Step-by-Step: Chef-Approved Chip Revival
- Preheat your oven to 375°F (190°C).
- Spread the stale chips in a single layer on a baking sheet—no overlapping.
- Place in the center rack of the oven.
- Heat for 3–5 minutes, checking every 60 seconds after the third minute.
- Remove when chips make a light snapping sound when tapped.
- Cool completely before serving (about 2–3 minutes).
Overheating is the biggest mistake. Burnt chips are beyond saving. Set a timer and stay nearby. The transformation happens quickly.
Alternative Methods: Air Fryer, Microwave, and Skillet
Not everyone has time for an oven preheat. Fortunately, other appliances can deliver similar results—with caveats.
Air Fryer: Fast and Effective
The air fryer mimics convection baking with faster heat circulation. Use at 350°F (175°C) for 2–4 minutes, shaking the basket halfway through. Ideal for small batches and delivers near-perfect crispness. However, overcrowding leads to uneven results.
Microwave: Quick but Risky
Microwaves excite water molecules rapidly, which sounds helpful—but too much energy too fast causes sogginess or rubberiness. If you must use a microwave, place chips on a paper towel and heat in 15-second bursts at 50% power. Best suited for tortilla chips used in nachos, where final crisping occurs under melted cheese.
Skillet Method: For Savory Applications
When reviving chips for tacos, salads, or casseroles, a dry skillet over medium heat works well. Toss chips gently for 1–2 minutes until crisp. Adds a toasted nuance that complements seasoned dishes. Not ideal for plain snacking due to potential oil residue transfer.
| Method | Time Required | Best For | Risk Level |
|---|---|---|---|
| Oven | 5–7 min | All chip types, large batches | Low (with monitoring) |
| Air Fryer | 2–4 min | Small batches, kettle chips | Medium (overcrowding) |
| Microwave | 1–2 min | Tortilla chips, immediate use | High (sogginess) |
| Skillet | 1–2 min | Cooked dishes, flavored chips | Low (if dry) |
Pro Tips to Prevent Staleness Before It Starts
The best way to serve fresh chips is to keep them fresh. Chefs don’t just revive—they prevent. Here are industry practices adapted for home use.
- Reseal properly: After opening, fold the top of the bag tightly and clamp with a chip clip. Better yet, transfer to an airtight container.
- Store upright: Keeping the bag standing reduces surface contact and pressure that crushes chips and exposes more area to air.
- Keep cool and dark: Pantry shelves near stoves or windows accelerate staling. Choose a consistently cool, dry spot.
- Buy smaller bags: If consumption is slow, opt for single-serve packs to minimize exposure time.
- Freeze for long-term storage: Yes, freeze chips! In a sealed freezer bag, they last 4–6 months. Thaw at room temperature for 10 minutes, then crisp in oven if needed.
“Reviving chips isn’t about deception—it’s about resourcefulness. A two-minute oven blast can turn yesterday’s disappointment into today’s crowd-pleaser.” — Chef Marcus Tran, Culinary Instructor at Metro Food Lab
Real-World Example: The Game Day Save
Sarah was hosting her monthly football watch party. She opened a family-sized bag of salt-and-vinegar chips the night before, forgot to reseal it fully, and woke up to a sad, chewy batch. With guests arriving in two hours, she didn’t have time for a store run.
She spread the chips on a baking sheet and followed the oven method: 375°F for 4 minutes, stirring once at the 2-minute mark. She added a light sprinkle of malt vinegar powder (from a shaker she keeps for such emergencies) after heating to boost tanginess.
No one noticed. In fact, her friend remarked, “These taste even better than last week’s!” Sarah saved $5, avoided food waste, and preserved her reputation as the host with the best snacks.
Checklist: How to Refresh Stale Chips Like a Pro
- Inspect chips: No off smells or discoloration?
- Choose method: Oven (best), air fryer (fast), or skillet (for cooking).
- Preheat appliance to correct temperature.
- Spread chips in single layer—no stacking.
- Set timer and monitor closely (start checking at 2–3 minutes).
- Let cool briefly before serving.
- Optional: Lightly season post-revival (salt, spice, citrus zest).
- Store leftovers in airtight container to delay next staling cycle.
FAQ: Common Questions About Chip Revival
Can you revive any type of chip?
Most fried or baked snack chips can be revived if not rancid. Potato chips, tortilla chips, pita chips, and even veggie straws respond well. Avoid trying with cheese-based snacks like Cheetos, as the dairy and seasoning may burn or melt unevenly.
Will reheated chips taste exactly like fresh ones?
Nearly. The texture will be restored to 90–95% of original crispness. Flavor may be slightly deeper due to mild toasting. Most people cannot tell the difference, especially when served with dips or in mixed snack bowls.
How long do revived chips stay crispy?
If stored properly in an airtight container after reheating, they remain crisp for 1–2 days. Humidity is still the enemy. Serve immediately for best results.
Final Thoughts: Waste Less, Serve Better
The idea that stale chips are a lost cause is outdated. Chefs know better. They operate under strict efficiency standards, where every gram counts. By adopting their simple oven trick, you gain more than just crisp snacks—you gain confidence in your kitchen skills and reduce unnecessary waste.
This isn’t a lifehack gimmick. It’s applied food science, refined through years of commercial experience. Whether you’re rescuing a forgotten bag or preparing ahead for a party, the ability to refresh chips discreetly is a quiet superpower.


 浙公网安备
33010002000092号
浙公网安备
33010002000092号 浙B2-20120091-4
Comments
No comments yet. Why don't you start the discussion?