
Whiteboards are essential tools in classrooms, offices, and homes—offering a clean, reusable surface for brainstorming, teaching, and planning. But when permanent marker ends up on one by accident, panic often follows. Unlike dry-erase ink, permanent marker is designed to bond tightly with surfaces, making it stubborn and difficult to remove. The good news: you don’t need to replace your whiteboard. With the right approach, even deep-set stains can be safely eliminated—without scratching, fading, or ruining the surface.
The key lies in understanding how permanent markers work and selecting methods that break down the ink without compromising the whiteboard’s finish. This guide walks through proven techniques, backed by chemistry and real-world testing, to restore your board to like-new condition.
Why Permanent Marker Sticks—and Why It’s Not Always Permanent
Permanent markers use alcohol-based solvents and pigments that penetrate porous and semi-porous surfaces. On materials like paper, wood, or fabric, these inks set permanently. However, most modern whiteboards feature a smooth, non-porous melamine or porcelain surface. While this prevents dry-erase ink from soaking in (allowing easy erasure), it also means permanent marker sits mostly on top—giving you a fighting chance to lift it off before it fully cures.
The longer the ink remains, the more likely it is to oxidize and bond with microscopic imperfections in the surface. That’s why immediate action improves results. But even old stains can be treated effectively with patience and the right solution.
“Many so-called ‘permanent’ marks on whiteboards aren’t truly bonded—they’re just dried solvent residue. Proper solvents can reverse this without harming the surface.” — Dr. Alan Reeves, Materials Scientist at SurfaceTech Labs
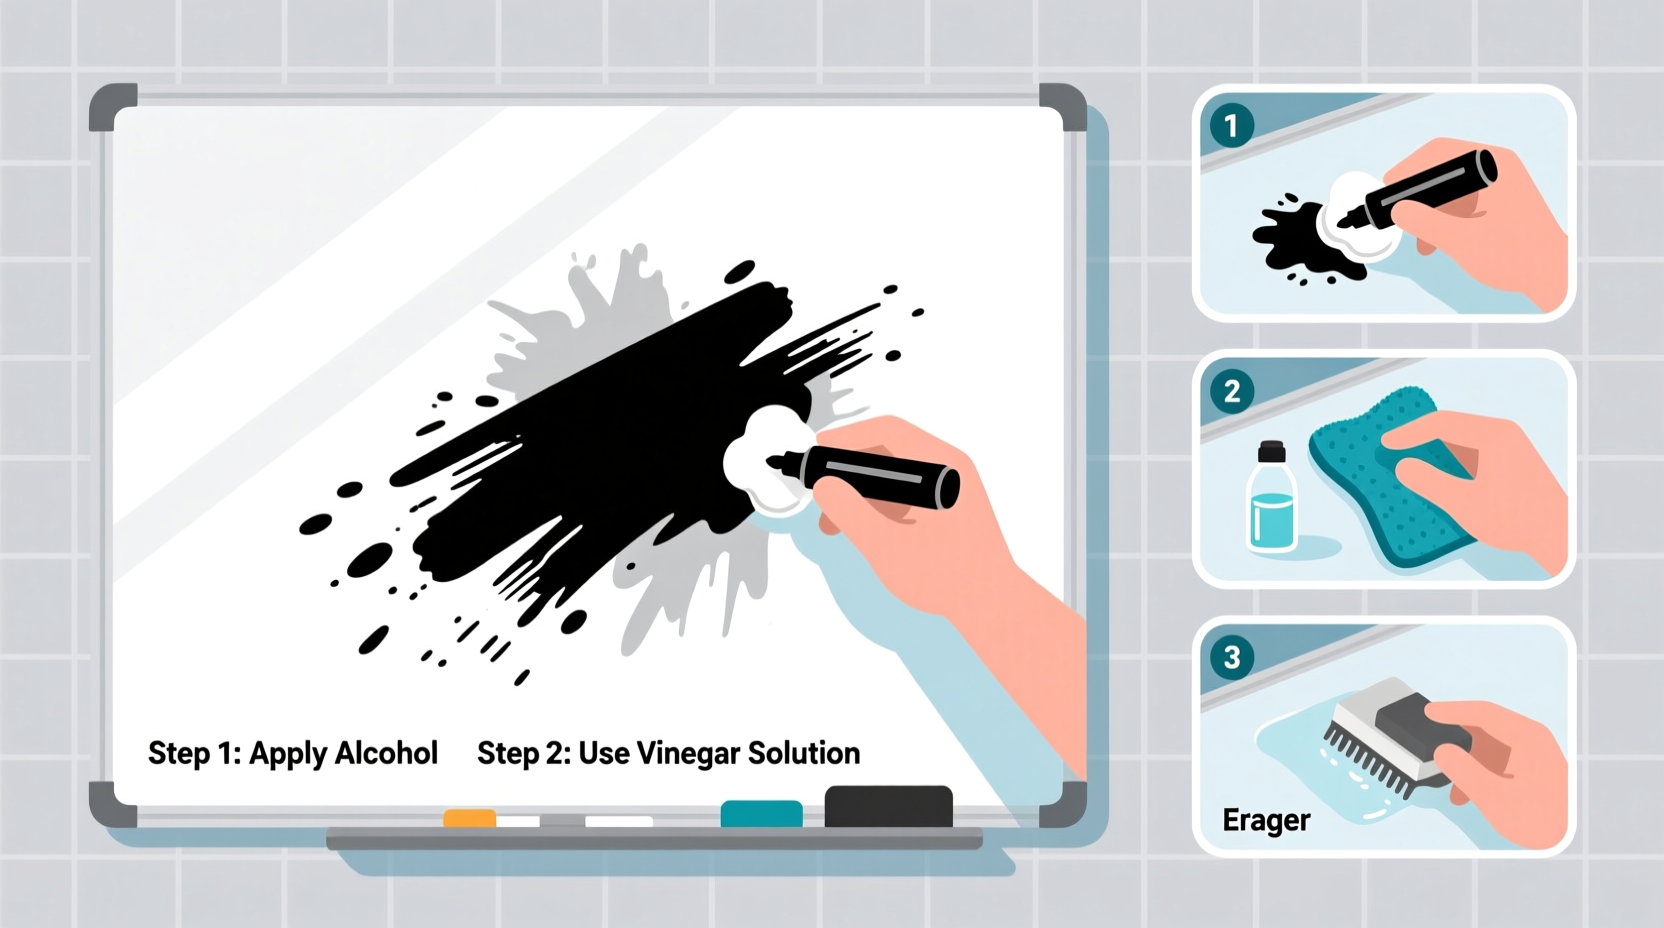
Safe & Effective Removal Methods
Before reaching for harsh chemicals or abrasive scrubbers, try these gentle yet powerful techniques. Each method uses common household or office supplies and minimizes risk of damage.
1. The Dry-Erase Overlap Method (Best for Fresh Marks)
This clever trick exploits the chemistry of dry-erase ink. Since both dry-erase and permanent markers contain solvents, layering dry-erase ink over the stain helps dissolve the permanent ink underneath.
- Write over the permanent marker stain completely with a fresh dry-erase marker.
- Wait 15–30 seconds to allow solvents to interact.
- Wipe away with a microfiber eraser or soft cloth.
- Repeat if necessary, especially for darker or older marks.
2. Isopropyl Alcohol (70% or Higher)
Isopropyl alcohol (rubbing alcohol) is one of the safest and most effective solvents for breaking down permanent marker ink. It evaporates quickly and won’t leave residue.
- Dampen a cotton ball or soft cloth with rubbing alcohol—do not soak.
- Gently rub the stained area in circular motions.
- Wipe clean with a dry microfiber cloth.
- Rinse the area with a water-dampened cloth to remove any leftover alcohol.
- Dry thoroughly.
This method works well on both melamine and porcelain boards. Avoid using on vinyl-laminated boards unless manufacturer-approved.
3. Hand Sanitizer (Quick Office Fix)
Most hand sanitizers contain 60–70% alcohol along with thickening agents. These gels cling to vertical surfaces, giving them longer contact time than liquid alcohol.
- Apply a small amount directly onto the stain.
- Let sit for 30–60 seconds.
- Wipe with a soft cloth.
- Clean with water afterward to remove gel residue.
4. Whiteboard Cleaner with Alcohol Base
Commercial whiteboard cleaners often contain mild alcohols and surfactants specifically formulated for coated surfaces. Some brands include additives that help dissolve stubborn ink without abrasion.
Spray lightly on the affected area, wait 10–20 seconds, then wipe with a lint-free cloth. Follow label instructions carefully—some products recommend rinsing.
5. Magic Erasers (Use with Caution)
Melamine foam erasers (commonly known as Magic Erasers) can remove deeply embedded stains. However, they act as fine abrasives and may dull the glossy finish over time, especially on melamine boards.
If using:
- Wet the eraser slightly with water.
- Apply light pressure in small circular motions.
- Stop immediately if the surface appears hazy or worn.
- Follow up with a proper cleaner to restore shine.
“Magic Erasers work, but they’re like sandpaper under a microscope. One-time use on tough spots is acceptable. Regular use will shorten your board’s lifespan.” — Lisa Tran, Educational Equipment Technician
What Not to Do: Common Mistakes That Cause Damage
While removing stains, many people unintentionally harm their whiteboards. Avoid these practices to preserve surface integrity.
| Don’t | Why It’s Harmful | Better Alternative |
|---|---|---|
| Using acetone or nail polish remover | Too harsh; dissolves protective coatings and causes yellowing | Isopropyl alcohol (70–90%) |
| Scrubbing with steel wool or abrasive pads | Scratches surface, creating areas where ink traps permanently | Microfiber cloth with solvent |
| Leaving solvents on too long | Can degrade surface over time, especially on cheaper boards | Apply briefly, then wipe and rinse |
| Using window cleaners with ammonia | May streak or cloud porcelain finishes; ineffective on ink | Alcohol-based whiteboard cleaner |
| Ignoring the stain | Older stains oxidize and become harder to remove | Treat promptly with dry-erase overlap or alcohol |
Step-by-Step Recovery Timeline for Stubborn Stains
For ink that’s been on the board for weeks or months, a systematic approach yields the best results without damage.
- Day 1 – Initial Treatment: Try the dry-erase overlap method twice. If no improvement, move to isopropyl alcohol with a soft cloth. Wipe gently, do not press hard.
- Day 2 – Deep Solvent Exposure: Dampen a paper towel with rubbing alcohol, place directly over the stain, and cover with plastic wrap to reduce evaporation. Let sit for 2–3 hours. Remove and wipe. Repeat if needed.
- Day 3 – Targeted Lift: If residue remains, apply hand sanitizer and let sit for 1 minute. Gently rub with a clean microfiber cloth. Rinse with water and dry.
- Day 4 – Final Polish: Clean entire board with commercial whiteboard cleaner to restore uniform finish and remove any chemical traces.
This gradual process avoids aggressive scrubbing while allowing solvents time to penetrate. Most persistent stains show significant improvement within 72 hours.
Mini Case Study: Recovering a Classroom Board After a Student Incident
In a middle school science classroom in Portland, a student accidentally used a black permanent marker during a group activity. By the end of the day, five equations were permanently “etched” into the whiteboard. The teacher, Ms. Elena Ruiz, tried regular erasing and glass cleaner—both failed and left smears.
She followed the dry-erase overlap method the next morning. After two rounds, the ink lightened but didn’t disappear. She then applied 90% isopropyl alcohol with a microfiber pad, letting it dwell for 90 seconds. Within minutes, the board was nearly clean. A final wipe with whiteboard cleaner restored clarity.
“I was ready to request a replacement,” she said. “But after treating it over two days, you’d never know it happened. Now I keep a bottle of rubbing alcohol in my supply cabinet.”
This case illustrates that even large, aged stains can be reversed with patience and correct technique—no replacement needed.
Prevention Tips to Avoid Future Accidents
Once your board is clean, protect it from repeat incidents with these practical strategies.
- Label markers clearly: Use color-coded labels or tape to distinguish dry-erase from permanent markers.
- Store separately: Keep permanent markers in a drawer or separate container away from whiteboard trays.
- Train users: In shared environments, post a quick-reference guide near the board showing proper vs. improper markers.
- Use anti-mark pens: Some brands offer “whiteboard-safe” permanent markers that resist adhesion but still write visibly.
- Weekly maintenance: Wipe the board with a proper cleaner once a week to prevent ink buildup.
FAQ: Common Questions About Permanent Marker Removal
Can I use WD-40 to remove permanent marker from a whiteboard?
No. While WD-40 can dissolve ink, it leaves behind an oily residue that attracts dust and grime. It may also degrade the board’s surface coating over time. Stick to alcohol-based solutions instead.
Will vinegar remove permanent marker from a whiteboard?
Vinegar is mildly acidic but lacks the solvent strength to break down permanent marker resins. It may help with light smudges but is ineffective on set stains. For reliable results, use isopropyl alcohol or the dry-erase method.
Can I prevent staining by seasoning a new whiteboard?
Yes. “Seasoning” involves filling microscopic pores in new boards by writing over the entire surface with a dry-erase marker and erasing it. This creates a protective layer that reduces the chance of permanent ink bonding. Repeat every few months on high-use boards.
Checklist: How to Safely Remove Permanent Marker From a Whiteboard
- Assess the age and extent of the stain
- Try the dry-erase marker method first
- Use isopropyl alcohol (70% or higher) on a soft cloth
- Avoid acetone, ammonia, or abrasive tools
- Test any solution on a small corner first
- Wipe with water and dry after treatment
- Restore shine with whiteboard cleaner
- Implement labeling and storage habits to prevent recurrence
Conclusion: Restore Your Board, Save Money, Reduce Waste
Removing permanent marker from a whiteboard doesn’t require expensive tools or risky chemicals. With knowledge of surface types and ink behavior, you can safely reverse mistakes using simple, accessible methods. Whether it’s a minor slip or a full-panel disaster, timely and thoughtful intervention preserves your board’s functionality and appearance.
Instead of replacing equipment, invest in prevention and maintenance. A well-cared-for whiteboard can last for years—even after accidents. Share these techniques with teachers, office managers, or parents who rely on these tools daily.


 浙公网安备
33010002000092号
浙公网安备
33010002000092号 浙B2-20120091-4
Comments
No comments yet. Why don't you start the discussion?