
Laptops are essential tools for work, study, and personal use. Over time, they often accumulate stickers—brand logos, warning labels, promotional decals, or custom designs. While removing the sticker itself is usually straightforward, the sticky residue it leaves behind can be frustratingly persistent. Worse, many people resort to harsh scraping or chemicals that risk damaging the laptop’s surface, especially on delicate aluminum or plastic finishes.
The good news is that you don’t need specialized products or risky techniques. With the right approach, you can completely eliminate adhesive residue while preserving your laptop’s finish. This guide provides tested, safe methods backed by material science and real-world experience. Whether you're prepping your device for resale, restoring its original look, or just tired of that gummy leftover layer, these strategies will deliver clean results—without a single scratch.
Why Sticker Residue Is So Stubborn
Adhesives used in stickers are designed to bond strongly to surfaces, resisting moisture, heat, and light abrasion. Pressure-sensitive adhesives (PSAs), common in most stickers, create an instant bond when pressed onto a surface. Over time, exposure to heat and UV light can cause the adhesive to harden or oxidize, making it even more difficult to remove.
On laptops, this residue clings not only to visible areas but also into tiny surface textures. Aluminum casings, such as those on MacBooks, have micro-anodized layers that can trap adhesive particles. Plastic surfaces, like those on budget Windows laptops, may absorb oils from certain solvents if misused, leading to clouding or discoloration.
Attempting to peel off dried residue with fingernails or metal scrapers almost always leads to micro-scratches. These may seem minor at first but accumulate over time, dulling the finish and reducing aesthetic appeal—and potentially lowering resale value.
“Improper removal techniques do more harm than the sticker ever did. The key is dissolving the adhesive gently, not fighting it.” — Dr. Lena Torres, Materials Scientist at the Consumer Electronics Durability Lab
Safe & Effective Removal Methods
The safest way to remove residue involves softening the adhesive so it lifts cleanly, rather than being scraped off. Below are five proven techniques using common household items. Each method is suitable for both metal and plastic laptop surfaces when applied correctly.
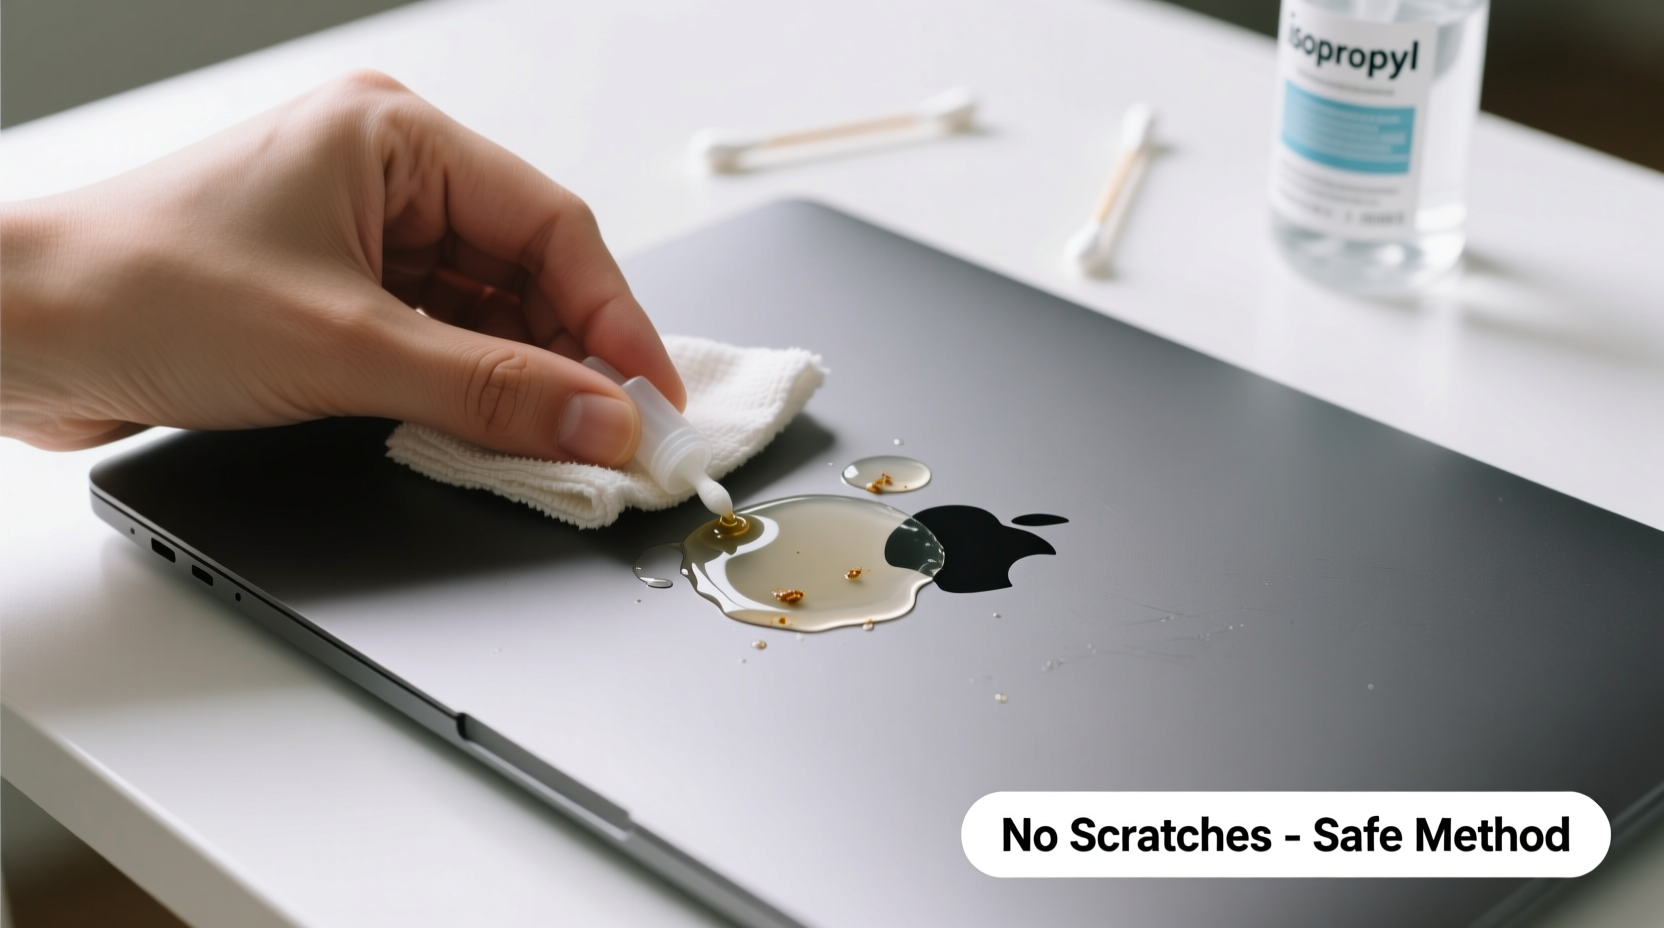
1. Rubbing Alcohol (Isopropyl Alcohol)
Rubbing alcohol is one of the most effective and widely available solutions. It breaks down adhesive polymers without harming most laptop finishes. Use 70% or higher concentration for best results.
- Dampen a lint-free cloth (microfiber is ideal) with rubbing alcohol. Do not soak it—wring out excess liquid.
- Gently rub the residue in small circular motions. Let the alcohol sit for 10–15 seconds if the glue is thick.
- Wipe away dissolved adhesive with a dry section of the cloth.
- Repeat until all residue is gone, then wipe the entire area with a dry microfiber cloth to prevent streaks.
Avoid getting liquid near ports, vents, or seams. Never spray alcohol directly onto the laptop.
2. Warm Soapy Water
For mild residue or recently removed stickers, warm water mixed with dish soap can be surprisingly effective. This method is the gentlest and safest for sensitive finishes.
- Mix a few drops of mild dish soap into warm (not hot) water.
- Dampen a corner of a microfiber cloth and gently rub the affected area.
- Rinse the cloth with clean water, wring thoroughly, and wipe again to remove soap residue.
- Dry immediately with a clean, dry cloth.
This works best when combined with a plastic scraper (like an old credit card) used at a very low angle to lift softened adhesive without pressure.
3. Olive Oil or Coconut Oil
Natural oils penetrate adhesive deeply, softening it over time. While unconventional, this method is highly effective for aged, crusty residue.
- Apply a small drop of olive or coconut oil directly onto the residue.
- Let it sit for 5–10 minutes to allow penetration.
- Wipe gently with a microfiber cloth using light pressure.
- Once residue is gone, clean the area with a drop of dish soap on a damp cloth to remove oily film.
- Dry thoroughly.
Oils should be used sparingly—too much can attract dust or leave a greasy sheen if not properly cleaned afterward.
4. Goo Gone (or Similar Adhesive Removers)
Commercial adhesive removers like Goo Gone contain citrus-based solvents that dissolve glue efficiently. They’re formulated to be safe on plastics and metals, but caution is still required.
- Apply a small amount to a microfiber cloth—not directly on the laptop.
- Rub gently over the residue until it lifts.
- Wipe the area with a damp soapy cloth to remove any solvent residue.
- Dry completely.
Always ensure the room is well-ventilated when using chemical solvents.
5. Hair Dryer + Plastic Scraper
Heat softens adhesive, making it easier to wipe away. A hair dryer can provide controlled warmth without direct contact.
- Set the hair dryer to medium heat (no hot setting).
- Hold it 6–8 inches from the residue for 20–30 seconds.
- Immediately wipe with a microfiber cloth. The adhesive should smear and lift.
- If needed, use a plastic ID card or guitar pick at a shallow angle to gently push residue off—never scrape aggressively.
- Finish by cleaning with a slightly damp soapy cloth and drying.
This method is excellent for large sticker areas but requires patience to avoid overheating sensitive components.
Do’s and Don’ts: What to Avoid
Many well-intentioned attempts go wrong because of common misconceptions. The table below summarizes best practices versus high-risk behaviors.
| Do’s | Don’ts |
|---|---|
| Use a microfiber cloth for all wiping | Use paper towels or rough fabrics that can scratch |
| Apply solvents to the cloth, not the laptop | Spray liquids directly onto the device |
| Test any method on a hidden area first | Assume all cleaners are safe for your model |
| Use plastic tools at a low angle for lifting | Scrape with metal knives, box cutters, or keys |
| Work in short sessions with breaks | Rub aggressively or repeatedly in one spot |
Real-World Example: Removing a Decade-Old Warranty Sticker
Mark, a freelance graphic designer, inherited his father’s old MacBook Pro from 2012. The laptop was functional but covered in yellowed warning stickers and price tags from international travel. One sticker on the bottom casing had been there so long that peeling left behind a dark, tar-like residue that resisted basic wiping.
He tried nail polish remover first—big mistake. The acetone dulled the aluminum finish in one spot, creating a permanent haze. After researching safer options, he switched tactics. He applied a small amount of coconut oil, let it sit for eight minutes, then gently rubbed with a microfiber cloth warmed by a hair dryer. The residue lifted in soft sheets. He finished with a quick pass of 70% isopropyl alcohol on a fresh cloth to degrease the surface.
The result? A clean, uniform finish that looked nearly new. Mark later sold the laptop online for 30% more than expected, with buyers commenting on its pristine condition.
Step-by-Step Checklist for Residue Removal
Follow this concise checklist to ensure safe, complete removal every time:
- Power off the laptop and unplug all cables.
- Choose your removal method based on residue age and surface type.
- Test the method on a hidden area (e.g., near the battery compartment).
- Apply your chosen solution to a microfiber cloth—never spray directly.
- Gently rub the residue in small circles, reapplying as needed.
- For stubborn spots, combine heat (hair dryer) with oil or alcohol.
- Lift softened adhesive with a plastic edge at a shallow angle—no digging.
- Clean the area with a damp soapy cloth to remove any leftover film.
- Dry thoroughly with a clean microfiber towel.
- Inspect under bright light to confirm all residue is gone.
Frequently Asked Questions
Can I use vinegar to remove sticker residue?
Vinegar is mildly acidic and can degrade certain coatings over time, especially on aluminum. While it may work on light residue, it's not recommended for frequent or primary use on laptops. Stick to isopropyl alcohol or commercial removers instead.
Will rubbing alcohol damage my laptop’s finish?
When used properly—on a cloth, not sprayed, and wiped gently—rubbing alcohol is safe for most modern laptop finishes. However, older devices with painted or coated surfaces may react poorly. Always test first, and avoid prolonged exposure.
What if the residue has dyed the surface?
In rare cases, colored stickers can leach dye into porous surfaces, especially plastics. If cleaning removes the stickiness but leaves a stain, the discoloration may be permanent. For resale, consider using a matching vinyl skin to cover the area discreetly.
Final Tips for Long-Term Care
Once your laptop is clean, maintain its appearance by avoiding future sticker buildup. If you must apply labels, choose removable vinyl decals designed for electronics. Store your laptop in a sleeve or case to minimize dust and grime accumulation.
Regular maintenance—like weekly dusting with a dry microfiber cloth and monthly checks for smudges or residue—keeps your device looking professional and extends its usable life.
“A clean laptop isn’t just about looks—it reflects care and attention to detail, whether you’re presenting in a boardroom or working from home.” — Jordan Lee, Tech Lifestyle Coach
Take Action Today
Your laptop deserves to look as sharp as it performs. That stubborn sticker residue doesn’t stand a chance with the right knowledge and tools. Start with the mildest method—warm soapy water or a little oil—and progress only if needed. Avoid shortcuts that risk scratches or chemical damage.
With patience and precision, you’ll restore your device to a sleek, professional state. Share your success story or tips in the comments—your experience could help someone else revive their own tech.


 浙公网安备
33010002000092号
浙公网安备
33010002000092号 浙B2-20120091-4
Comments
No comments yet. Why don't you start the discussion?