
Orchids are among the most elegant houseplants, capable of blooming for months when cared for properly. But even experienced growers face the heartbreak of seeing their orchid wilt, lose leaves, or appear completely lifeless. The good news? Many orchids labeled “dead” aren’t beyond saving. With the right intervention, you can often revive an orchid by restoring its roots, adjusting care conditions, and stimulating new growth. This guide walks through practical, science-backed steps to bring your orchid back to health—and eventually, bloom again.
Assessing Whether Your Orchid Is Truly Dead
The first step in reviving an orchid is determining whether it still has any living tissue. It’s easy to assume the worst when leaves yellow or stems shrivel, but orchids are resilient and often enter dormancy rather than dying outright.
Look for these signs:
- Firm, green pseudobulbs (in sympodial orchids like Cattleyas): These store water and nutrients and indicate active reserves.
- Green or white roots with green tips: Even if aerial roots look dry, check for firmness and color at the base.
- Healthy crown: The center where leaves emerge should not be mushy or blackened.
- Living leaf sheaths: If lower sheaths remain intact and pliable, the plant may still regenerate.
If all leaves have fallen and every root is brown and brittle, examine the stem closely. A green core inside the stem suggests the orchid might still respond to treatment. Complete browning or hollowness throughout typically means the plant is beyond recovery.
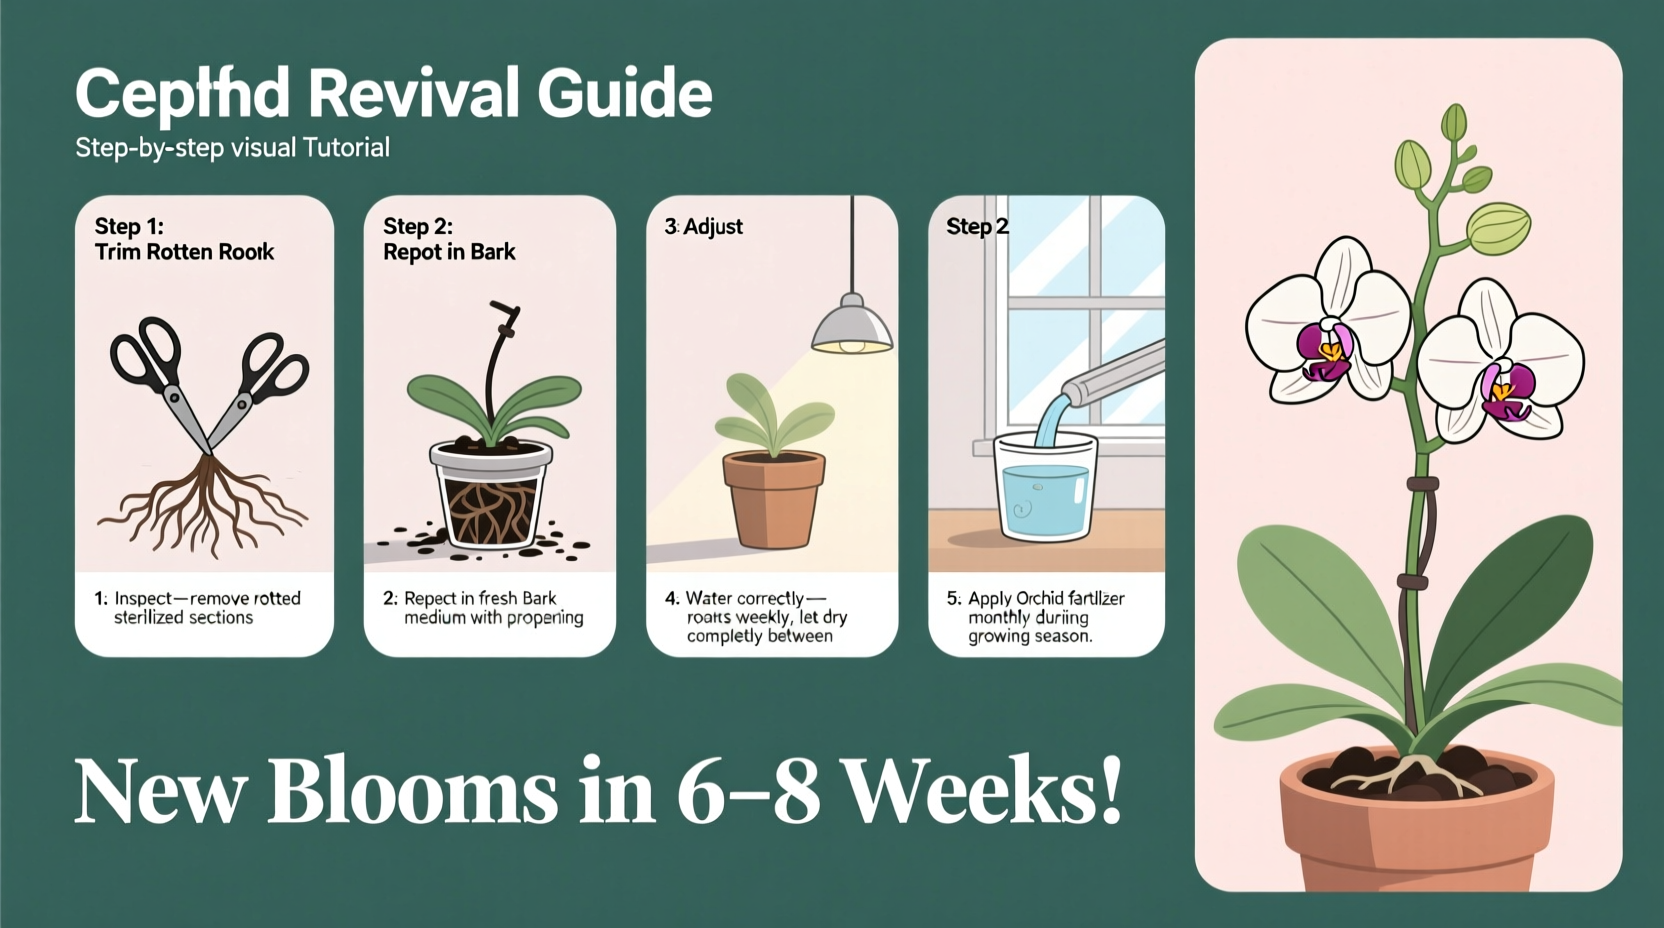
Step-by-Step Guide to Reviving a Dying Orchid
Revival isn't about quick fixes—it's about replicating natural growing conditions and giving the plant time to recover. Follow this timeline-based process to maximize your chances.
- Remove the orchid from its pot carefully. Gently shake off old media and rinse roots under lukewarm water to remove debris.
- Sterilize tools with rubbing alcohol before trimming. Cut away all dead, mushy, or hollow roots. Healthy roots are firm and range from silvery-white to green when wet.
- Treat remaining roots with a hydrogen peroxide solution (1 part 3% H₂O₂ to 3 parts water) to kill lingering fungi or bacteria.
- Repot in fresh, well-draining medium. Use coarse bark mix designed for orchids—never regular potting soil. Ensure the pot has ample drainage holes.
- Place in bright, indirect light. An east-facing window is ideal. Avoid direct midday sun, which stresses weakened plants.
- Water sparingly at first—only when the medium is nearly dry. Overwatering remains the top killer of recovering orchids.
- Maintain humidity between 50–70%. Use a pebble tray or humidifier if indoor air is dry.
- Wait patiently. New root growth may take 4–8 weeks. Do not fertilize during the first month.
Once new roots reach 1–2 inches long, begin a weak fertilizer regimen (¼ strength balanced orchid food every two weeks). This supports leaf and spike development down the line.
Common Causes of Orchid Decline—and How to Fix Them
Understanding what went wrong helps prevent future issues. Below is a breakdown of typical problems and corrective actions.
| Problem | Symptoms | Solution |
|---|---|---|
| Overwatering / Root Rot | Brown, mushy roots; yellowing leaves; foul odor | Trim affected roots, repot in dry bark, reduce watering frequency |
| Underwatering / Dehydration | Shriveled pseudobulbs; dry, gray roots; limp leaves | Soak roots in room-temp water for 10 minutes weekly until recovery |
| Poor Lighting | No new growth; dark green leaves (too little); scorched tips (too much) | Move to bright indirect light; use sheer curtain to diffuse strong sun |
| Low Humidity | Crispy leaf edges; bud drop; slow growth | Use humidity tray or group plants; mist only in morning |
| Old or Compacted Media | Stagnant water; roots circling tightly; poor nutrient uptake | Replace bark annually; avoid moss-heavy mixes unless species-specific |
Real Example: Bringing Back a Phalaenopsis After Months of Neglect
Sarah from Portland inherited a Phalaenopsis from her grandmother’s estate. The orchid had no leaves, a single shriveled stem, and was sitting in soggy sphagnum moss. She assumed it was dead—but decided to try one last revival effort.
She followed the protocol: removed all decaying matter, sterilized the remaining stem base, repotted into chunky bark, and placed it on a bright bathroom windowsill with consistent warmth. For six weeks, nothing happened. Then, a tiny green bump appeared near the base. Within three months, two healthy roots emerged, followed by a new leaf.
Nine months later, Sarah’s orchid produced a flower spike and bloomed with three lavender flowers—proof that persistence pays.
“Many orchids go dormant after stress. What looks like death is often just survival mode.” — Dr. Lin Wei, Botanist & Orchid Conservation Specialist
Checklist: Orchid Revival Action Plan
Follow this concise checklist to ensure no step is missed during rescue efforts:
- ☐ Remove orchid from current pot and inspect root system
- ☐ Sterilize scissors or shears with rubbing alcohol
- ☐ Trim all dead, mushy, or hollow roots and stems
- ☐ Rinse remaining roots gently under lukewarm water
- ☐ Treat cut areas with cinnamon powder or diluted hydrogen peroxide
- ☐ Repot in fresh, airy orchid mix (medium-grade fir bark recommended)
- ☐ Choose a slightly snug pot with excellent drainage
- ☐ Place in bright, indirect light (no direct afternoon sun)
- ☐ Maintain 65–80°F (18–27°C) and moderate humidity
- ☐ Water only when media is nearly dry—start with once every 10 days
- ☐ Wait for new root growth before resuming fertilization
- ☐ Monitor weekly for signs of improvement or deterioration
How to Encourage Blooms After Recovery
A revived orchid doesn’t automatically mean reblooming. Once stability returns, you must signal the plant that it’s safe—and energetically viable—to produce flowers.
Key strategies include:
- Establish a light cycle: Provide 12–14 hours of bright, indirect light daily. Consistency matters more than intensity.
- Introduce a temperature differential: Drop nighttime temperatures by 10°F (5–6°C) for 2–4 weeks to initiate spike formation. This mimics seasonal changes in tropical habitats.
- Fertilize appropriately: Use a high-phosphorus formula (such as 10-30-20) every other week during fall to promote flowering.
- Avoid moving the plant once a spike appears: Sudden shifts in environment often cause bud blast.
Patience is essential. It can take 6–12 months from revival to bloom, depending on species and initial damage. Phalaenopsis may rebloom on old spikes if the node remains viable; others require entirely new growth.
Frequently Asked Questions
Can an orchid grow back without any roots?
Yes, under optimal conditions. If the stem and crown are alive, new roots can emerge from the base. Keep the plant stabilized in moist (not wet) sphagnum moss or mounted on cork, with high humidity and indirect light. Mist lightly every few days and avoid submerging the base.
How long does it take to revive a dead-looking orchid?
Visible recovery typically begins within 4–8 weeks if living tissue remains. Full revival—including new leaves and roots—can take 3–6 months. Flowering may require an additional 6 months or more, depending on species and seasonal timing.
Should I cut off a dried flower spike?
Yes, once it turns completely brown and shows no green nodes. However, if the spike remains green or has dormant buds (small bumps along the stem), trim it just above the second or third node. Some Phalaenopsis will re-bloom from the same spike.
Final Thoughts: Don’t Give Up Too Soon
Orchids possess remarkable resilience. Their ability to survive extended droughts, withstand periods of neglect, and regenerate from minimal tissue makes them worth fighting for. Labeling an orchid “dead” too quickly leads many growers to discard plants that could have been saved with timely intervention.
The key lies in accurate diagnosis, precise action, and sustained care. By understanding the plant’s natural rhythms and addressing root health first, you create the foundation for long-term vitality. Even a leafless, rootless specimen deserves a chance if the central structure holds promise.


 浙公网安备
33010002000092号
浙公网安备
33010002000092号 浙B2-20120091-4
Comments
No comments yet. Why don't you start the discussion?