
Succulents are prized for their resilience and low maintenance, but even the hardiest plant can fall victim to root rot—a silent killer that begins beneath the soil. Overwatering, poor drainage, or compacted soil can lead to fungal infections in the roots, causing them to decay and ultimately suffocate the plant. The good news is that most succulents can be revived if caught early. With careful intervention and the right techniques, you can restore your plant’s health and prevent future issues. This guide walks you through identifying root rot, removing damaged tissue, repotting correctly, and establishing a sustainable care routine.
Recognizing Root Rot: Early Signs and Diagnosis
Root rot doesn’t announce itself with dramatic fanfare. Instead, it progresses quietly, often showing above-ground symptoms only after significant damage has occurred. Recognizing these signs early dramatically increases the chances of recovery.
Common indicators include:
- Yellowing or translucent leaves – Unlike natural leaf drop at the base, widespread yellowing, especially in younger leaves, suggests internal distress.
- Mushy, soft stems – Healthy succulent stems are firm. If the stem feels squishy or darkens near the base, rot may be spreading upward.
- Leaves falling off with slight touch – While older leaves naturally shed, excessive shedding across multiple areas points to stress.
- Foul odor from soil – A musty or sour smell indicates decaying organic matter—likely roots.
- No new growth over weeks – Stunted development despite ideal conditions may mean the roots aren’t functioning.
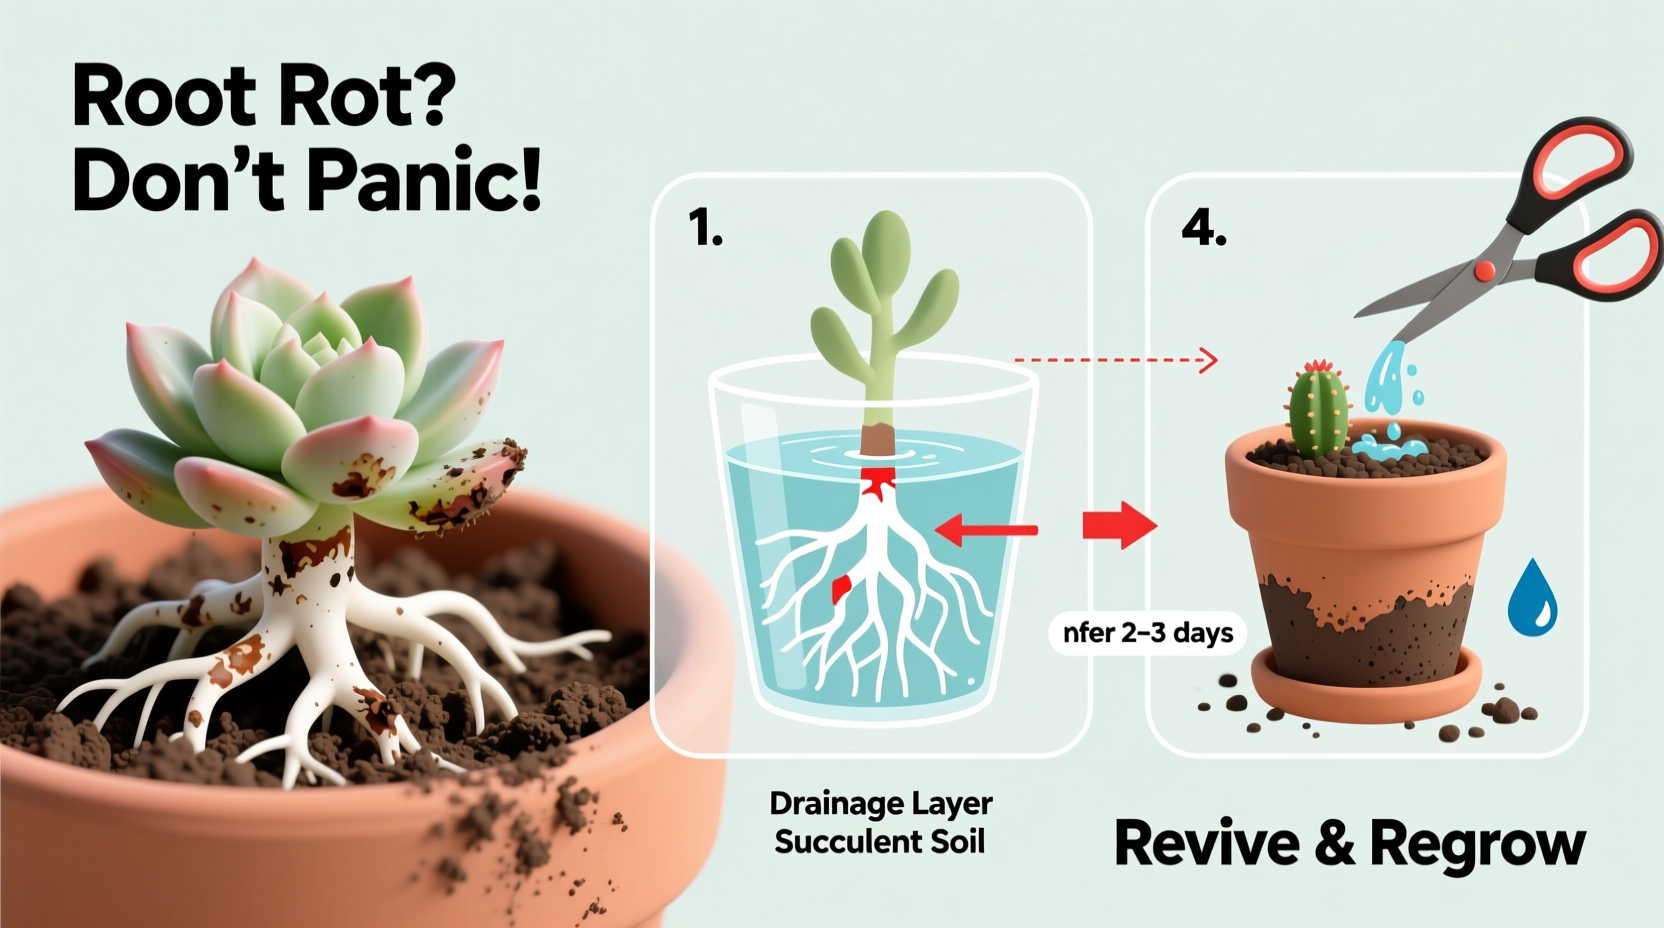
The definitive way to confirm root rot is to remove the plant from its pot and inspect the roots. Healthy roots are firm, white or light tan, and spread evenly. Rotten roots appear black, brown, or mushy, often with a slimy texture. If more than 50% of the root system is compromised, immediate action is required.
Step-by-Step Guide to Reviving a Succulent with Root Rot
Revival isn’t about quick fixes—it’s a methodical process that prioritizes sanitation, precision, and patience. Follow this timeline to give your succulent the best chance of survival.
- Remove the plant from its pot – Gently loosen the soil and lift the plant, preserving as much intact root mass as possible.
- Shake off excess soil – Use your fingers or a soft brush to expose all roots. Avoid water rinses unless necessary, as wet roots are harder to assess.
- Inspect and trim damaged roots – Using sterilized scissors or pruning shears (wipe with rubbing alcohol), cut away any black, mushy, or stringy roots. Cut back into healthy tissue to ensure no infection remains.
- Trim affected stems and leaves – Remove any discolored, soft, or leaking parts of the plant. Make clean cuts just above healthy nodes.
- Allow the plant to callus – Place the bare plant in a dry, shaded area for 2–5 days. This prevents reinfection when replanted.
- Prepare a new pot and soil mix – Choose a container with drainage holes. Fill with a gritty succulent mix—ideally two parts perlite or pumice to one part cactus soil.
- Repot carefully – Position the plant so the base sits slightly above the soil line. Do not water immediately.
- Wait before watering – Wait 5–7 days post-repotting to allow roots to begin healing. Then, lightly moisten the soil.
This process halts the progression of rot and creates an environment conducive to regrowth. Rushing steps—especially premature watering—is the most common reason for failure.
Do’s and Don’ts When Treating Root Rot
Mistakes during revival can undo progress. The following table outlines key actions to take—and avoid—for optimal results.
| Do’s | Don’ts |
|---|---|
| Use sterilized tools for cutting | Use dirty or rusty scissors |
| Let the plant callus for several days | Replant immediately after trimming |
| Use fast-draining soil mix | Reuse old soil or standard potting mix |
| Choose a slightly smaller pot if needed | Move to a much larger container |
| Water sparingly after repotting | Resume regular watering schedule too soon |
| Place in bright, indirect light | Expose to direct sun immediately after treatment |
Following these guidelines minimizes stress and supports cellular regeneration. Remember: a dehydrated but alive succulent has a better chance than one re-exposed to soggy conditions.
Real Example: Saving a Rotted Echeveria ‘Perle von Nürnberg’
A horticulturist in San Diego shared the case of an Echeveria ‘Perle von Nürnberg’ that arrived at her studio with severe root rot. The owner had watered it weekly despite cool winter temperatures and used a sealed ceramic pot without drainage. The leaves were pale, the center was collapsing, and the stem had turned brown at the base.
She removed the plant and found less than 20% of the roots remained healthy. After trimming all decayed tissue and allowing a four-day callusing period, she repotted it in a terracotta container with a 3:1 mix of pumice and coco coir. She placed it in a north-facing window and waited six days before applying a light mist to the soil edges.
Within three weeks, tiny pink rosettes emerged from the remaining stem. By week eight, new roots had formed, and the plant was thriving. This case underscores that even severely damaged succulents can recover when given the right conditions and time.
“Root rot isn’t a death sentence—it’s a wake-up call. The key is stopping the cycle of moisture retention and giving the plant space to heal.” — Dr. Lena Reyes, Botanist & Plant Pathologist, University of California, Davis
Preventing Future Root Rot: Sustainable Care Practices
Once your succulent recovers, maintaining long-term health requires adjusting your care habits. Prevention is far more effective than treatment.
Consider the following strategies:
- Water deeply but infrequently – Soak the soil completely, then let it dry entirely before watering again. In most climates, this means every 2–3 weeks in summer and once a month in winter.
- Use pots with drainage holes – Terracotta or unglazed ceramic pots wick away moisture, reducing the risk of saturation.
- Choose the right soil – Standard potting soil retains too much water. Opt for a blend designed for succulents or make your own with added perlite, coarse sand, or pumice.
- Monitor environmental humidity – Indoor succulents in humid bathrooms or kitchens are prone to rot. Keep them in well-ventilated areas with consistent airflow.
- Lift the pot to check weight – A heavy pot usually means wet soil. Wait until it feels noticeably lighter before watering.
Frequently Asked Questions
Can a succulent survive without any roots?
Yes. Even if all roots are lost, many succulents can regenerate them if the stem and leaves are still viable. Allow the plant to callus, then place it atop dry, gritty soil. Mist lightly every few days until roots emerge. This process can take 2–6 weeks.
Should I use rooting hormone when reviving a succulent?
While not essential, powdered rooting hormone can accelerate root development and reduce fungal risk. Dip the cut end after callusing but before planting. Choose a formula with antifungal properties for best results.
Is bottom watering helpful after treating root rot?
Bottom watering can be beneficial post-recovery because it encourages roots to grow downward and avoids wetting the stem or leaves. However, only use this method once the plant has established new roots. For newly repotted plants, top-watering with caution is safer initially.
Final Checklist for Succulent Revival Success
To ensure you’ve covered all bases, follow this concise checklist:
- Diagnosed root rot by inspecting roots (not just guessing from leaves)
- Used sterilized tools to remove all dead or mushy tissue
- Let the plant callus for at least 2–5 days
- Selected a clean pot with drainage holes
- Used a fast-draining succulent-specific soil mix
- Placed the plant in bright, indirect light—not full sun
- Waited 5–7 days before first post-repotting water
- Established a mindful watering schedule based on soil dryness
Conclusion: Give Your Succulent a Second Chance
Reviving a succulent with root rot is a test of patience and attention to detail. It’s easy to assume the plant is beyond saving when leaves droop and stems soften, but beneath the surface, life often persists. With careful intervention, you can halt decay, stimulate regrowth, and restore vibrancy. More importantly, the experience teaches valuable lessons about plant biology, environmental balance, and the importance of restraint in care routines.
Your efforts don’t just save a single plant—they deepen your understanding of what succulents truly need to thrive. Whether you’re a novice or experienced grower, every rescued succulent strengthens your green thumb. Start today: pull that struggling plant from its pot, assess the roots, and take the first step toward recovery. Nature rewards those who listen closely and act wisely.


 浙公网安备
33010002000092号
浙公网安备
33010002000092号 浙B2-20120091-4
Comments
No comments yet. Why don't you start the discussion?