
Lip balm is a staple in many people’s daily routines, offering protection against dryness, chapping, and environmental stressors. Yet, despite its small size, it's easy to overlook until it starts to feel waxy, stiff, or ineffective. A dried-out lip balm doesn’t always mean it’s time to throw it away—often, the product inside is still usable, just dehydrated or separated. With a few smart techniques, you can restore its texture, boost its performance, and even extend its lifespan significantly.
Reviving dried lip balm isn't just about saving money—it's also about reducing waste and making the most of what you already own. Whether it’s an expensive organic formula or a drugstore favorite, understanding how to rejuvenate and maintain your lip balm ensures you get full value from every tube or pot.
Understanding Why Lip Balm Dries Out
Lip balms lose their effectiveness over time due to ingredient separation, oxidation, evaporation of volatile components, and exposure to heat or air. Most balms are made from a blend of waxes (like beeswax or carnauba), oils (such as coconut, jojoba, or shea butter), and emollients. When these ingredients degrade or separate, the consistency changes—becoming grainy, hard, or crumbly.
Heat accelerates this process. Leaving a balm in a hot car or direct sunlight can melt the oils, which then re-solidify unevenly. Cold temperatures may harden the wax excessively, making application difficult. Additionally, repeated exposure to fingers introduces bacteria and moisture, which can spoil the product faster—especially in jar-style containers.
“Lip balm degradation is often preventable. The key is minimizing exposure to heat, light, and contamination.” — Dr. Lena Peterson, Cosmetic Chemist
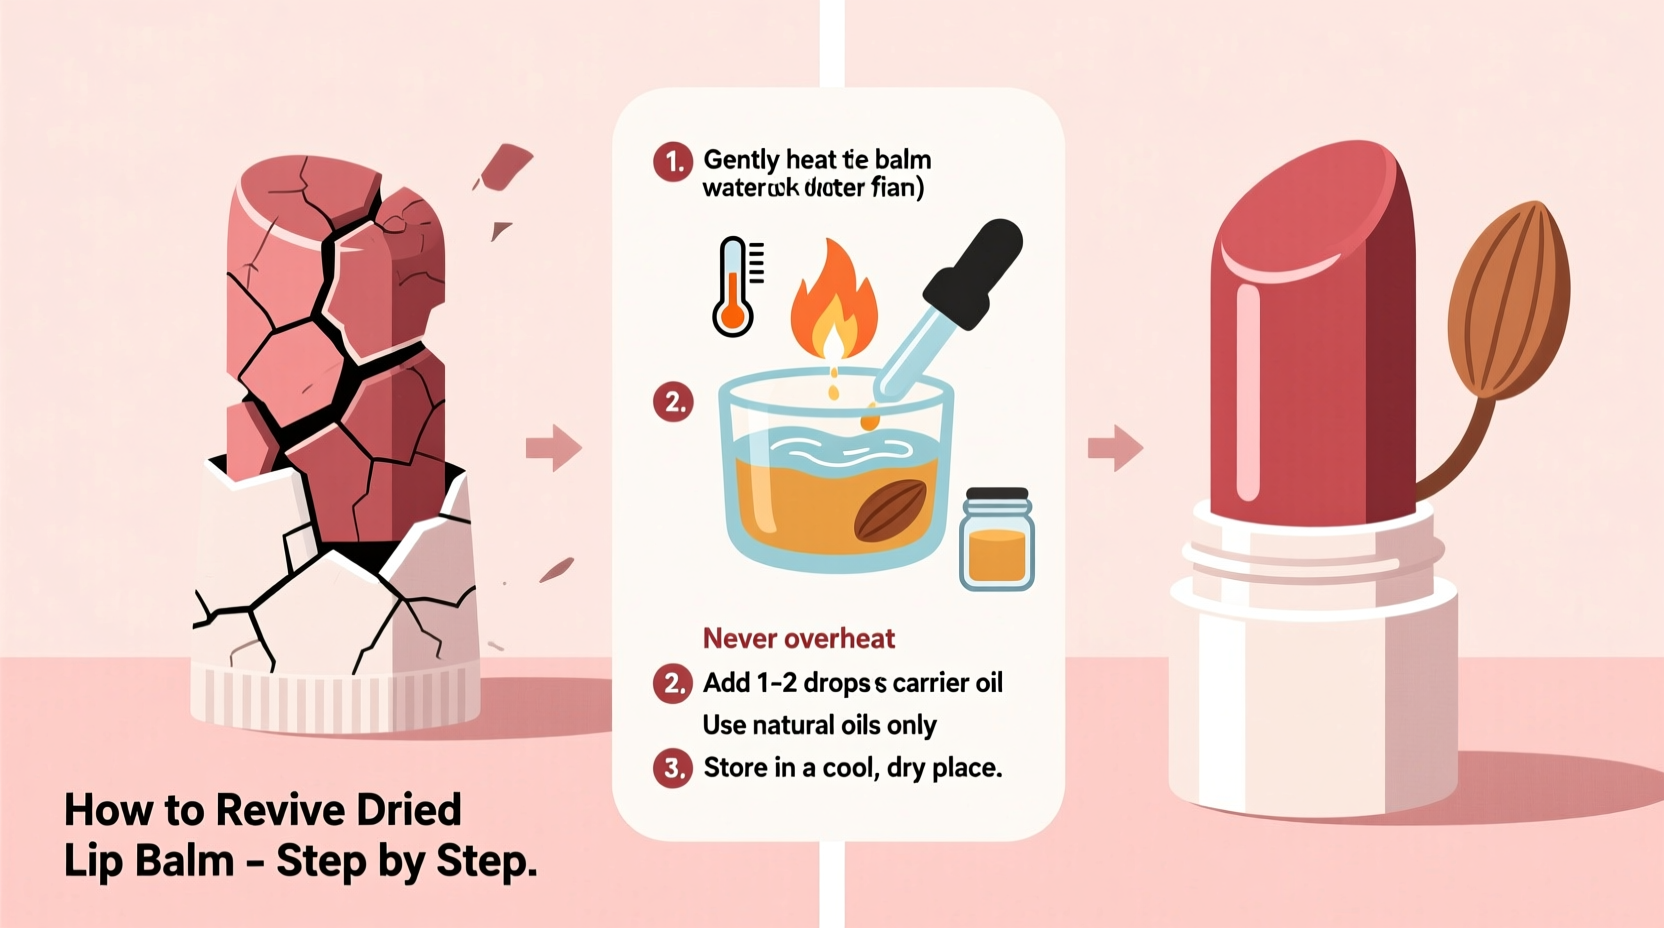
Step-by-Step Guide to Revive Dried Lip Balm
Reviving a dried lip balm involves gently melting and re-blending the ingredients to restore smoothness and glide. This method works best for balms in tubes or pots that have become stiff but aren’t moldy or rancid.
- Gather supplies: You’ll need a clean double boiler (or a heat-safe bowl over simmering water), a clean spoon or spatula, and optionally, a few drops of carrier oil.
- Remove the balm: If it’s in a tube, push it up as far as possible and use a clean pin or toothpick to loosen the base. For pots, scoop out the contents carefully.
- Melt gently: Place the balm in the top of a double boiler. Heat on low until fully liquefied—do not boil or overheat, as this can alter the chemical structure of sensitive oils.
- Stir thoroughly: Use a clean utensil to mix the melted balm for 30 seconds, ensuring all components are evenly distributed.
- Add moisture (optional): If the balm feels too thick or waxy, add 2–3 drops of a lightweight oil like sweet almond, jojoba, or vitamin E oil. Stir well.
- Pour back into container: Carefully pour the liquid back into the original tube or pot. If using a tube, place it upright in a holder (like a mug) to cool without spilling.
- Cool completely: Let it sit undisturbed at room temperature for 2–4 hours. Avoid refrigeration unless necessary, as rapid cooling can cause uneven texture.
Alternative Methods for Quick Fixes
If you don’t want to go through a full melt-and-reform process, several quick fixes can improve usability without disassembling the product.
- Warm with body heat: Hold the tube between your palms for a minute or press the applicator gently to your lips before swiping. The warmth softens the balm slightly for smoother application.
- Breathe into the tube: Open the cap and breathe warm, moist air into the tube for a few seconds before closing and shaking lightly. The humidity can temporarily soften hardened wax.
- Use a damp fingertip: For pot balms, lightly dampen your finger with water (not too wet) before dipping. The moisture helps pick up more product and spreads it easier.
- Layer under lipstick: Apply a tiny amount of revived balm as a base. Even if slightly stiff, it can hydrate lips beneath color without affecting finish.
How to Extend Lip Balm Usability Long-Term
Prevention is the best way to avoid frequent revival. Simple habits can keep your lip balm effective for months longer than average.
| Practice | Benefit | Frequency |
|---|---|---|
| Store in a cool, dark place | Prevents melting and oxidation | Ongoing |
| Avoid direct sunlight | Reduces UV degradation of oils | Ongoing |
| Keep cap tightly closed | Minimizes air exposure and drying | After each use |
| Use clean hands or applicator | Reduces bacterial contamination | Every time |
| Rotate multiple balms | Prevents one product from sitting unused too long | Weekly check |
Consider labeling your lip balms with purchase or opening dates. Most balms last 6–12 months after opening. Natural formulas without preservatives degrade faster—typically within 6 months.
Mini Case Study: Reviving a Forgotten Winter Balm
Sophie, a freelance writer from Vermont, found an old tube of shea butter lip balm at the bottom of her winter coat pocket in early spring. It had been exposed to freezing temperatures and occasional warmth near radiators. The balm was nearly impossible to swipe out—hard and flaky when applied.
Instead of discarding it, she followed the double boiler method. She removed the balm, melted it with a few drops of jojoba oil, and poured it back into the tube. After cooling, the texture was smooth and creamy again. She continued using it for three more weeks with no issues.
“I didn’t think it could be saved,” Sophie said. “But now I look at all my ‘dead’ beauty products differently. It’s amazing what a little heat and oil can do.”
Checklist: How to Safely Revive and Maintain Lip Balm
Follow this checklist to ensure safe and effective revival and ongoing care:
- ☐ Check expiration date—discard if past 12 months (6 months for natural formulas)
- ☐ Inspect for mold, odd smell, or discoloration—do not use if present
- ☐ Clean container thoroughly before reuse
- ☐ Use indirect heat only—never microwave or expose to open flame
- ☐ Add only skin-safe oils in small amounts (2–3 drops max)
- ☐ Label revived balms with a new use-by date
- ☐ Store in stable environment: below 75°F (24°C), away from windows
- ☐ Replace caps immediately after use
Frequently Asked Questions
Can I add essential oils when reviving lip balm?
No, unless you're certain of proper dilution and safety. Essential oils can irritate lips or cause photosensitivity. Stick to carrier oils like jojoba, almond, or fractionated coconut oil for revival.
Is it safe to revive lip balm that’s been used frequently?
It depends. If the balm has been applied directly to lips multiple times, bacteria may be present. Melting won’t sterilize it. For hygiene, only revive balms that were used infrequently or with clean tools. Pots picked at with fingers pose higher risk.
Can I combine different lip balms when reviving?
You can, but cautiously. Mixing balms can create unpredictable textures or reactions—especially if one contains sunscreen, menthol, or SPF. Only combine similar formulas (e.g., two plain shea balms). Avoid mixing medicated with regular types.
Expert Insight: What Formulators Recommend
Professional cosmetic formulators emphasize ingredient stability and user hygiene when discussing product longevity.
“Consumers often underestimate how much contamination affects shelf life. A lip balm touched by fingers dozens of times is essentially a petri dish. If reviving, assume microbial load and consider adding a drop of tocopherol (vitamin E) as a natural preservative booster.” — Marcus Reed, Skincare Formulation Specialist
He also advises against using water during revival, as it introduces microbes and doesn’t mix with oil-based formulas. Any added liquids should be anhydrous (water-free).
Conclusion: Waste Less, Care More
A dried-out lip balm isn’t necessarily dead—it’s often just dormant. With careful handling, gentle reformulation, and better storage habits, you can breathe new life into products you thought were finished. Beyond saving money, this practice supports sustainable beauty routines by reducing unnecessary consumption and landfill waste.
The next time you reach for a stiff tube or crumbly pot, pause before tossing it. Take five minutes to assess, revive, and reset. Small actions like warming, blending, or cleaning containers build a mindset of mindful usage—one that values quality, consistency, and responsibility.


 浙公网安备
33010002000092号
浙公网安备
33010002000092号 浙B2-20120091-4
Comments
No comments yet. Why don't you start the discussion?