
Houseplants bring life, color, and calm into our homes. But when leaves yellow, stems weaken, and the soil smells sour, something’s wrong beneath the surface. Root rot—the silent killer of indoor plants—is often the culprit. It occurs when roots sit in waterlogged soil too long, creating a breeding ground for fungi that destroy root tissue. The good news? You don’t need expensive treatments or specialty products to fix it. With common household items and careful intervention, many plants can be saved—even when they seem beyond help.
Reviving a plant with root rot is less about magic and more about method: removing damaged tissue, restoring airflow, and creating conditions where healthy roots can regrow. This guide walks through every step, from diagnosis to recovery, using only items most households already have on hand.
Understanding Root Rot: Why It Happens
Root rot isn’t just an overwatering issue—it’s a chain reaction triggered by poor drainage, compacted soil, or containers without drainage holes. When soil stays saturated, oxygen levels drop. Roots suffocate, cells die, and opportunistic pathogens like *Pythium* and *Fusarium* move in. These microbes spread quickly, turning firm, white roots into mushy, brown strands.
The signs aren’t always obvious at first. Above-ground symptoms—wilting despite wet soil, yellowing leaves, stunted growth—are often mistaken for underwatering. By the time you notice, significant damage may already exist below. Early detection is key. If your plant feels loose in the pot or emits a foul, swampy odor from the soil, suspect root rot immediately.
“Root rot doesn’t mean game over. Many houseplants can recover if caught early and treated properly.” — Dr. Linda Chen, Urban Horticulturist & Plant Health Specialist
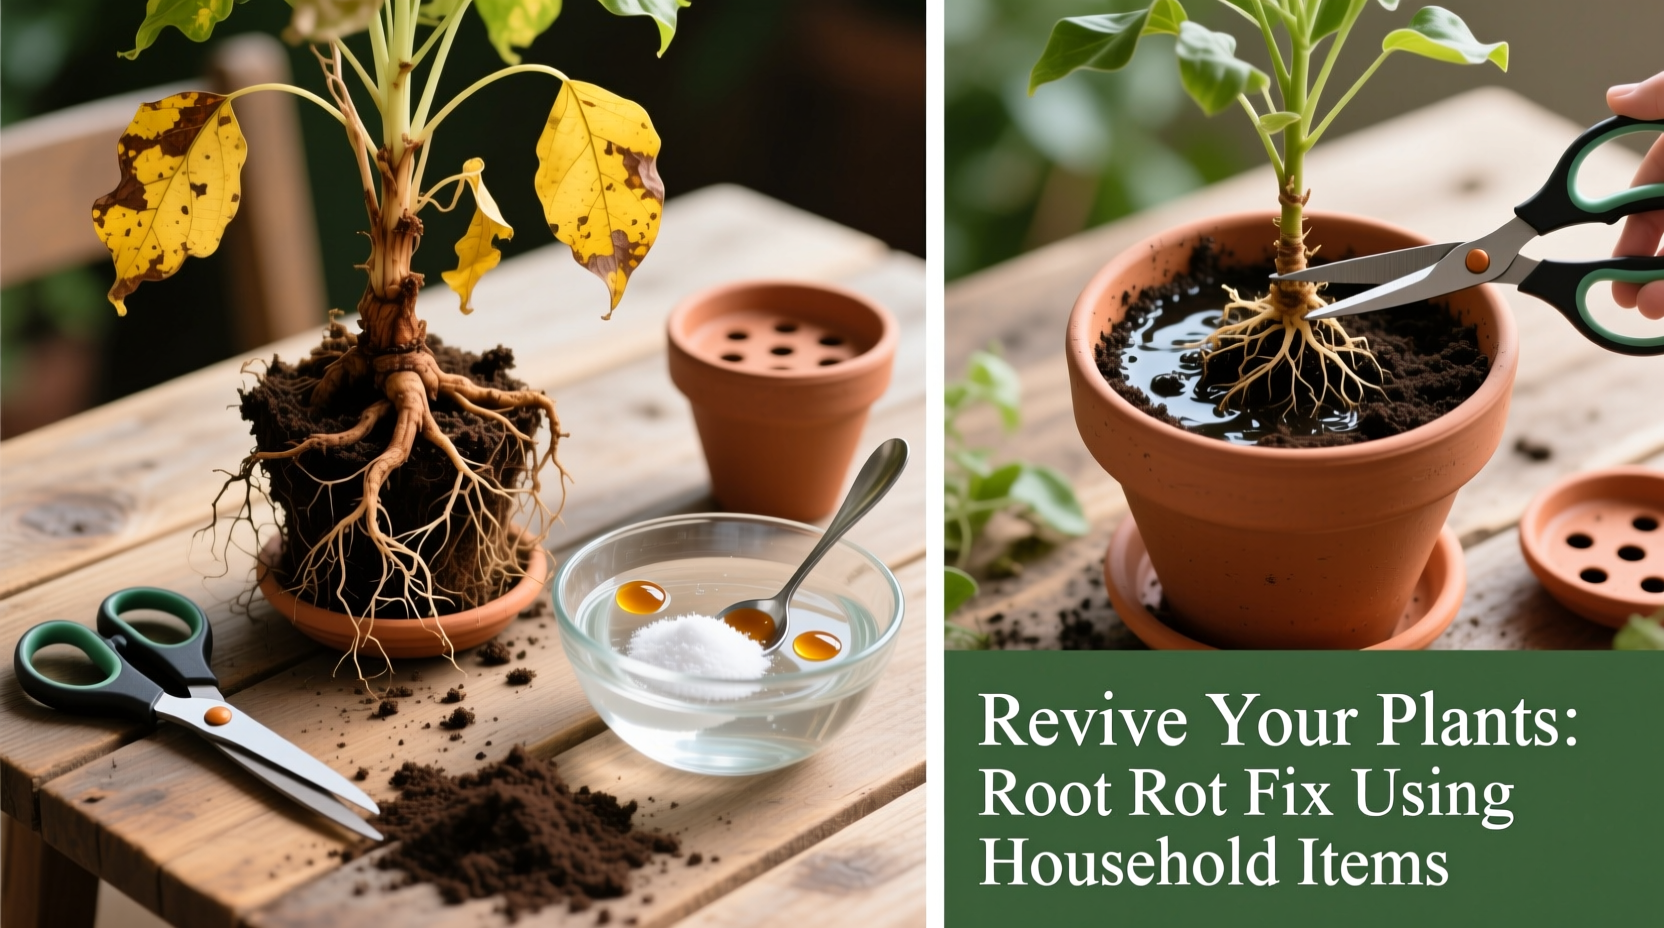
Step-by-Step Guide to Reviving a Plant with Root Rot
Saving a plant with root rot requires patience and precision. Follow this sequence carefully. Each step uses only basic household tools and materials.
- Remove the plant from its pot: Gently tip the container and slide the root ball out. If it resists, tap the sides or run a butter knife around the edge. Avoid pulling the stem.
- Shake off excess soil: Place the plant on newspaper or a tray. Loosen the soil by hand, removing as much as possible without damaging fragile roots.
- Inspect the roots: Healthy roots are firm and white or light tan. Rotten ones are dark, soft, and may fall apart when touched. Use scissors or shears to trim away all affected areas, cutting back to healthy tissue.
- Sanitize tools between cuts: Wipe blades with rubbing alcohol (70% isopropyl) after each cut to prevent spreading pathogens.
- Rinse the remaining roots: Wash under lukewarm running water to remove debris and lingering spores.
- Soak in hydrogen peroxide solution: Mix 1 part 3% hydrogen peroxide with 2 parts water. Soak roots for 10–15 minutes. This kills remaining fungi and adds oxygen to root tissues.
- Dry the roots: Lay the plant on paper towels in a shaded area for 1–2 hours. Do not expose to direct sun.
- Prepare a new pot and soil: Choose a clean container with drainage holes. If reusing the old pot, wash it with soapy water and rinse with a diluted bleach solution (1 part bleach to 9 parts water).
- Repot using fresh, well-draining mix: Combine two parts potting soil, one part perlite, and one part coarse sand. Alternatively, use a cactus/succulent mix as a base.
- Water lightly after repotting: Moisten the soil, but do not soak. Wait 7–10 days before watering again to allow healing.
Household Items That Help Fight Root Rot
You likely already own effective tools for treating root rot. These common items serve as antiseptics, drying agents, or soil conditioners:
- Hydrogen peroxide (3%): Found in medicine cabinets, it oxygenates soil and kills anaerobic bacteria.
- Isopropyl alcohol (70%): Disinfects pruning tools and pot surfaces.
- Cinnamon powder: A natural fungicide. Dust on cut root ends after trimming to inhibit mold growth.
- Unflavored yogurt (probiotic): Contains beneficial bacteria that can suppress harmful fungi. Mix a spoonful into irrigation water once monthly during recovery.
- Activated charcoal (from air purifiers or aquarium filters): Add a tablespoon to new soil to absorb toxins and reduce microbial activity.
- Perlite or rice hulls: Improve soil aeration. Mix into potting mix to prevent compaction.
| Item | Use Case | Avoid If… |
|---|---|---|
| Hydrogen peroxide | Root soak, soil drench | Plant is severely dehydrated |
| Cinnamon powder | Natural fungicide on cuts | Used in large quantities in soil |
| Isopropyl alcohol | Tool and pot sanitation | Applied directly to live roots |
| Yogurt (probiotic) | Mild microbial support | Plant is in active decay |
| Activated charcoal | Toxin absorption in soil | Substituted for proper drainage |
Real Example: Saving a Peace Lily with Advanced Root Rot
María, a teacher in Portland, noticed her peace lily drooping despite daily watering. The leaves turned yellow, then brown at the tips. She lifted the plant and detected a musty smell. Suspecting root rot, she followed these steps:
She removed the plant and found nearly 70% of the roots were black and slimy. Using kitchen scissors cleaned with rubbing alcohol, she trimmed all dead tissue. She soaked the remaining roots in a hydrogen peroxide solution, then dusted the cuts with cinnamon from her spice rack. After repotting in a mix of potting soil, perlite, and activated charcoal from an old filter, she placed it in indirect light.
For two weeks, she didn’t water it—only misting the leaves lightly. On day 18, new green shoots emerged. Within six weeks, the plant stood upright and produced a fresh white spathe. “I thought it was done,” she said. “But giving it time and clean conditions made all the difference.”
Recovery Timeline and Care Plan
Healing takes time. Roots don’t regenerate overnight. Follow this timeline to support recovery without over-intervening:
- Days 1–3: No watering. Keep in bright, indirect light. Monitor for collapse.
- Days 4–7: Lightly moisten soil if it’s completely dry. Begin weekly leaf misting to maintain humidity.
- Week 2: Check for new root nubs or improved stability. Apply a diluted seaweed extract (1 tsp per liter) to stimulate growth.
- Week 3–4: Gradually increase watering as new roots appear. Use room-temperature water.
- Week 6+: Resume light feeding with half-strength liquid fertilizer every 4–6 weeks.
Avoid fertilizing during the first month. Nutrients stress recovering roots. Also, resist the urge to repot again—give the plant at least 8–12 weeks to settle.
Preventing Future Root Rot
Once your plant recovers, protect it from repeating the cycle. Prevention relies on three pillars: proper watering, adequate drainage, and attentive monitoring.
Use the “finger test” before watering: insert your index finger up to the second knuckle. If the soil feels damp, wait. Most tropical houseplants prefer to dry out slightly between waterings. For those prone to overwatering, place pots on pebble trays instead of saucers to elevate them above standing water.
Choose pots with drainage holes. If you love a decorative container without holes, use it as a sleeve and keep the plant in a perforated nursery pot inside. Remove it when watering, let it drain fully, then return it.
Refresh soil annually. Over time, organic matter breaks down and compacts, reducing aeration. Replace top 2 inches with fresh mix each spring, or repot entirely every 18–24 months.
“Most root rot cases I see stem from emotional watering—people water because they think their plant ‘needs love,’ not because it needs water.” — Carlos Mendez, Indoor Plant Consultant
FAQ: Common Questions About Root Rot Recovery
Can a plant survive with no healthy roots left?
It’s unlikely, but not impossible. If even a small portion of firm root tissue remains, there’s hope. In rare cases, some plants like pothos or philodendrons can regrow roots from stem nodes placed in water or moist sphagnum moss. However, full root loss usually means replacement is necessary.
Is apple cider vinegar effective against root rot?
No. Despite online claims, vinegar lowers pH and can harm sensitive root systems. Stick to proven methods like hydrogen peroxide or proper sanitation. Natural doesn’t always mean safe for plants.
How long does it take for a plant to recover from root rot?
Visible improvement typically appears within 3–6 weeks. Full recovery, including robust new growth and root establishment, takes 2–4 months. Patience is essential—rushing care routines often leads to relapse.
Final Checklist: Revival Action Steps
Keep this checklist handy when treating a plant with suspected root rot:
- ☑️ Remove plant from pot gently
- ☑️ Inspect and trim all mushy, dark roots
- ☑️ Sanitize tools with rubbing alcohol
- ☑️ Soak roots in 3% hydrogen peroxide (1:2 ratio with water)
- ☑️ Air-dry roots for 1–2 hours
- ☑️ Repot in clean container with drainage
- ☑️ Use fresh, well-aerated soil mix
- ☑️ Water sparingly post-repotting
- ☑️ Place in bright, indirect light
- ☑️ Monitor weekly for new growth or setbacks
Conclusion: Bring Your Plants Back to Life
Root rot doesn’t have to be a death sentence. With observation, timely action, and everyday household supplies, you can rescue even the most pitiful-looking houseplant. The process teaches deeper awareness of your plant’s needs—not just water, but air, space, and balance. Every saved plant strengthens your confidence as a caretaker.
Start today. Pick one struggling plant, assess its roots, and apply what you’ve learned. Share your progress, ask questions, and celebrate small victories. Healthy roots mean thriving foliage, and that quiet joy of watching life return to something you nearly lost.


 浙公网安备
33010002000092号
浙公网安备
33010002000092号 浙B2-20120091-4
Comments
No comments yet. Why don't you start the discussion?