
Tire maintenance is one of the most overlooked yet critical aspects of vehicle care. Regular tire rotation not only extends tread life but also enhances traction, improves fuel efficiency, and ensures balanced handling. When done correctly—and paired with the ability to spot early signs of uneven wear—this routine task can save you hundreds in premature replacements and reduce the risk of blowouts. While many drivers rely on service centers, rotating your own tires at home is both practical and cost-effective if approached with caution and knowledge.
This guide walks through the entire process: from gathering tools and lifting your vehicle safely, to executing the correct rotation pattern based on your drivetrain, and finally inspecting for telltale wear indicators that signal alignment issues, underinflation, or suspension problems. With a little preparation and attention to detail, you’ll gain confidence in maintaining your vehicle’s performance year-round.
Gather the Right Tools and Prepare Your Vehicle
Before lifting any part of your car, ensure you have all necessary equipment within reach. Working without proper tools increases the risk of injury and damage. The following items are essential:
- Jack and jack stands (never rely solely on a jack)
- Lug wrench or impact wrench
- Torque wrench (recommended for precise lug nut tightening)
- Wheel chocks (to prevent rolling)
- Owner’s manual (for rotation pattern and torque specs)
- Gloves and safety glasses
Park your vehicle on a flat, hard surface like concrete or asphalt. Engage the parking brake firmly and place wheel chocks behind the tires that will remain on the ground during lifting. For example, if you’re lifting the front end, chock the rear wheels. Turn off the engine and remove the key. Never work under a vehicle supported only by a hydraulic jack—always use jack stands rated for your vehicle's weight.
Follow the Correct Rotation Pattern for Your Drivetrain
The way you rotate your tires depends on your vehicle’s drive system and whether your tires are directional or staggered in size. Using the wrong pattern can lead to accelerated wear and compromised performance.
Rear-Wheel Drive (RWD): Move rear tires to the front on the same side. Front tires move to the opposite sides at the rear. This crisscross method balances longitudinal and lateral forces over time.
Front-Wheel Drive (FWD): Most common in passenger cars. Rotate front tires straight back. Rear tires move forward and cross over to the opposite side. Since FWD vehicles carry more weight and power delivery at the front, this pattern helps counteract faster front wear.
All-Wheel Drive (AWD) and Four-Wheel Drive (4WD): Use an “X-pattern” unless otherwise specified. Each tire moves diagonally to the opposite corner. AWD systems demand even tread depth across all four tires to prevent drivetrain strain.
If your tires are directional (marked with rotation arrows), they can only be rotated front-to-back on the same side. Swapping sides would require remounting, which isn’t feasible at home.
“Rotating tires every 5,000 to 7,500 miles can improve tread life by up to 30% and maintain consistent grip.” — National Institute for Automotive Service Excellence (ASE)
Step-by-Step Guide to Rotating Tires Safely
Safety is paramount when working beneath a lifted vehicle. Follow this sequence carefully to avoid accidents and ensure proper reassembly.
- Loosen lug nuts: Before jacking up the car, break the lug nut tension using a wrench. Do not remove them fully—just enough to turn easily once the wheel is off the ground.
- Lift the vehicle: Position the jack under the manufacturer-recommended lift point (usually a reinforced frame rail). Raise the corner until the tire clears the ground by about 1–2 inches.
- Secure with jack stands: Place a jack stand under a solid support point near the jack. Lower the vehicle slightly onto the stand. Repeat for additional corners as needed.
- Remove wheels: Fully unscrew and remove the lug nuts. Carefully take off the wheel and set it aside on its tread to avoid damaging rims.
- Inspect components: While wheels are off, examine brake pads, rotors, and suspension parts for leaks or wear. Clean debris from wheel hubs.
- Install tires in new positions: Mount each tire according to your chosen rotation pattern. Hand-thread lug nuts to prevent cross-threading.
- Lower and tighten: Remove jack stands and lower the vehicle completely. Once on the ground, tighten lug nuts in a star pattern using a torque wrench set to your vehicle’s specification (typically 80–100 ft-lbs).
Repeat the process for all four wheels. After completion, store tools and dispose of old debris responsibly. Take a short test drive at low speed to confirm no vibrations or loose sensations.
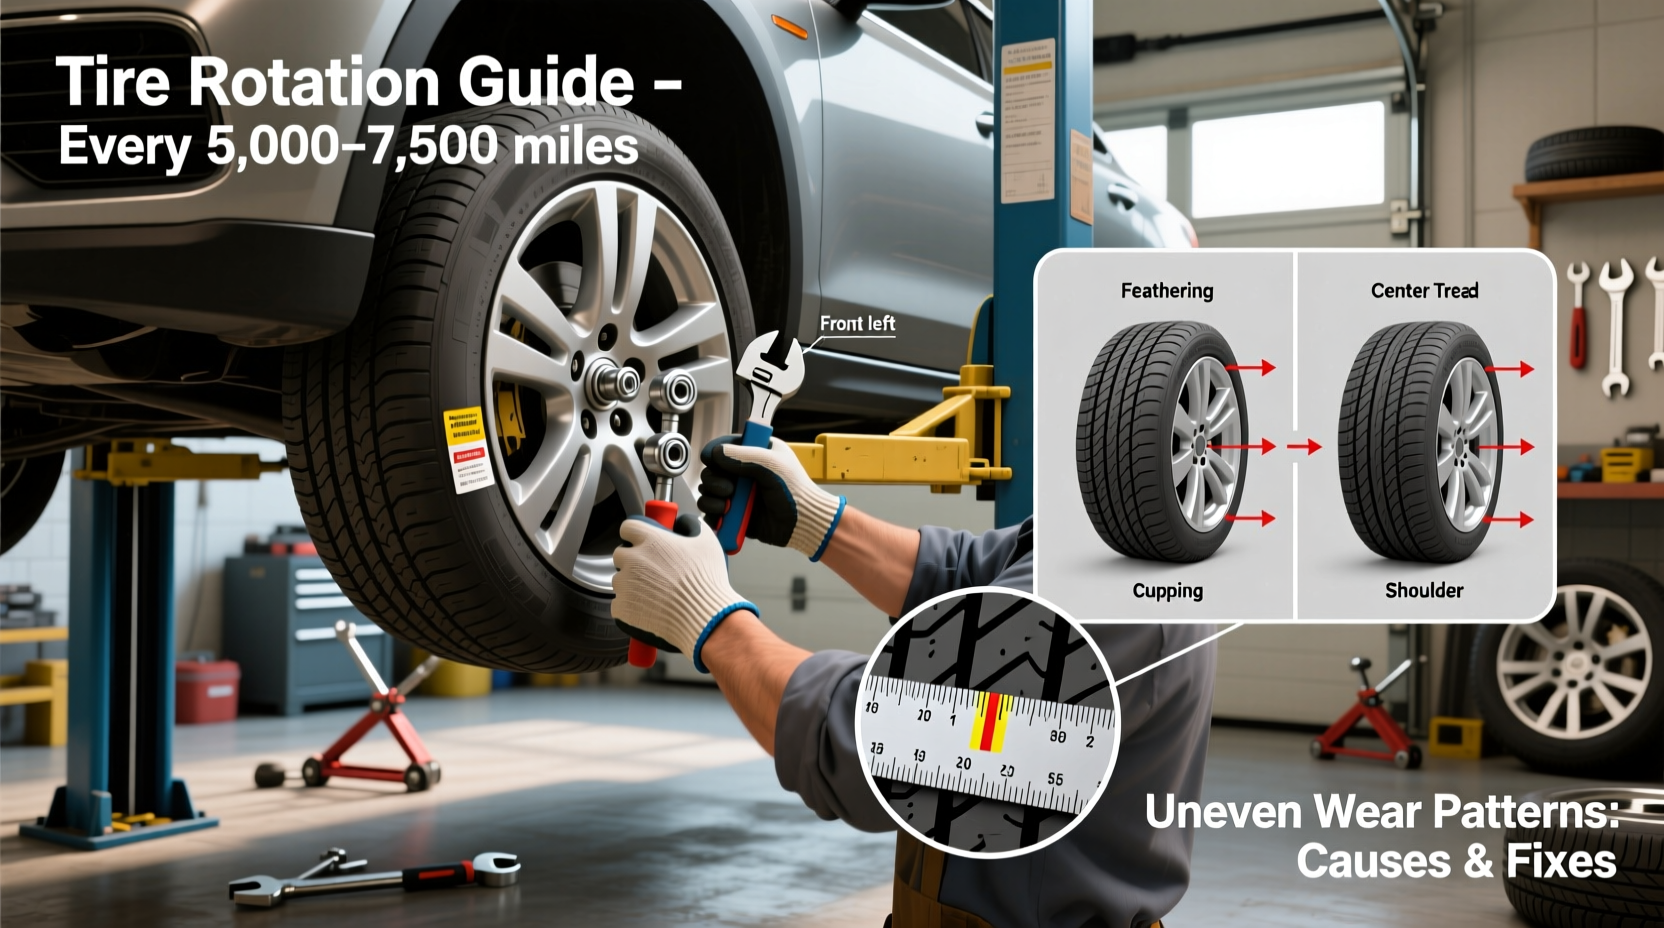
Recognizing Uneven Wear Patterns and Their Causes
Rotation provides the perfect opportunity to inspect tread condition. Uneven wear doesn't just shorten tire life—it often reveals deeper mechanical issues. Learn these common patterns:
| Wear Pattern | Appearance | Most Likely Cause |
|---|---|---|
| Center Wear | Excessive wear down the center of the tread | Overinflation – too much air pressure pushes center into road |
| Edge Wear | Outer edges worn more than center | Underinflation – sidewalls flex excessively, increasing edge contact |
| One-Sided Wear | Inner or outer shoulder significantly worn | Incorrect camber alignment – tilted axle causing uneven load |
| Cupping / Scalloping | Dips or scalloped patches around tread | Worn suspension components (shocks, struts, ball joints) |
| Feathering | Tread blocks have smooth edge on one side, sharp on the other | Improper toe alignment or aggressive cornering |
Use a tread depth gauge or the penny test (insert a penny upside-down into grooves; if Lincoln’s head is fully visible, tread is below 2/32 inch and replacement is urgent). Compare readings across multiple points on each tire. Differences greater than 2/32 inch between inner and outer edges warrant professional inspection.
Real Example: Preventing Costly Repairs Through Early Detection
Mark, a DIY enthusiast in Colorado, rotated his SUV’s tires every 6,000 miles. During one session, he noticed pronounced wear on the inside edges of the front tires. Though inflation was correct, the pattern suggested negative camber. He took the vehicle to a shop, where a technician confirmed a bent control arm from hitting a hidden pothole months earlier. By catching it early, Mark avoided catastrophic failure during winter mountain driving and saved $600 in potential tire and drivetrain damage.
This case illustrates how routine rotation serves as preventive maintenance. Visual checks are just as important as the physical swap.
Essential Checklist for Home Tire Rotation
Use this checklist before starting to ensure nothing is missed:
- ✅ Park on level ground and engage parking brake
- ✅ Apply wheel chocks to non-lifted wheels
- ✅ Gather jack, jack stands, lug wrench, torque wrench, gloves
- ✅ Confirm correct rotation pattern from owner’s manual
- ✅ Loosen lug nuts while vehicle is still on the ground
- ✅ Lift one corner at a time and secure with jack stands
- ✅ Remove wheels and inspect brakes, suspension, hub surfaces
- ✅ Rotate tires according to drivetrain pattern
- ✅ Reinstall wheels and hand-tighten lug nuts
- ✅ Lower vehicle and torque lug nuts in star pattern
- ✅ Check and adjust tire pressures
- ✅ Inspect tread for wear patterns and record depth measurements
Frequently Asked Questions
How often should I rotate my tires?
Most manufacturers recommend rotation every 5,000 to 7,500 miles. If you drive aggressively, carry heavy loads, or frequently travel on rough roads, consider rotating every 5,000 miles. Always consult your owner’s manual for model-specific guidance.
Can I rotate tires with different tread depths?
Yes, as long as the difference isn’t extreme (more than 3/32 inch). However, significant imbalance in tread depth on AWD or 4WD vehicles can cause drivetrain binding. In such cases, replacement may be necessary instead of rotation.
Is it safe to rotate tires without a torque wrench?
It’s possible but not advisable. Over-tightening can stretch or crack wheel studs; under-tightening risks lug nuts coming loose while driving. A torque wrench costs less than $30 and ensures safety and compliance with engineering standards.
Conclusion: Take Control of Your Vehicle’s Safety and Efficiency
Rotating your tires at home isn’t just about saving money—it’s about taking responsibility for your vehicle’s reliability and your safety on the road. With the right tools, a clear understanding of rotation patterns, and the ability to read wear signals, you transform a basic chore into a powerful diagnostic tool. Small habits like checking tread depth and noting wear trends compound into major benefits: longer-lasting tires, smoother rides, and fewer unexpected repairs.


 浙公网安备
33010002000092号
浙公网安备
33010002000092号 浙B2-20120091-4
Comments
No comments yet. Why don't you start the discussion?