
Tire rotation is a critical part of vehicle maintenance that promotes even tread wear, improves handling, and extends tire life. While many drivers rely on mechanics for this task, it’s entirely possible—and often economical—to rotate your own tires at home. You don’t need a hydraulic lift or expensive equipment. With basic hand tools, common household items, and strict attention to safety, you can complete the job efficiently and correctly.
Rotating tires every 5,000 to 7,500 miles helps maintain balanced performance across all four wheels. Front tires typically wear faster due to steering and braking forces, especially in front-wheel-drive vehicles. Rear tires, meanwhile, may develop irregular wear patterns if left too long in one position. Regular rotation mitigates these issues, saving money over time and improving driving safety.
Understanding Tire Rotation Patterns
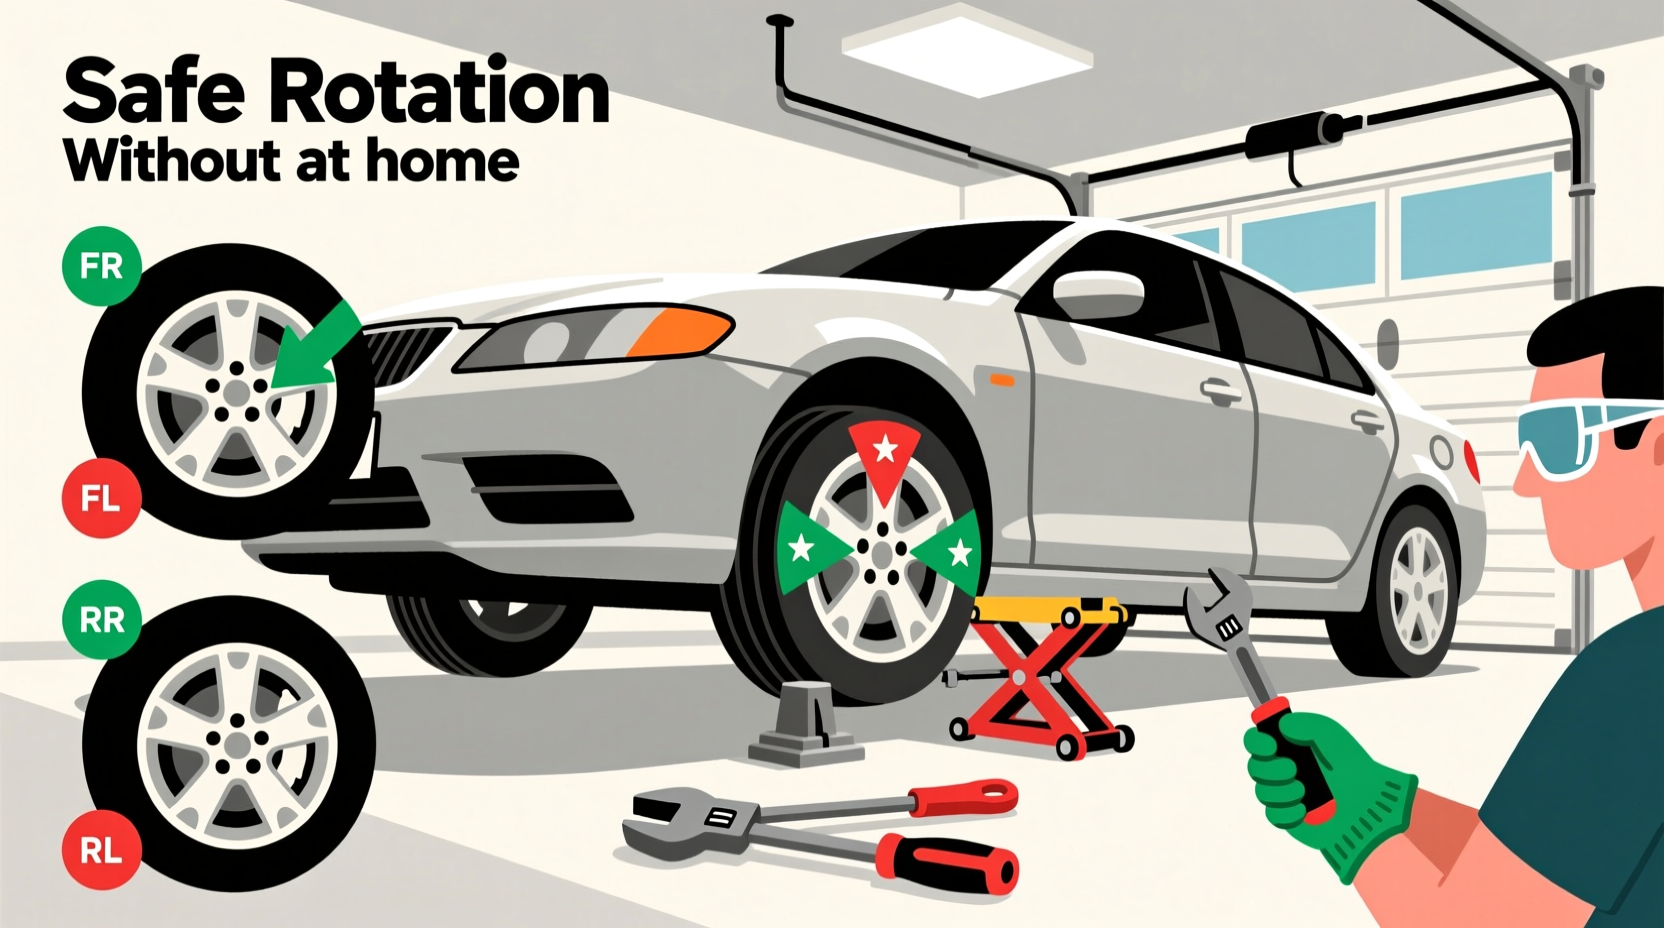
The correct rotation pattern depends on your vehicle's drivetrain (front-wheel drive, rear-wheel drive, all-wheel drive) and whether your tires are directional or non-directional. Using the wrong pattern can lead to uneven wear or reduced traction.
- Front-wheel drive: Move the rear tires straight forward (left rear to left front, right rear to right front). The front tires cross to the opposite rear positions (left front to right rear, right front to left rear).
- Rear-wheel or all-wheel drive: Reverse the front-wheel drive pattern. Front tires move straight back; rear tires cross to the opposite front positions.
- Directional tires: These have a tread pattern designed to rotate in one direction only. They can only be rotated front-to-back on the same side of the vehicle.
- Spare tires (full-size): If your spare matches the others, include it in rotation using a five-tire pattern, typically placing it at the rear and rotating the others accordingly.
Essential Tools and Materials
You won't need a lift or air compressor, but certain tools are necessary for safety and efficiency. Most can be found in a basic home garage toolkit.
| Item | Purpose | Household Alternatives |
|---|---|---|
| Jack (scissor or hydraulic) | Lifts the vehicle off the ground | None—this is essential |
| Jack stands (x2 or x4) | Supports the vehicle safely while working | Cinder blocks (not recommended), sturdy wooden beams (only as last resort) |
| Lug wrench or breaker bar | Loosens and tightens lug nuts | Strong adjustable wrench (less ideal) |
| Wheel chocks | Prevents vehicle from rolling | Brick, thick wood block |
| Torque wrench (optional but recommended) | Ensures lug nuts are tightened to manufacturer specs | Firm hand tightening plus double-check later |
| Flashlight or work light | Improves visibility under the car | Phone flashlight, lantern |
“Never rely solely on a jack to support a vehicle. Always use jack stands or another secure secondary support.” — National Highway Traffic Safety Administration (NHTSA)
Step-by-Step Guide to Rotating Tires Safely
Follow this sequence carefully. Rushing or skipping steps increases the risk of injury or damage.
- Park on a flat, level surface. Concrete or asphalt is ideal. Avoid slopes or gravel. Engage the parking brake firmly.
- Chock the wheels. Place wheel chocks or sturdy blocks behind the tires that will remain on the ground. For example, when lifting the front, chock the rear tires.
- Loosen the lug nuts slightly. Use the lug wrench to break the tension on each nut before lifting the car. Do not remove them yet—just turn counterclockwise about half a turn.
- Lift one end of the vehicle. Position the jack under the manufacturer’s designated lift point (usually a reinforced section of frame or axle). Raise the vehicle until the tire is 2–3 inches off the ground.
- Secure with jack stands. Place stands under solid structural points. Lower the jack slightly so the vehicle’s weight rests on the stands, not the jack.
- Remove the wheels. Fully unscrew and remove the lug nuts. Keep them in a container or magnetic tray to avoid losing them. Carefully take off the tire and lay it flat.
- Inspect components. While the wheel is off, check for brake fluid leaks, worn brake pads, damaged rotors, or corroded suspension parts. Address any concerns before reassembly.
- Reinstall tires in new positions. Following your chosen rotation pattern, mount the new tire onto the hub. Hand-thread the lug nuts to ensure proper alignment.
- Tighten lug nuts in a star pattern. Snug them down firmly using the wrench, following a crisscross sequence to evenly seat the wheel.
- Lower the vehicle and repeat. Remove the jack stands, lower the car, then repeat the process on the other end.
- Final torque check. Once all tires are rotated and the vehicle is on the ground, use a torque wrench to tighten lug nuts to the manufacturer’s specification (typically 80–100 ft-lbs for passenger cars). If you lack a torque wrench, tighten firmly and recheck after driving 25–50 miles.
Common Mistakes to Avoid
Even experienced DIYers make errors that compromise safety or effectiveness. Be mindful of these pitfalls:
- Using unstable supports: Never work under a vehicle held up only by a jack. Jack stands are non-negotiable.
- Over-tightening lug nuts: This can strip threads or warp brake rotors. Under-tightening risks the wheel coming loose.
- Ignoring tire condition: Rotation isn’t a substitute for inspection. Replace tires with less than 2/32” tread depth or visible damage.
- Mixing incompatible tires: Don’t rotate if you have different sizes, tread types, or levels of wear between axles. Mismatched tires can affect stability, especially in AWD vehicles.
- Skipping the break-in drive: After reassembly, drive slowly for the first few miles and listen for unusual noises. Stop immediately if you hear clunking or vibration.
Real Example: Sarah’s First DIY Rotation
Sarah, a freelance graphic designer from Portland, decided to rotate her compact SUV’s tires after noticing uneven wear on the front edges. Her local mechanic quoted $35 for the service—plus an oil change upsell. Determined to save money and learn more about her vehicle, she watched a few tutorials and gathered tools from her basement.
She used a hydraulic jack she already owned, purchased two affordable jack stands online, and borrowed a torque wrench from a neighbor. On a Saturday morning, she followed the front-to-rear cross pattern for her front-wheel-drive SUV. She marked each tire with chalk, loosened lugs while the car was grounded, and worked methodically—one end at a time.
During inspection, she discovered a small nail in the left rear tire. She removed it and sealed the puncture with a plug kit, avoiding a costly repair. After completing the rotation, she drove cautiously around the block and felt improved steering response. Six months later, her tires showed significantly more uniform wear, and she estimated saving over $200 in maintenance costs that year.
“Once you do it once, it feels empowering. It’s like learning to cook instead of always ordering takeout—you gain control and confidence.” — Sarah R., DIY Enthusiast
Checklist: Home Tire Rotation Preparation
Use this checklist before starting to ensure you’re fully prepared and safe.
- ✅ Park on a flat, stable surface
- ✅ Engage parking brake
- ✅ Chock opposite wheels
- ✅ Gather jack, jack stands, lug wrench, and torque wrench
- ✅ Loosen lug nuts before lifting
- ✅ Confirm correct rotation pattern for your vehicle
- ✅ Inspect tires and brakes during dismount
- ✅ Re-torque lug nuts after completion
- ✅ Test drive at low speed first
Frequently Asked Questions
Can I rotate tires without a torque wrench?
Yes, but it’s not ideal. You can tighten lug nuts firmly by hand using a wrench and follow a star pattern. However, without proper torque, you risk warping brake rotors or having wheels come loose. Recheck tightness after 25–50 miles of driving. Investing in an affordable click-type torque wrench ($30–$50) is highly recommended for long-term safety.
How often should I rotate my tires?
Most manufacturers recommend every 5,000 to 7,500 miles. Check your owner’s manual for specific guidance. If you drive aggressively, carry heavy loads, or frequently travel on rough roads, consider rotating every 5,000 miles. Delaying rotation leads to irreversible wear patterns and reduces tire lifespan by up to 30%.
Is it safe to use cinder blocks instead of jack stands?
No. Cinder blocks can crack under load and fail catastrophically. Jack stands are engineered for controlled weight distribution and safety locking mechanisms. If you don’t have jack stands, do not proceed. Borrow or rent them—it’s not worth the risk.
Final Thoughts and Call to Action
Rotating your tires at home is a practical skill that pays off in safety, savings, and vehicle longevity. With minimal investment in tools and a commitment to careful procedure, you can perform this essential maintenance task confidently and correctly. The knowledge gained builds a deeper understanding of your vehicle and empowers smarter decisions about upkeep.
Don’t wait for a warning sign or a costly repair bill. Take control of your car care today. Schedule your first DIY tire rotation this weekend, follow the steps outlined here, and experience the satisfaction of self-reliance. Share your experience, ask questions, or help others succeed—because smart maintenance is better when shared.


 浙公网安备
33010002000092号
浙公网安备
33010002000092号 浙B2-20120091-4
Comments
No comments yet. Why don't you start the discussion?