
Rotating your tires is one of the most effective ways to extend their lifespan, improve fuel efficiency, and ensure a smoother, safer ride. While many drivers rely on service centers for this routine maintenance, you can easily perform tire rotation at home—without expensive equipment or technical expertise. With just a few basic tools, some patience, and strict adherence to safety practices, you can save time and money while taking better control of your vehicle’s performance.
Tire wear isn’t uniform across all four wheels. Front tires typically bear more load during steering and braking, especially in front-wheel-drive vehicles, leading to faster tread degradation. Rotating tires redistributes this wear, promoting balanced traction and longer usability. Most manufacturers recommend rotating tires every 5,000 to 7,500 miles, or with each oil change. Doing it yourself means you’re more likely to stick to that schedule.
Essential Tools and Materials
Before starting, gather the necessary tools. You don’t need a professional garage setup—just a standard toolkit and a safe workspace. Here’s what you’ll need:
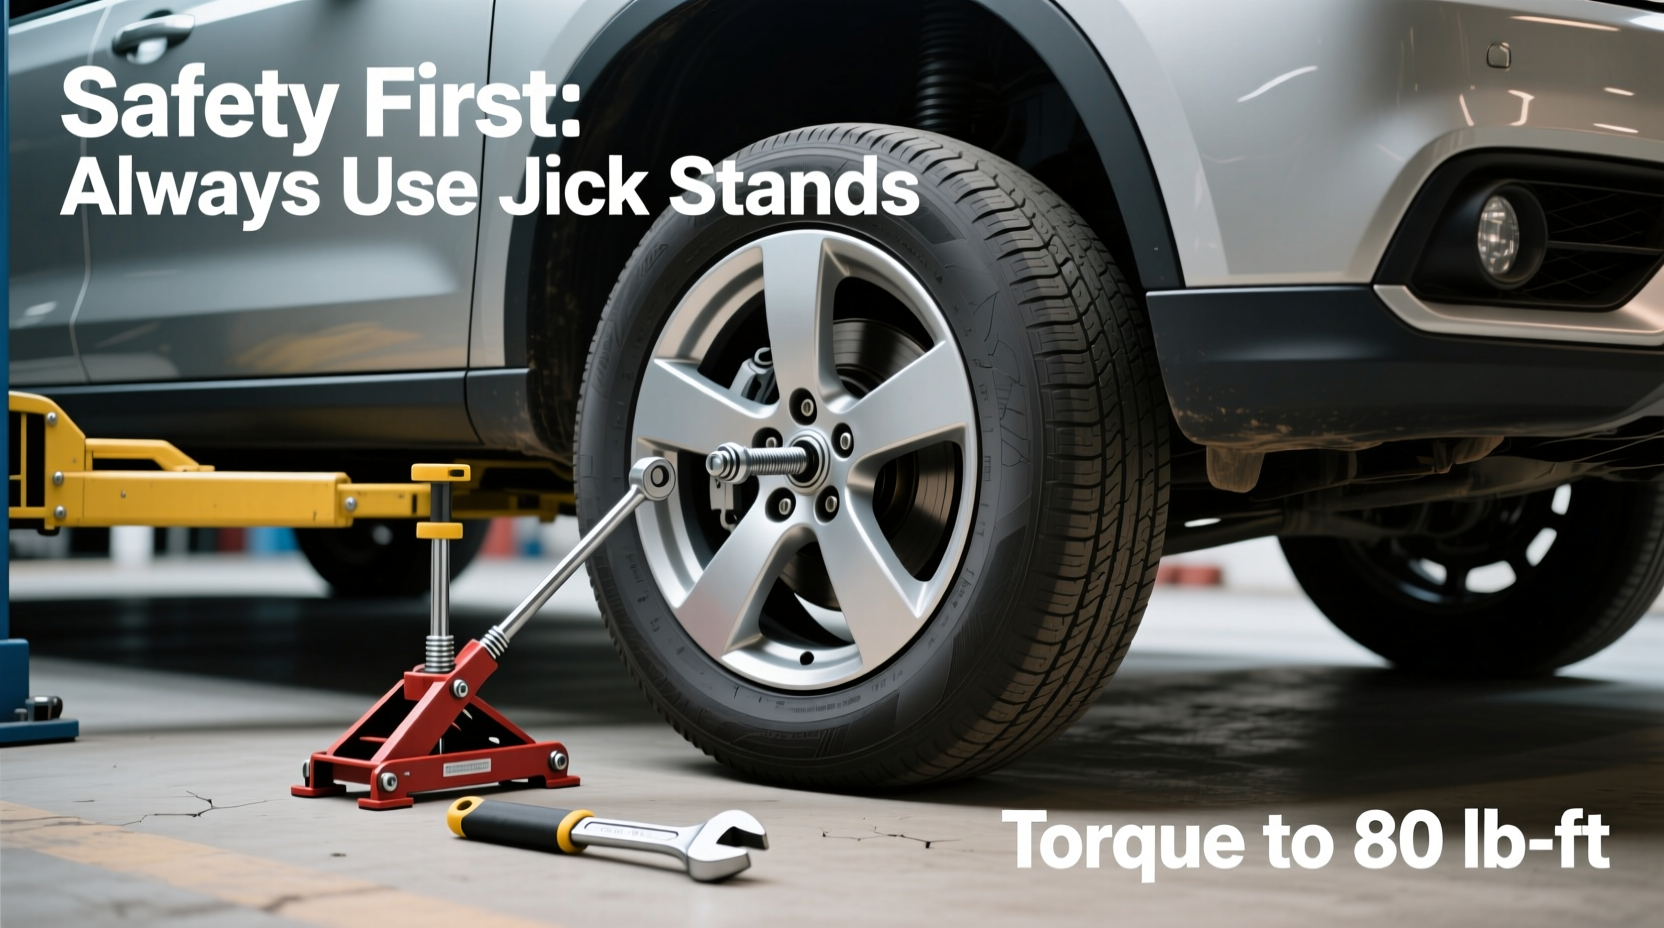
- Jack and jack stands: A hydraulic floor jack is ideal, but a scissor jack (usually included with your vehicle) will work. Never rely solely on the jack to support the car—always use jack stands.
- Lug wrench or impact wrench: Most cars come with a cross-shaped lug wrench. If your lugs are tight, consider a breaker bar for extra leverage.
- Torque wrench: Crucial for tightening lug nuts to the manufacturer’s specification. Overtightening can damage wheel studs; undertightening risks the wheel coming loose.
- Wheel chocks: Prevent the vehicle from rolling when lifted. Use bricks or dedicated rubber chocks.
- Gloves and safety glasses: Protect your hands and eyes from dirt, grease, and unexpected debris.
- Pen and tape (optional): Useful for marking tires if you want to track rotation patterns.
Safety First: Critical Precautions Before Lifting Your Vehicle
Working under a raised vehicle carries inherent risks. One mistake with the jack or improper placement of jack stands can lead to serious injury. Follow these safety rules without exception:
- Park on a level surface: Uneven ground increases the risk of the vehicle shifting or tipping. A flat concrete driveway or garage floor is best.
- Engage the parking brake: This prevents rear-wheel movement, especially important on slight inclines.
- Use wheel chocks: Place them against the tires that remain on the ground. For example, if lifting the front, chock the rear tires.
- Never work under a vehicle supported only by a jack: Jack stands must be placed under reinforced frame points (such as pinch welds or axle housings). Consult your manual for proper lift points.
- Double-check stability: After raising the car, gently push on the bumper to test for wobbling or shifting.
“Safety isn’t optional when lifting a vehicle. A single failure can result in permanent injury. Always use jack stands and verify weight-bearing points.” — Mark Reynolds, ASE-Certified Master Technician
Step-by-Step Guide to Rotating Your Tires at Home
The exact rotation pattern depends on your vehicle’s drivetrain and tire type. The most common configurations are front-wheel drive (FWD), rear-wheel drive (RWD), and all-wheel drive (AWD). If your tires are directional (marked with rotation arrows), they should only be moved front-to-back on the same side. Non-directional tires allow for cross-rotation.
Step 1: Loosen Lug Nuts (Before Lifting)
With the car on the ground, use your lug wrench to slightly loosen each lug nut on all four wheels. Turn them counterclockwise about half a turn. This prevents the wheel from spinning when you're under the car.
Step 2: Lift the Vehicle Safely
Position the jack under the manufacturer-recommended lift point near the front left wheel. Raise the car until the tire is 2–3 inches off the ground. Place a jack stand under the same structural point and slowly lower the vehicle onto it. Repeat for the other wheels as needed, working one end at a time.
Step 3: Remove the Wheels
Now that the car is securely supported, fully remove the lug nuts and take off the wheel. Set the nuts aside in a container or magnetic tray to avoid losing them.
Step 4: Follow the Correct Rotation Pattern
Refer to the table below to determine the right pattern based on your vehicle type:
| Vehicle Type | Tire Type | Rotation Pattern |
|---|---|---|
| FWD or RWD | Non-directional | Move front tires to opposite rear; rear tires straight to front |
| FWD or RWD | Directional | Front-to-back on same side only |
| AWD or 4x4 | All types | Cross-rotation (rear to front diagonally, front to rear diagonally) |
| Spare (full-size) | Same size | Incorporate spare into rotation every second cycle |
For example, in a FWD car with non-directional tires, the front left tire moves to the rear right, the front right to the rear left, and both rear tires move straight forward.
Step 5: Mount and Hand-Tighten the Wheels
Place each tire on its new hub, aligning the lug bolts with the holes. Install the lug nuts and tighten them by hand in a star or crisscross pattern. This ensures even pressure and prevents warping of the brake rotor.
Step 6: Lower the Vehicle and Torque the Lugs
Remove the jack stands and lower the car completely using the jack. Once all wheels are on the ground, use your torque wrench to tighten the lug nuts to the factory-specified setting. Again, follow the star pattern to achieve even clamping force.
Common Mistakes to Avoid
Even experienced DIYers make errors that compromise safety or reduce tire life. Watch out for these pitfalls:
- Skipping torque specs: Using only a lug wrench often leads to over- or under-tightening. A torque wrench is non-negotiable.
- Mixing up rotation patterns: Applying a cross-rotation to directional tires can degrade performance and create noise.
- Ignoring tire condition: Use rotation time to inspect for uneven wear, cracks, bulges, or embedded nails.
- Forgetting to clean hubs: Corrosion between the wheel and hub can cause vibrations. Wipe contact surfaces with a wire brush or cloth.
- Rotating too infrequently: Waiting beyond 7,500 miles reduces the benefit, especially in aggressive driving conditions.
“A well-executed tire rotation can add up to 20% more mileage to your set. But if done incorrectly, it can mask alignment issues or accelerate wear.” — Diane Patel, Tire Engineering Consultant
Mini Case Study: Sarah’s DIY Success Story
Sarah, a 34-year-old teacher from Portland, had been paying $35 every six months to rotate her compact sedan’s tires. After noticing premature shoulder wear on her front tires, she decided to try doing it herself. She watched a tutorial, bought a torque wrench for $40, and followed a step-by-step process similar to this guide.
During her first rotation, she discovered that one rear tire had low pressure and a small puncture. She repaired it early, avoiding a blowout. Over the next year, she rotated her tires every 6,000 miles. Her set lasted 58,000 miles—nearly 10,000 more than her previous set—and she saved over $200 in service fees. “It took me 45 minutes the first time,” she said. “Now I do it in 25, and I feel more connected to my car.”
Checklist: DIY Tire Rotation at a Glance
Print or save this checklist to ensure nothing is missed:
- ✅ Park on a level surface and engage parking brake
- ✅ Chock the wheels opposite the ones being lifted
- ✅ Loosen lug nuts while the car is on the ground
- ✅ Lift one corner at a time using the correct jack point
- ✅ Secure the vehicle with jack stands (never rely on the jack alone)
- ✅ Remove wheels and inspect for wear, damage, and pressure
- ✅ Rotate tires according to your vehicle’s recommended pattern
- ✅ Reinstall wheels and hand-tighten lug nuts in a star pattern
- ✅ Lower the vehicle and torque lug nuts to manufacturer specs
- ✅ Record the date and mileage for your next rotation
Frequently Asked Questions
Can I rotate tires without a torque wrench?
You can, but it’s strongly discouraged. Without proper torque, you risk damaging wheel studs or creating a safety hazard. A basic torque wrench costs around $30 and pays for itself in two rotations.
What if my tires have different sizes front and rear?
If your vehicle has staggered tire sizes (common in performance models), rotation is not possible. In that case, monitor wear closely and replace tires in pairs or sets as needed.
Should I balance my tires when rotating?
Not necessarily. Balancing is only required if you notice vibration or are installing new tires. However, if you’ve had recent alignment work or experience steering shimmy, consider having them balanced during rotation.
Final Thoughts and Call to Action
Rotating your tires at home is a practical, empowering skill that enhances vehicle safety and saves money over time. With attention to detail and respect for safety protocols, anyone with basic mechanical sense can master this task. Beyond extending tire life, the process gives you valuable insight into your car’s condition—helping you catch small issues before they become costly repairs.
Don’t wait for a warning sign or a service reminder. Take initiative today. Schedule your first DIY tire rotation, gather your tools, and apply the steps outlined here. Share your experience, ask questions, or help others learn—because informed drivers make safer roads for everyone.


 浙公网安备
33010002000092号
浙公网安备
33010002000092号 浙B2-20120091-4
Comments
No comments yet. Why don't you start the discussion?