
Tire rotation is a critical part of vehicle maintenance that promotes even tread wear, improves fuel efficiency, enhances handling, and extends the life of your tires. Most service centers recommend rotating tires every 5,000 to 7,500 miles, but you don’t need to visit a mechanic or own specialized tools to do it yourself. With the right technique and a bit of physical effort, you can rotate your tires at home—without jacks, lug wrenches, or car lifts. This guide walks you through a practical, tool-free method that’s safe, effective, and accessible for most passenger vehicles.
Why Rotate Tires Without Tools?
Not everyone has access to a garage, jack stands, or torque wrenches. Yet, skipping tire rotation leads to uneven wear, reduced traction, and premature tire replacement—costing hundreds over time. Rotating tires manually eliminates dependency on equipment while still delivering real benefits. The method described here relies on controlled vehicle movement and strategic wheel blocking to swap tire positions safely.
This approach works best on flat, paved surfaces like driveways or parking lots. It’s particularly useful for drivers in apartments, urban areas, or those traveling where tools aren’t available. While it requires more physical involvement than traditional methods, it’s proven effective when done correctly.
“Even rotation patterns matter more than frequency. A consistent cross-pattern—even done manually—can extend tire life by up to 30%.” — Marcus Lin, Automotive Maintenance Instructor, ASE Certified
Understanding Tire Wear Patterns
Different axle positions experience different loads and stresses. Front tires typically wear faster due to steering, braking forces, and engine weight (in front-wheel-drive vehicles). Rear tires, especially in rear-wheel-drive cars, wear differently based on power delivery. Over time, this creates uneven tread depth, vibration, and compromised wet-weather performance.
Rotating tires redistributes this wear. Common rotation patterns include:
- Forward Cross: Front tires move straight back; rear tires cross to opposite front positions (ideal for front-wheel drive).
- Rearward Cross: Reverse of forward cross (common in rear-wheel drive).
- X-Pattern: Each tire moves diagonally to the opposite corner (suitable for all-wheel drive or equal-sized tires).
- Side-to-Side: Fronts swap sides, rears swap sides (used when directional tread design prevents cross-axle movement).
Always check your owner’s manual for the manufacturer-recommended pattern. Using the wrong pattern on directional tires can reduce grip and increase noise.
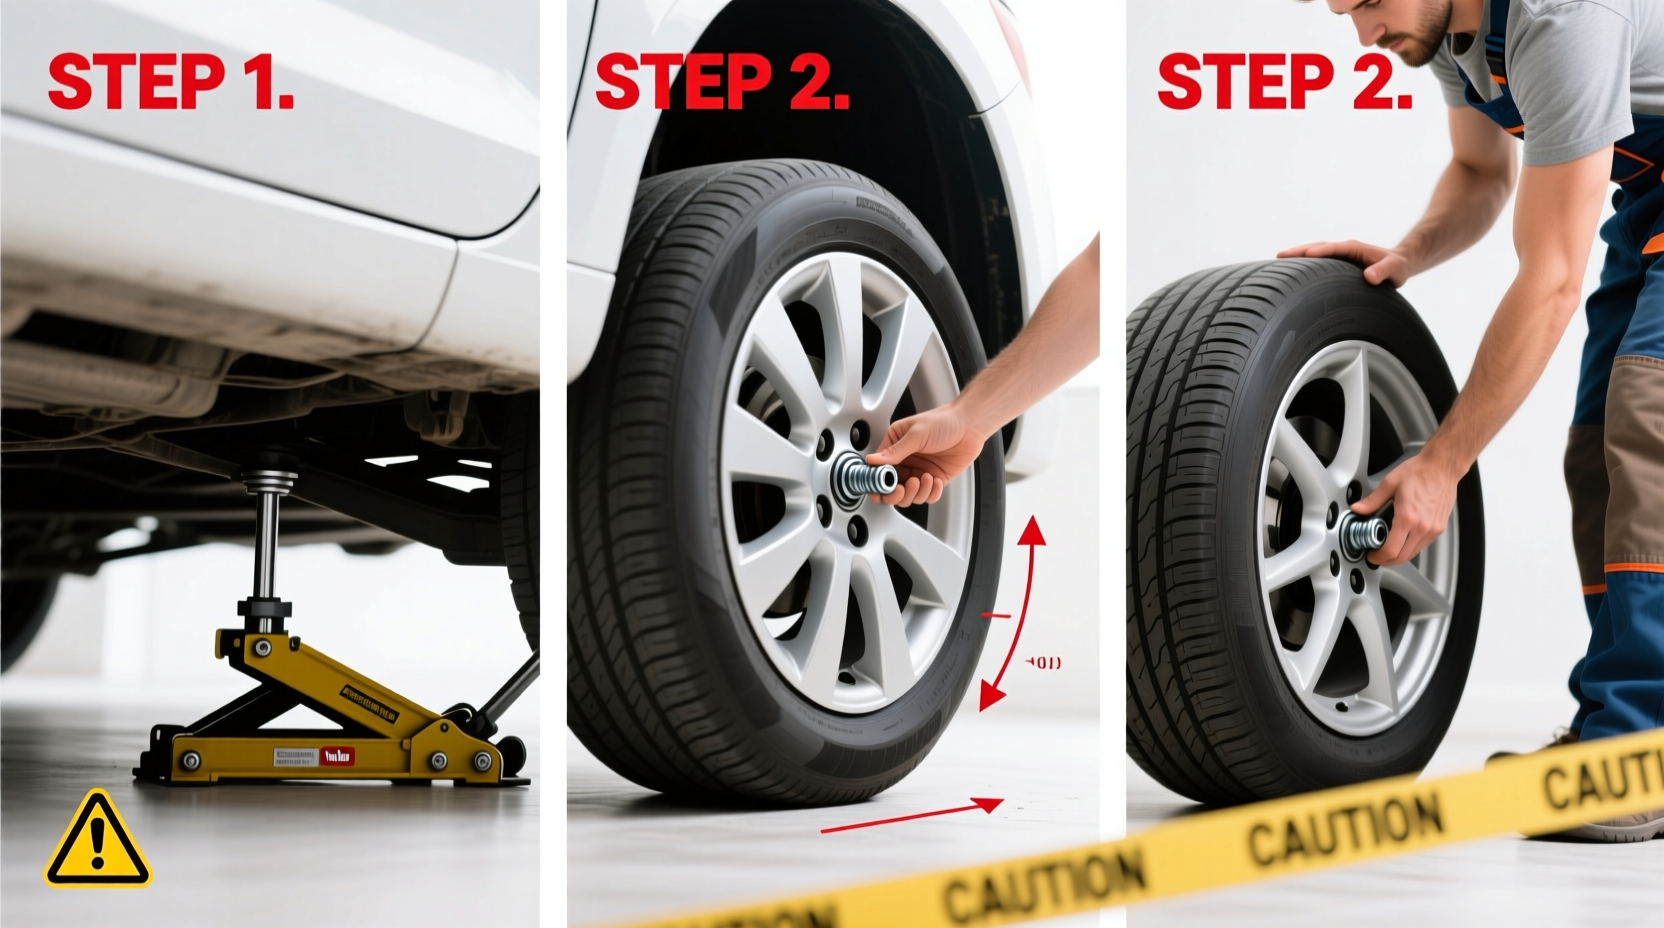
Step-by-Step Guide: Rotating Tires Without Tools
The following method uses vehicle motion and wheel chocks to shift tire positions without lifting the car. It assumes you're performing a forward cross rotation on a front-wheel-drive sedan with non-directional tires.
- Park on a Flat, Level Surface
Choose a smooth, hard surface like concrete or asphalt. Avoid gravel, grass, or inclines. Engage the parking brake firmly. - Mark Each Tire Position
Use sidewalk chalk or masking tape to label each tire: FL (front-left), FR (front-right), RL (rear-left), RR (rear-right). This prevents mix-ups later. - Loosen Lug Nuts Slightly (If Possible)
While full removal isn’t required yet, gently breaking the resistance on each lug nut (using your foot or body weight on a long pipe over the nut) makes final removal easier once the tire is free. Skip if no leverage is available—this step is optional. - Block All Wheels Except One
Place sturdy wooden blocks or bricks against the front and rear of three tires. Leave one rear tire unblocked—the one you’ll start with (e.g., RR). - Roll the Vehicle Forward Slowly
Get inside and release the parking brake. Gently press the accelerator to roll the car forward about 2–3 feet. The unblocked rear tire will move, allowing you to remove it once the vehicle stops. Reapply the brake immediately after moving. - Remove the Unblocked Tire
Now that the car has shifted slightly, the unblocked wheel is under less tension. Use your hands or a rock/pipe to unscrew lug nuts completely. Carefully pull the tire straight off and set it aside. - Reposition Remaining Tires Using Movement
Repeat the rolling process strategically:- Block three wheels again, leaving a different tire unblocked.
- Roll forward just enough to relieve pressure on that tire.
- Remove it and place it in its new position according to your rotation pattern.
- Install Tires in New Positions
Once a tire is removed, carry it to its new location. Align the rim with the studs and hand-tighten the lug nuts. Do not fully tighten until all tires are in place. - Final Tightening Sequence
After all tires are mounted, roll the car forward and backward slightly to settle each wheel onto the hub. Then, tighten all lug nuts in a star pattern using only your hands or improvised leverage (like a broom handle). Ensure they’re snug, though not torqued to specification—visit a shop later for proper torque. - Verify Placement and Test Drive
Double-check that each tire is secure and properly positioned. Take a slow test drive around the block, listening for vibrations or unusual noises. Stop immediately if anything feels off.
“This method isn’t ideal for high-performance vehicles or trucks, but for compact sedans and daily commuters, it’s a viable emergency or temporary solution.” — Dana Ruiz, Mobile Mechanic & Roadside Safety Trainer
Safety Tips and Best Practices
Working without tools increases risk. Follow these precautions to stay safe:
- Never attempt this on an incline or soft ground.
- Use heavy, immovable objects (like cinder blocks) as wheel chocks—never rely on small rocks.
- Move the vehicle only a few inches at a time—excessive rolling reduces control.
- Wear gloves and closed-toe shoes to protect your hands and feet.
- Have someone assist you if possible—one person drives while another monitors wheel movement.
Do’s and Don’ts Table
| Do | Don’t |
|---|---|
| Work on a flat, dry, paved surface | Try this on a hill or gravel driveway |
| Use wooden blocks or bricks as chocks | Use loose stones or cardboard |
| Roll the car only a few inches at a time | Accelerate quickly or roll long distances |
| Label tires before moving | Assume you’ll remember positions |
| Tighten lug nuts in a star pattern | Over-tighten by jumping on the rim |
Real Example: Maria’s Weekend DIY Rotation
Maria, a rideshare driver from Portland, needed to rotate her 2018 Honda Civic’s tires but didn’t own a jack. Her front tires were showing visible inner-edge wear, and she wanted to avoid $80 in shop fees. On a Saturday morning, she cleared her driveway, gathered four cinder blocks, and marked each tire with colored tape.
She started by blocking FL, FR, and RL, then rolled the car forward just enough to unweight the RR tire. After removing it, she placed it on the back of her trunk lid temporarily. She repeated the process for RL, then installed RR at RL position and RL at FR. She continued until all tires were rotated in a forward cross pattern.
Though it took nearly 45 minutes, Maria saved money and gained confidence. A week later, she visited a tire shop for a torque check. The technician confirmed all lug nuts were secure and praised her for maintaining even wear. “You bought yourself another 4,000 miles,” he said.
Checklist: Tool-Free Tire Rotation
Use this checklist before starting:
- ✅ Park on flat, level pavement
- ✅ Engage parking brake
- ✅ Gather wheel chocks (blocks, bricks)
- ✅ Label each tire position with chalk or tape
- ✅ Loosen lug nuts slightly if possible
- ✅ Block three wheels securely
- ✅ Roll car forward slowly to unweight one tire
- ✅ Remove and reposition tires according to rotation pattern
- ✅ Hand-tighten lug nuts in star pattern
- ✅ Test drive at low speed to check stability
Frequently Asked Questions
Can I really rotate tires without any tools?
Yes, but with limitations. You can reposition tires using controlled vehicle movement and wheel chocking. However, final lug nut tightening should eventually be done with proper torque using a wrench. This method is best for temporary maintenance or when tools aren’t available.
Is it safe to drive after hand-tightening lug nuts?
Short drives (under 10 miles) to reach a service station are generally safe if nuts are snug and tightened in a star pattern. However, driving long distances or at high speeds with improperly torqued lug nuts risks wheel detachment. Always get them checked professionally as soon as possible.
What if my tires are directional?
Directional tires must stay on the same side of the vehicle and can only be rotated front-to-back. In this case, use a side-to-side method only if the tread is symmetrical and approved by the manufacturer. Otherwise, skip cross-patterns and stick to straight axle swaps.
Conclusion: Take Control of Your Vehicle Maintenance
Rotating your tires doesn’t require a full toolbox or mechanical background. With awareness, patience, and the right technique, you can maintain your vehicle’s performance and safety from your driveway. This tool-free method empowers drivers who lack resources but value self-reliance. While not a permanent substitute for professional service, it keeps your tires balanced between visits to the shop.


 浙公网安备
33010002000092号
浙公网安备
33010002000092号 浙B2-20120091-4
Comments
No comments yet. Why don't you start the discussion?