
Gaming controllers are essential tools for immersive gameplay, but they also collect dust, grime, oils from fingers, and even bacteria over time. Regular cleaning is crucial not only for hygiene but also to maintain responsiveness and extend the device’s lifespan. However, improper cleaning methods—especially around sensitive buttons and analog sticks—can lead to permanent damage, stick drift, or unresponsive inputs. Many gamers hesitate to clean their controllers for fear of breaking them. This guide provides a comprehensive, safe approach to deep-cleaning your gaming controller while preserving its functionality.
Why Cleaning Your Controller Matters
Controllers come into direct contact with your hands for extended periods, making them breeding grounds for bacteria. A 2020 study by the University of Arizona found that gaming controllers can harbor more germs per square inch than a toilet seat. Beyond hygiene, accumulated debris under buttons and inside analog sticks can interfere with performance. Sticky buttons, delayed responses, or erratic cursor movement often stem from dirt buildup rather than hardware failure.
Regular maintenance prevents long-term wear. Dust particles act as abrasives when pressed between moving parts. Over time, this can degrade internal contacts and reduce button sensitivity. Cleaning isn’t just cosmetic—it’s preventative care for your investment.
What You’ll Need: Safe Cleaning Supplies
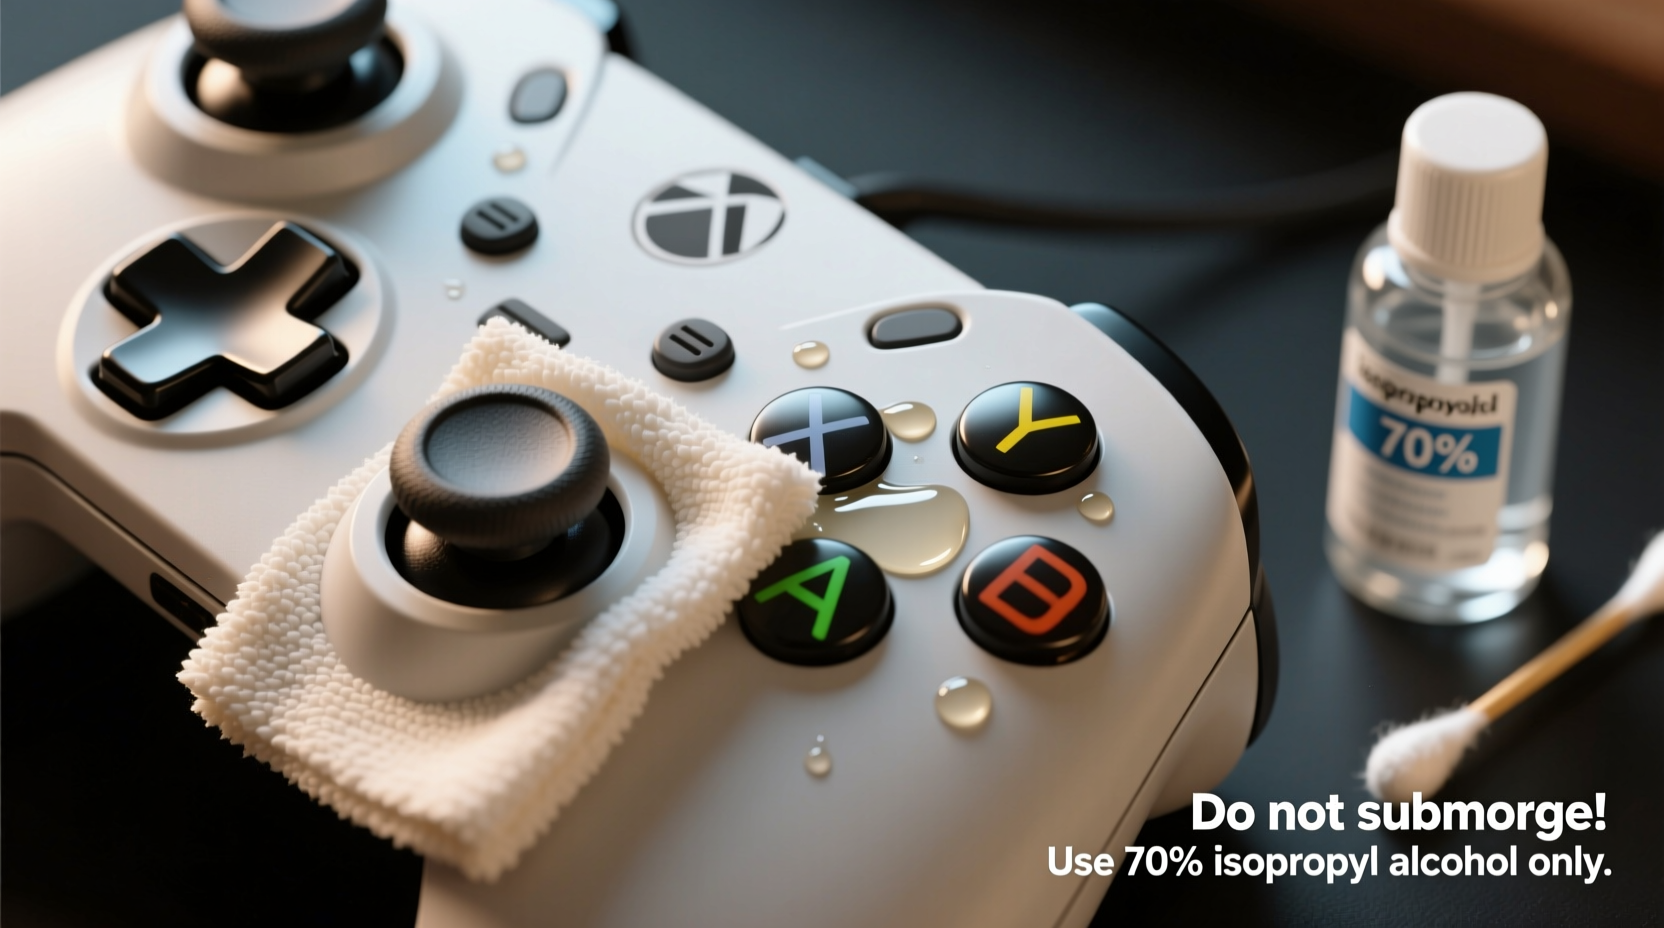
Using the wrong materials can cause irreversible harm. Avoid household cleaners like Windex, bleach, or alcohol-based wipes unless specified. These can strip coatings, crack plastic, or seep into circuits. Instead, gather the following:
- Microfiber cloth – lint-free and gentle on surfaces
- Isopropyl alcohol (70%) – effective at disinfecting without excessive moisture
- Cotton swabs (Q-tips) – ideal for tight spaces
- Compressed air – removes loose debris from crevices
- Soft-bristled brush – such as a clean toothbrush or electronics brush
- Distilled water – safer than tap water due to lack of minerals
- Plastic prying tool (optional) – for removing faceplates on some models
“Always power off and disconnect the controller before cleaning. Even wireless devices retain charge in capacitors, which moisture could short-circuit.” — David Lin, Electronics Repair Technician at GameFix Labs
Step-by-Step Guide to Cleaning Your Controller Safely
Follow this methodical process to ensure thorough yet non-damaging cleaning. This sequence applies to most major brands including Xbox, PlayStation, Nintendo Switch, and third-party controllers.
- Power down and disconnect: Turn off the controller and unplug it if wired. For wireless models, let it sit unused for 10 minutes to discharge residual power.
- Dry debris removal: Use compressed air to blow out dust from between buttons, triggers, and analog sticks. Hold the can upright and spray in short bursts at a 45-degree angle to avoid liquid propellant leakage.
- Surface wipe-down: Dampen a microfiber cloth with a small amount of 70% isopropyl alcohol. Wring it until nearly dry—moist, not wet. Gently wipe all surfaces, focusing on thumbsticks, D-pads, and frequently touched buttons. Never pour liquid directly onto the controller.
- Clean under buttons: Dip a cotton swab in alcohol, squeeze excess liquid, and carefully run it around the base of each button. Rotate the swab to pick up grime. Replace frequently as it collects debris.
- Analog stick care: Swab around the rubber cap and base ring. Avoid pressing down excessively, which can misalign internal potentiometers. If sticks feel gritty, gently rotate them while wiping to expose hidden dirt.
- Deep clean (optional): On select controllers (e.g., Xbox Elite, DualShock 4), removable faceplates allow access to underlying components. Use a plastic tool to gently pry them off, then clean exposed areas with swabs. Reattach securely.
- Dry thoroughly: Let the controller air-dry for at least 30 minutes before use. Place it in a warm, ventilated area—never near direct heat or sunlight.
Do’s and Don’ts of Controller Cleaning
| Do’s | Don’ts |
|---|---|
| Use 70% isopropyl alcohol on a cloth or swab | Submerge any part of the controller in liquid |
| Clean in a well-lit area to spot debris | Use paper towels—they can scratch surfaces |
| Apply light pressure when swabbing | Insert sharp objects under buttons |
| Store the controller in a dust cover when not in use | Use household cleaners like Windex or Clorox wipes |
| Check manufacturer guidelines before disassembling | Play immediately after cleaning—wait for full dry time |
Avoiding Common Mistakes That Damage Buttons
The most vulnerable parts of a controller are the buttons and analog sticks, which rely on delicate mechanical or conductive mechanisms. One common error is oversaturating cotton swabs, leading to liquid seepage into the circuit board. Even small amounts of moisture can corrode contacts or cause short circuits over time.
Another issue is aggressive scrubbing. Gamers sometimes press too hard on sticky buttons, thinking friction will help. In reality, this wears down the rubber domes beneath membrane buttons, reducing tactile feedback and lifespan.
Some users attempt to remove buttons entirely. While possible on certain high-end models, doing so risks breaking clips or losing small springs. Unless you’re experienced or the manufacturer provides instructions, keep buttons intact.
“Over 60% of controller repairs we see are due to liquid damage from improper cleaning—not spills, but misguided wipe-downs.” — Sarah Kim, Lead Technician at ConsoleMedic Pro
Real Example: Reviving a Grimy Xbox Controller
Mark, a competitive Halo player, noticed his right trigger was registering input intermittently. Assuming hardware failure, he almost replaced the $60 controller. Instead, he followed a careful cleaning process. Using compressed air, he blew out visible dust from the trigger well. He then dampened a swab with 70% alcohol and ran it along the trigger’s glide path. After drying for 40 minutes, the trigger responded smoothly. The culprit? A mix of skin oil and carpet fibers jamming the slider mechanism. Cleaning restored full function—saving him money and reducing e-waste.
When to Consider Professional Cleaning or Repair
While most cleaning can be done at home, some situations require expert attention. If your controller exhibits any of the following, professional service may be safer:
- Visible corrosion on ports or battery compartment
- Buttons remain unresponsive after multiple cleanings
- Internal rattling suggesting broken components
- Water or liquid spill exposure beyond surface contact
Specialized repair shops use ultrasonic cleaners for deep sanitation without disassembly. They also have anti-static tools to prevent electrostatic discharge during handling. For collectors or limited-edition controllers, professional cleaning preserves both function and resale value.
Preventative Maintenance Checklist
Keep your controller in top condition with this routine:
- ✅ Wash hands before playing to reduce oil transfer
- ✅ Use a microfiber wipe weekly for quick surface cleaning
- ✅ Apply compressed air monthly to vents and joints
- ✅ Perform full disinfection every 4–6 weeks
- ✅ Store in a closed case or drawer to minimize dust accumulation
- ✅ Rotate between multiple controllers if available
- ✅ Inspect for wear, especially around analog stick bases
Frequently Asked Questions
Can I use hand sanitizer to clean my controller?
No. Hand sanitizers often contain gelling agents, fragrances, and higher alcohol concentrations that can leave residue or damage plastics. Stick to pure 70% isopropyl alcohol applied via cloth or swab.
How do I clean a Nintendo Switch Joy-Con without causing drift?
Stick drift is often caused by debris in the analog module. Use compressed air first. Then, lightly swab around the stick base with alcohol. Avoid pressing down while cleaning. If drift persists, consider sending it for recalibration or replacement under warranty.
Is it safe to clean a controller with the battery still inside?
Yes, as long as you avoid soaking the device. Most modern controllers have sealed batteries and internal protection. However, always power off the device and never immerse it. Moisture near charging ports poses the highest risk.
Conclusion: Make Cleaning Part of Your Gaming Routine
Your gaming controller is an extension of your skill—keeping it clean ensures peak performance and comfort. With the right tools and technique, you can eliminate germs, restore responsiveness, and prolong the life of your gear without risking damage. Simple habits like regular dusting, cautious disinfection, and proper storage go a long way. Whether you're a weekend player or a tournament competitor, treating your equipment with care enhances every session.


 浙公网安备
33010002000092号
浙公网安备
33010002000092号 浙B2-20120091-4
Comments
No comments yet. Why don't you start the discussion?