
Mechanical keyboards are built to last, but even the most durable components degrade over time if not properly maintained. Dust, oils from fingertips, crumbs, and debris accumulate under keycaps and inside switches, leading to inconsistent actuation, double-typing, or complete switch failure. While cleaning seems straightforward, improper techniques can damage delicate internal mechanisms—especially in sensitive switch types like linear, tactile, or optical variants. The goal isn’t just cleanliness; it’s preserving performance and extending lifespan. Done correctly, switch cleaning restores responsiveness and typing satisfaction. This guide walks through safe, effective methods that protect your investment while delivering real results.
Understanding Your Switch Type Before Cleaning
Not all mechanical switches react the same way to cleaning. Knowing what kind you have determines which tools and techniques are safe. Most consumer-grade keyboards use Cherry MX-style designs or compatible clones (Gateron, Kailh, etc.), but newer models may feature hot-swappable sockets or proprietary housings. Here’s a breakdown of common types:
- Cherry MX and Clones: Robust, sealed design with a stem, spring, and contact plate. Generally resilient to light cleaning if handled carefully.
- Optical Switches: Use infrared beams instead of metal contacts. More sensitive to residue on lenses—cleaning is critical but must avoid liquid exposure near the sensor.
- Hot-Swappable Switches: Can be removed without soldering. Allows for deep cleaning but requires careful insertion/removal to avoid socket damage.
- Low-Profile Switches: Found in compact boards. Smaller internal space means less tolerance for moisture or aggressive brushing.
“Switch longevity depends as much on maintenance technique as build quality. A well-cleaned switch lasts thousands more keystrokes than a neglected one.” — David Lin, Keyboard Engineer at Input Labs
Essential Tools and Materials for Safe Cleaning
Using the wrong tool—even something as simple as a damp cloth—can introduce moisture into electrical components or scratch plastic stems. Below is a curated list of recommended supplies:
| Tool/Material | Purpose | Safety Notes |
|---|---|---|
| Keycap Puller | Removes keycaps evenly without damaging stems | Avoid metal pullers on PBT keycaps—they can chip edges |
| Compressed Air | Dislodges dust and debris from switch housing | Hold cans upright; shaking introduces propellant liquid |
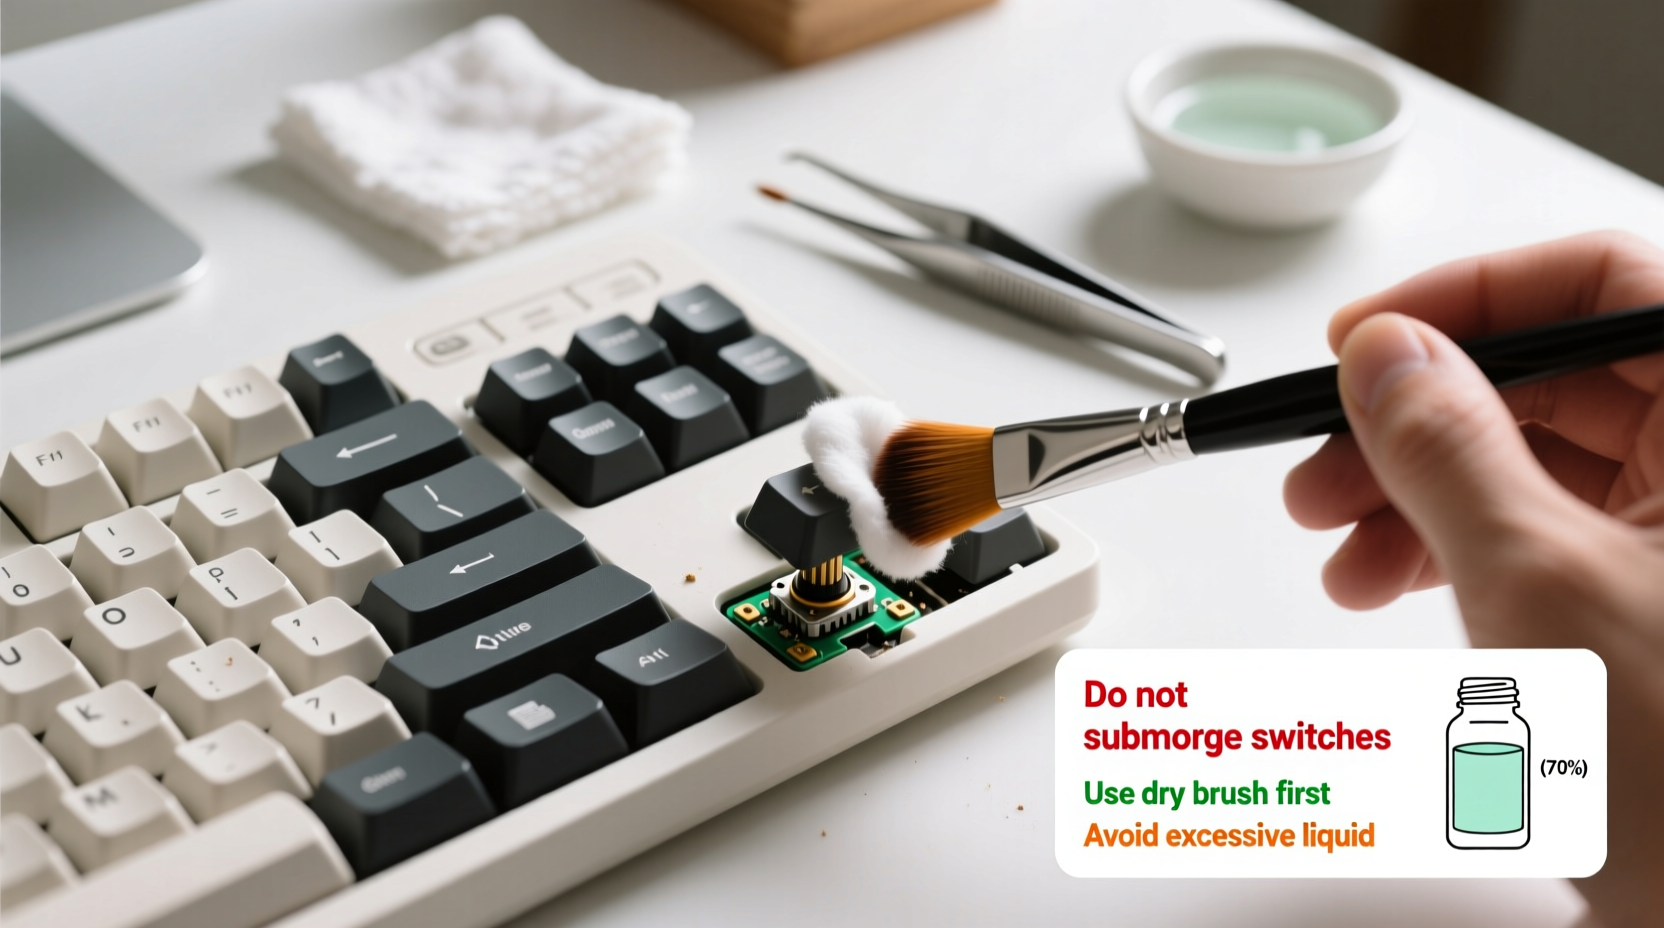
| Isopropyl Alcohol (IPA), 70%+ purity | Dissolves oils and grime without leaving residue | Never pour directly onto PCB; apply via swab only |
| Foam Swabs or Q-Tips | Reaches narrow spaces around switch stems | Use foam-tipped swabs—they shed less than cotton |
| Soft-Bristle Brush | Loosens stubborn particles | Nylon or anti-static brushes only; avoid wire bristles |
| Plastic Tweezers | Retrieves trapped debris | Easier to control than fingers; reduces risk of static discharge |
Optional but helpful: ultrasonic cleaner (for keycaps only), lint-free microfiber cloths, magnifying glass for inspection.
Step-by-Step Guide to Cleaning Switches Safely
Cleaning doesn’t require full disassembly. In most cases, surface and mid-level cleaning suffices. Follow this sequence to minimize risk:
- Power Down and Unplug: Disconnect the keyboard from any device. For wireless models, remove batteries or disable power completely.
- Remove Keycaps: Use a keycap puller starting from the top row. Work outward to prevent accidental pressure on exposed switches. Place caps in a labeled container to avoid mix-ups.
- Blow Out Debris: Hold compressed air nozzle 1–2 inches above switches. Use short bursts at different angles to flush out loose particles. Tilt the board slightly to allow debris to fall free.
- Brush Gently: With a soft brush, lightly scrub around each switch stem. Focus on areas where skin oils accumulate—typically the center and sides of frequently used keys (e.g., WASD, spacebar).
- Spot-Clean with IPA: Dampen a foam swab with isopropyl alcohol (do not saturate). Wipe around the switch housing and stem base. Let evaporate fully before proceeding—this takes 3–5 minutes.
- Inspect for Residue: Look closely for sticky films or discoloration. Repeat spot-cleaning if needed, but never flood the switch.
- Replace Keycaps: Once dry, reattach keycaps using the puller gently to seat them fully.
- Test Functionality: Plug in and test every key. Use an online keyboard tester to verify consistent registration.
This routine should be performed every 3–6 months depending on usage environment. Heavy typists or those in dusty spaces may benefit from quarterly cleaning.
When and How to Remove Switches for Deep Cleaning
Deep cleaning is only necessary when switches exhibit persistent stuttering, missed inputs, or physical resistance. It’s also advisable before lubing or modifying switches. Hot-swap keyboards make this process accessible. Soldered boards require desoldering expertise and are best left to professionals unless you’re trained.
For hot-swap models:
- Use a switch puller (plastic or magnetic) to extract switches vertically.
- Place removed switches on a clean tray, ideally labeled by position if planning reuse.
- Inspect for cracked housings or bent pins—replace damaged units immediately.
- To clean individually, submerge in >90% IPA for 10–15 minutes, then air-dry for at least 2 hours.
- Reinsert switches straight down with firm, even pressure until they click into place.
Do not attempt to open individual switch housings unless rebuilding is intended. Most are ultrasonically welded shut, and prying them often causes irreversible cracks.
“I once had a client ruin ten switches trying to ‘dry them faster’ with a hair dryer. Heat warped the plastic and misaligned the stem. Patience is part of the process.” — Mariko Tanaka, Custom Keyboard Technician
Common Mistakes That Damage Switches During Cleaning
Even with good intentions, users often compromise switch integrity through avoidable errors. These practices should be strictly avoided:
- Using water or household cleaners: Water conducts electricity and promotes corrosion. Window sprays or dish soap leave conductive residues.
- Over-saturating with alcohol: Excess IPA can seep into the PCB and degrade solder joints or traces over time.
- Shaking or tilting compressed air cans: Causes liquid propellant to spray out, which can corrode plastics and metals.
- Using metal tools near circuits: Screwdrivers or tweezers can short traces or bend pins if slipped.
- Skipping the drying phase: Reassembling before components are fully dry risks short circuits upon first use.
In one documented case, a user soaked their entire keyboard in soapy water believing it would “sanitize” the device. The result was permanent circuit damage requiring a full PCB replacement. Cleaning should target contamination, not sterilization.
Real Example: Recovering a Sticky Spacebar
A freelance writer noticed her spacebar registering multiple inputs per press. She initially assumed the switch was failing. Instead of replacing it immediately, she followed a controlled cleaning process: removed the keycap, used compressed air, then applied a lightly IPA-dampened swab around the stem. After letting it dry, the issue resolved completely. Upon closer inspection, she found dried droplets of hand lotion had migrated under the cap over weeks of typing. This illustrates how minor buildup—not hardware failure—often causes performance issues.
Preventative Maintenance Checklist
To reduce the need for intensive cleaning sessions, adopt these habits regularly:
- ✅ Wash hands before extended typing sessions to minimize oil transfer
- ✅ Keep food and drinks away from the workspace
- ✅ Cover the keyboard when not in use (a simple silicone cover works)
- ✅ Use compressed air monthly to prevent dust accumulation
- ✅ Rotate keycap sets seasonally to distribute wear and enable thorough cleaning
- ✅ Store spare switches in anti-static bags if collecting replacements
These small actions compound over time, significantly reducing grime infiltration and mechanical stress.
Frequently Asked Questions
Can I clean my mechanical keyboard with hand sanitizer?
No. Hand sanitizers contain additives like glycerin, fragrances, and thickeners that leave sticky residues. Even alcohol-based versions are formulated for skin, not electronics. Stick to pure isopropyl alcohol (70–99%) for cleaning.
How do I know if a switch needs replacement after cleaning?
If a switch still feels gritty, fails to reset properly, produces inconsistent actuation, or makes crackling sounds when pressed after thorough cleaning, it may be internally damaged. Test with a multimeter if possible, or replace it—especially in hot-swap setups where swaps take seconds.
Is it safe to use an ultrasonic cleaner on switches?
Yes—but only for fully removed, disassembled switches with no electronic components (like Hall effect sensors). Standard mechanical switches can be cleaned in IPA-filled ultrasonic tanks for 5–10 minutes, then air-dried completely. Never place a whole keyboard or PCB in an ultrasonic bath.
Final Thoughts: Clean Smart, Not Hard
Your mechanical keyboard is both a tool and an extension of your workflow. Treating it with care ensures reliability, comfort, and longevity. Cleaning isn’t about making it look new—it’s about maintaining precision and preventing avoidable failures. By respecting the limits of each component and following proven methods, you preserve function without inviting risk. The safest clean is the one that uses minimal intervention with maximum awareness.


 浙公网安备
33010002000092号
浙公网安备
33010002000092号 浙B2-20120091-4
Comments
No comments yet. Why don't you start the discussion?